Philips 32PFL3403D User manual - Page 23
Change your TV installation
 |
UPC - 609585162440
View all Philips 32PFL3403D manuals
Add to My Manuals
Save this manual to your list of manuals |
Page 23 highlights
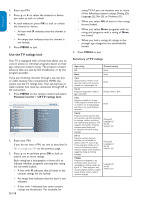
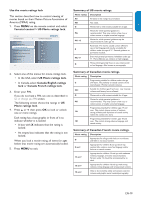
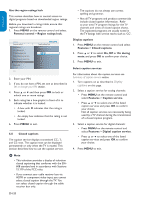
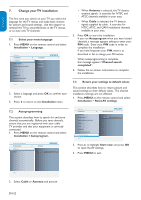
ENGLISH FRANÇAISE ESPAÑOL 7. Change Settings your TV installation Installation 8 Source 6 The Lfainrgsuatgetime you switch oTnV your TV you select the languAuatgoperogfroamr the TV menus AaVn1 d make basic choices for Weak channel installation picture and sound settinAVg2s. Use this chapter to Source Side AV reinstall the TV, to set preferences in the TV menus, Clock HDMI 1 or to tune HDMI CEC new TV channelHsD.MI 2 Current software info HDMI 3 Reset AV settings 7.1 Select your menu language Info 1. Press MENU on the remote control and select Installation > Language. Settings SIentstitnalglastion 8 Language 3 Installation 8 Source 6 Language English Language Autoprogram TV Français Autoprogram Weak channel installation AV 1 Español Weak channel installation Source AV 2 Source Clock Side AV Clock HDMI CEC HDMI 1 HDMI CEC Current software info HDMI 2 Current software info Reset AV settings HDMI 3 Reset AV settings Info Info 2. Select a language and press OK to confirm your choice. Settings I Installation 3. Press Í SeAtutitnogpsrogram Installation to retur8n2 to tLhAannegteunaIngnae stallation m3 enu. Antenna Language Cable English Start now Autoprogram Français 7.2 Weak Autoprogramming channel installation Español Source ThisCloscek ction describes how to search for and store chanHDnMeIlCsECautomatically. Before you tune channels, ensuCurrerenttshofatwtareyionfou are registered with your cable TV provider and Reset AV settings Info that your equipment is correctly connInefocted. 1. Press MENU on the remote control and select Installation > Autoprogram. Settings SInetsttianlglastiIoInnstallation 8 Autoprogram 2 Language Antenna Autoprogram Cable Weak channel installation Source Clock HDMI CEC Current software info Reset AV settings Info Info Reset AV settings Antenna Start now Start now HDMI CEC Current software info HDMI 2 HDMI 3 Reset AV settings Info • When Antenna is selected, the TV detects antenna signals. It searches for NTSC and ATSC channels available in your area. S•ettingWs hen Cable is selected, the TV detects signals Installation supplie8d by cLaanbgulaege. It searches 3for LanguNageTSC, ATSC, and QAM English modulated channels Autopraovgraamilable in your areFraan.çais Weak channel installation Español 3. PSoruercess OK to start the installation. ICflocykou run Autoprogram when you have locked cHDhMaInCEnCels, a message appears asking to enter your PIN code. Current software info Enter your PIN code in order to complete Reset AV settings the installation. IIfnfoyou have forgotten your PIN, reset it as described in Set or change your PIN section. When autoprogramming is complete, this message appears "Channel search completed". Settings I Installation Autoprogram 2 Antenna 4. FAnotelnlonaw the on-screen instructions to complete tChabele installation. Start now 7.3 Return your settings to default values This section describes how to return picture and sound settings to their default values. The channel instalIlnafotion settings are not affected. 1. Press MENU on the remote control and select Installation > Reset AV settings. Settings Installation 8 Language Autoprogram Weak channel installation Source Clock HDMI CEC Current software info Reset AV settings Info Reset AV settings Start now 2. Press Æ to highlight Start now, and press OK to reset the AV settings. 3. Press Menu to exit. 2. Select Cable or Antenna and press Æ. Settings Installation 8 EN-L2an2guage Autoprogram Weak channel installation Reset AV settings Start now
-
 1
1 -
2
-
3
-
4
-
5
-
6
-
7
-
8
-
9
-
10
-
11
-
12
-
13
-
14
-
15
-
16
-
17
-
 18
18 -
 19
19 -
 20
20 -
 21
21 -
 22
22 -
 23
23 -
 24
24 -
 25
25 -
 26
26 -
 27
27 -
 28
28 -
29
-
30
-
31
-
32
-
33
-
34
-
35
 |
 |
