Philips AZ8348 User Manual - Page 10
Flim
 |
View all Philips AZ8348 manuals
Add to My Manuals
Save this manual to your list of manuals |
Page 10 highlights
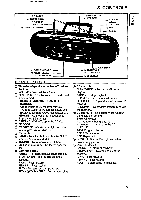
7. CASSETTE DECK • CASSETTE RECORDING • Press STOP/EJ(ect)© to open the cassette holder. • Insert the cassette. • When monitoring during re- cording, adjust the sound using the controls VOLUME FLIM. ., et. ® and the graphic equalizer (). These controls do not affect the record- ing. • To start recording, press REC(ord)/CD SYN- CHRO © and PLAY° at the same time. - When the end of the tape is reached, the recorder buttons are released. • To interrupt recording, press PAUSE ©. • To continue recording, press PAUSE again. • Press STOP/EJ(ect)© if you want to stop recording before the end of the tape. On pressing again, the cassette holder will open. • The set is switched off if the FUNCTION switch @ is in position TAPE and no but- tons are pressed. Note! During recording, no buttons on deck A should be pressed. Recording from the CD-player (CD synchro recording) • Set the FUNCTION switch @ to CD. - The POWER indicator *© lights up. • It's not necessary to start the CD player se- parately: by pressing REC(ord)/CD SYNCHRO O the CD player starts automatically. - If the CD player is in STOP position, recording will start from the beginning of the CD (or from the beginning of the programmed selection). • To start a recording in the middle of a track, play the CD in the normal way. Start recording by pressing REC(ord)/CD SYNCHRO © as soon as the desired passage is reached. Recording from the radio • Set the FUNCTION selector® to RADIO. - The POWER indicator* is lights up. • Select the wave band using the BAND switch Mono recording from the built-in microphone • Set the FUNCTION switch @ to TAPE - The POWER indicator *© goes out. • Set the RECORD MODE switch @ to MIC REC position. • Set the VOLUME control 0 to the minimum volume level (during microphone recording , monitoring is not possible). DUBBING -Copying from deck A to B When dubbing it is recommended to use fresh batteries or to connect the set to the AC power supply. • Set the FUNCTION switch @ to TAPE - The POWER indicator *© goes out. • Set the RECORD MODE switch g to: - NORMAL REC: for normal speed copying; - HIGH SPEED: for high speed copying. Do not use this switch during dubbing. • Press both STOP/EJ(ect) buttons and insert a record- ed cassette into deck A and muemu'I a cassette which is suited 4-, for recording into deck B. • Press PAUSE followed by REC/CD SYNCHRO on deck B. • To start dubbing, press PLAY on deck A. • Press PAUSE on deck B if you wish to omit undesired passages. - Playback in deck A continues. • Press PAUSE again to restart dubbing. • If, during dubbing, you press PAUSE on deck A, a blank part will be recorded on the cassette in deck B. • Press both STOP buttons if you wish to stop dubbing. - The set is then switched off. • Tune to desired radio station using the TUNING control knob 0. • In case of FM radio recordings, set the BAND switch 0 to the desired position. • If during the recording of an AM/MW station, a whistling sound is heard, this sound can be suppressed by setting the BEAT CANCEL switch 0 to another position. 10
-
 1
1 -
2
-
3
-
4
-
 5
5 -
 6
6 -
 7
7 -
 8
8 -
 9
9 -
 10
10 -
 11
11 -
 12
12 -
 13
13 -
 14
14
 |
 |
