Pioneer AVHP7800DVD Other Manual
Pioneer AVHP7800DVD - DVD Player / LCD Monitor Manual
 |
UPC - 012562799179
View all Pioneer AVHP7800DVD manuals
Add to My Manuals
Save this manual to your list of manuals |
Pioneer AVHP7800DVD manual content summary:
- Pioneer AVHP7800DVD | Other Manual - Page 1
English INSTALLATION MANUAL Français Deutsch Français MANUEL D'INSTALLATION AVH-P7800DVD This product conforms to CEMA cord colors. Le code de couleur des câbles utilisé pour ce produit est conforme à CEMA. Italiano Nederlands PyÒÒÍËÈ - Pioneer AVHP7800DVD | Other Manual - Page 2
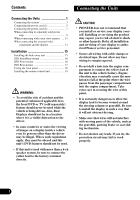
wound around the steering column or gearshift. Be sure to install the display in such a way that it will not obstruct driving. • Make sure that wires will not interfere with moving parts of the vehicle, such as the gearshift, parking brake or seat sliding mechanism. • Do not shorten any leads. If - Pioneer AVHP7800DVD | Other Manual - Page 3
installation. • Refer to the owner's manual for details on connecting the power amp and other units car features a glass antenna, connect to the antenna booster power supply terminal. • When an external power amp is being used unit cannot be installed in a vehicle that does not have an ACC (accessory - Pioneer AVHP7800DVD | Other Manual - Page 4
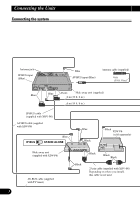
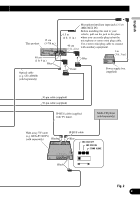
input (Blue) Antenna cable (supplied) 6 m (19 ft. 8 in.) Blue Blue Violet Hide-away unit (supplied) 6 m (19 ft. 8 in.) 6 m (19 ft. 8 in.) IP-BUS BUS Blue STAND ALONE Blue Black Black XDV-P6 (sold separately) Hide-away unit (supplied with XDV-P6) AV-BUS cable (supplied with TV tuner) - Pioneer AVHP7800DVD | Other Manual - Page 5
IN) Before installing this unit to your 1.5 Use a stereo mini plug cable to connect 40 cm with auxiliary equipment. (1 ft. 4 in.) 1 m (3 ft. 3 in.) Blue Violet Power supply box (supplied) 30-pin cable (supplied) 30-pin cable (supplied) IP-BUS cable (supplied with TV tuner) Multi-CD player - Pioneer AVHP7800DVD | Other Manual - Page 6
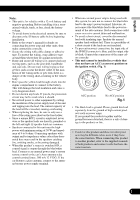
) To vehicle (metal) body. Yellow After making all other connections to this unit, connect this to the positive + terminal of the battery. CAUTION Attach a 20A fuse immediately prior to the battery. Also, use heat resistant battery cable with more than 5-square millimeter sectional area. Red To - Pioneer AVHP7800DVD | Other Manual - Page 7
English Español This product Yellow/black If you use an equipment with Mute function, wire this lead to the Audio Mute lead on that equipment. If not, keep the Audio Mute lead free of any connections. Power supply box (supplied) Deutsch Français Italiano Nederlands PyÒÒÍËÈ Fuse (7.5 A) Fuse - Pioneer AVHP7800DVD | Other Manual - Page 8
than a 6-ch speaker system, be sure to connect the yellow lead to the battery terminal directly. Hide-away unit (supplied) Connect when the audio settings of this product are used in the network mode. Left Tweeter + (FRONT HIGH OUTPUT) ≠ White White/black Gray Gray/black Right + Tweeter - Pioneer AVHP7800DVD | Other Manual - Page 9
firmly with needle-nosed pliers. Note: • The position of the parking brake switch depends on the vehicle model. For details, consult the vehicle Owner's Manual or dealer. Light green Used to detect the ON/OFF status of the parking brake. This lead must be connected to the power supply side of the - Pioneer AVHP7800DVD | Other Manual - Page 10
power amp Hide-away unit (supplied) See the section "Connecting the power cord (2)". Blue/white To system control terminal of the power amp or Auto-antenna relay control terminal (max. 300 mA 12 V DC). System remote control Connect when the audio settings of this product are used in the network - Pioneer AVHP7800DVD | Other Manual - Page 11
English Español RCA cables (sold separately) Power amp (sold separately) Power amp (sold separately) Power amp (sold separately) Power amp (sold separately) Power amp (sold separately) Power amp (sold separately) Deutsch Français Italiano Nederlands PyÒÒÍËÈ Front center speaker Left Tweeter - Pioneer AVHP7800DVD | Other Manual - Page 12
the Units When connecting with a rear view camera When using this product with a rear view camera, automatic switching to video from a rear view camera when the gear shift is moved to REVERSE (R) position is possible. WARNING: • USE INPUT ONLY FOR REVERSE OR MIRROR IMAGE REAR VIEW CAMERA. OTHER USE - Pioneer AVHP7800DVD | Other Manual - Page 13
English RCA cable (sold separately) To video output Rear view camera Hide-away unit (supplied) Español Deutsch Français Italiano See the section "Connecting the power cord (2)". CAUTION Pioneer recommends the use of a camera which outputs mirror reversed images, otherwise screen image may - Pioneer AVHP7800DVD | Other Manual - Page 14
unit To video input To audio inputs Display with RCA input jacks RCA cables (sold separately) To audio outputs To video output External video component (sold separately) Fig. 7 • It is necessary to set to AV INPUT in SETUP when connecting the external video com- ponent. When using a display - Pioneer AVHP7800DVD | Other Manual - Page 15
Español Deutsch Français About video input Depending on the unit connected to this unit, video image may be distorted. In this case, eliminate the distortion by adjusting the video image selecting switch on the underneath of the hide-away unit to the appropriate position. Use a thin standard-tip - Pioneer AVHP7800DVD | Other Manual - Page 16
you want to drill the holes. Do not drill into the gas line, brake line, electrical wiring or other important parts. • If the hide-away unit is installed in the passenger compartment, anchor it securely so it does not break free while the car is moving, and cause injury or an accident. • If the hide - Pioneer AVHP7800DVD | Other Manual - Page 17
unit Velcro tape (large) (hard) Velcro tape (large) (soft) Car mat or chassis Fig. 12 DIN Front/Rear-mount This unit can be properly installed (Fig. 14) When installing in a shallow space, change the position of side brackets. In this case, stick conceal tape on parts that protrude from the - Pioneer AVHP7800DVD | Other Manual - Page 18
bottom tabs. To secure, bend the tabs 90 degrees.) Dashboard 182 53 Rubber bush Screw Holder DIN Rear-mount Installation using the screw holes on the side of the unit • Fastening the unit to the factory radio mounting bracket. (Fig. 17) (Fig. 18) (Fig. 19) Select a position where the screw holes - Pioneer AVHP7800DVD | Other Manual - Page 19
the screw holes of the bracket to match up the screw holes on this unit. Tighten the screws at 2 places on each side. Fig. 19 Fixing screws Fig. 20 Installing the remote control unit When not using the remote control unit, secure it with velcro tape to prevent it from moving. • Thoroughly wipe off - Pioneer AVHP7800DVD | Other Manual - Page 20
tre respectée, et les fonctions DVD de cet appareil ne doivent pas installer ou d'entretenir vous-même cet écran, car ces travaux peuvent présenter un risque d'électrocution ou d'autres dangers. Confiez tous les travaux d'installation et d'entretien de votre écran au personnel de service Pioneer - Pioneer AVHP7800DVD | Other Manual - Page 21
avec pôle négatif à la masse. Avant de l'installer dans un véhicule de loisir, un camion ou un car, vérifier la tension de la batterie. • Afin connecteur IP-BUS est bleu et même couleur correctement. • Cette unité ne peut pas être installée dans un véhicule dont le contacteur d'allumage n'a pas de - Pioneer AVHP7800DVD | Other Manual - Page 22
-BUS (fourni avec le syntoniseur de télévision) Noir Noir Noir Noir Câble péritel 25 broches (fourni avec le XDV-P6) En fonction de l'emplacement de l'installation, il se peut que ce câble ne soit pas nécessaire. 3 - Pioneer AVHP7800DVD | Other Manual - Page 23
40 cm Bleu Câble optique (par ex. CD-AD600) (vendu séparément) 1,5 m 40 cm Microphone/prise d'entrée auxiliaire (3,5 ø) (MIC/AUX IN) Avant d'installer cet appareil sur votre véhicule, placez la prise dans un endroit où vous pouvez facilement brancher/débrancher le microphone ou le câble à fiche - Pioneer AVHP7800DVD | Other Manual - Page 24
Raccordements des appareils Branchement du cordon d'alimentation (1) Si cet appareil est utilisé avec un système de haut-parleurs à plus de 6 voies, assurez-vous de raccorder le fil jaune directement à la batterie. Noir (masse) Fil de masse vers un élément en métal apparent de la voiture. Jaune Apr - Pioneer AVHP7800DVD | Other Manual - Page 25
Français Cet appareil Jaune/noir Si vous utilisez un appareil possédant une fonction de silencieux, reliez ce conducteur au conducteur de commande du silencieux de l'appareil en question. Sinon, ne reliez ce conducteur à rien. Boîtier d'alimentation (fourni) Deutsch Français Italiano - Pioneer AVHP7800DVD | Other Manual - Page 26
haut-parleurs à plus de 6 voies, assurez-vous de raccorder le fil jaune directement à la batterie. Appareil déporté (fourni) Raccordez quand les réglages audio de cet appareil sont utilisés dans le mode réseau. Gauche Haut-parleur d'aigus (FRONT HIGH OUTPUT) Blanc + ≠ Blanc/noir Gris Gris/noir - Pioneer AVHP7800DVD | Other Manual - Page 27
Français Reportez-vous à la section Violet/blanc "Raccordements à une caméra de recul". AVERTISSEMENT LE FIL VERT CLAIR SUR LE CONNECTEUR D'ALIMENTATION A POUR BUT DE DETECTER L'ETAT DE STATIONNEMENT DU VEHICULE ET DOIT ETRE CONNECTE AU COTE ALIMENTATION DU COMMUTATEUR DU FREIN A MAIN. UNE - Pioneer AVHP7800DVD | Other Manual - Page 28
l'amplificateur de puissance ou vers la borne de commande du relais de l'antenne motorisée (max. 300 mA, 12 V CC). Télécommande d'ensemble Raccordez quand les réglages audio de cet appareil sont utilisés dans le mode réseau. 9 - Pioneer AVHP7800DVD | Other Manual - Page 29
Français Câbles à fiches Cinch (RCA) (vendu séparément) Amplificateur de puissance (vendu séparément) Amplificateur de puissance (vendu séparément) Amplificateur de puissance (vendu séparément) Amplificateur de puissance (vendu séparément) Amplificateur de puissance (vendu séparément) - Pioneer AVHP7800DVD | Other Manual - Page 30
Raccordements des appareils Raccordements à une caméra de recul Si vous utilisez cet appareil associé à une caméra de recul, la sélection automatique de la vidéo provenant de la caméra de recul est possible dès que le sélecteur de vitesse est placé sur la position REVERSE (R). AVERTISSEMENT: • - Pioneer AVHP7800DVD | Other Manual - Page 31
éra de recul Appareil déporté (fourni) Français Deutsch Français Italiano Reportez-vous à la section "Branchement du cordon d'alimentation (2)". PRÉCAUTION Pioneer conseille l'utilisation d'une caméra qui fournit des images inversées, comme dans un miroir; dans le cas contraire, l'image sur - Pioneer AVHP7800DVD | Other Manual - Page 32
CD. AVERTISSEMENT: • Veillez à ce que l'écran NE SOIT PAS installé en un endroit tel que le conducteur puisse observer les images fournies par le DVD ou le Video CD tout en conduisant. • NE raccordez JAMAIS la sortie audio arrière (REAR DISPLAY OUT) à un amplificateur de puis- sance vendu séparément - Pioneer AVHP7800DVD | Other Manual - Page 33
Français Deutsch Français À propos de l'entrée vidéo En fonction de l'appareil connecté à cet appareil, l'image vidéo peut être déformée. Dans ce cas, réglez le commutateur de sélection de l'image vidéo situé à l'arrière de l'appareil déporté sur la position correcte permettant d'éliminer la dé - Pioneer AVHP7800DVD | Other Manual - Page 34
de chauffage. • L'angle de l'installation, ne doit pas dépasser 30° par rapport à l'horizontale, faute de quoi l'unité ne fournira pas ses performances rails et provoquer un court-circuit. • Suivez les instructions ci-dessous lors de l'installation du boîtier d'alimentation fourni. -Placez le boî - Pioneer AVHP7800DVD | Other Manual - Page 35
) (rugueux) Bande Velcro (grande) (doux) Moquette ou châssis du véhicule Fig. 12 Montage DIN avant/arrière Cet appareil peut être convenable installé en choisissant soit la méthode habituelle de montage par "l'avant" (montage DIN avant), soit la méthode de montage par "l'arrière" (montage DIN - Pioneer AVHP7800DVD | Other Manual - Page 36
(face à face) des perçages de vis de l'appareil puis mettez en place 2 vis de chaque côté de l'appareil. Selon la forme du perçage du support, utilisez les vis de pression de 4 × 3 mm, les vis de pression de 5 × 6 mm ou les vis à tête plate de 5 × 6 mm. *1 N'utilisez que les vis de - Pioneer AVHP7800DVD | Other Manual - Page 37
ère qu'ils soient en regard de ceux de l'appareil. Serrez les vis en 2 endroits de chaque côté. Fig. 19 Vis de fixation Fig. 20 Installation du boîtier de télécommande Lorsque vous n'utilisez pas le boîtier de télécommande, assurez son immobilisation au moyen d'un morceau de bande Velcro. • Essuyez - Pioneer AVHP7800DVD | Other Manual - Page 38
1-CHOME, MEGURO-KU, TOKYO 153-8654, JAPAN PIONEER ELECTRONICS (USA) INC. P.O. Box 1540, Long Beach, California 90801-1540, U.S.A. TEL: (800) 421-1404 PIONEER EUROPE NV Haven 1087, Keetberglaan 1, B-9120 Melsele, Belgium TEL: (0) 3/570.05.11 PIONEER ELECTRONICS ASIACENTRE PTE. LTD. 253 Alexandra Road
-
 1
1 -
 2
2 -
 3
3 -
 4
4 -
 5
5 -
 6
6 -
 7
7 -
8
-
9
-
10
-
11
-
12
-
13
-
14
-
15
-
16
-
17
-
18
-
19
-
20
-
21
-
22
-
23
-
24
-
25
-
26
-
27
-
28
-
29
-
30
-
31
-
32
-
33
-
34
-
35
-
36
-
37
-
38
 |
 |
English
Français
Deutsch
Français
Italiano
Nederlands
PyÒÒÍËÈ
AVH-P7800DVD
INSTALLATION MANUAL
MANUEL D’INSTALLATION
This product conforms to CEMA cord colors.
Le code de couleur des câbles utilisé pour ce produit est
conforme à CEMA.