Pioneer BDP-95FD Owner's Manual - Page 16
Network connection, Controlling this player via another Pioneer, component - remote control
 |
View all Pioneer BDP-95FD manuals
Add to My Manuals
Save this manual to your list of manuals |
Page 16 highlights
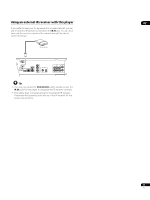
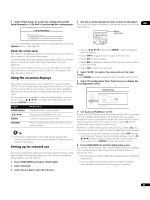
02 Network connection This player can be connected to a local area network (LAN) via the Ethernet port on the rear panel. Connecting directly to a PC If you only need to use one PC to act as a media server, you can connect this player directly to the PC using the included LAN cable. After making the physical connection the player needs to be set up for network communication. This is done from the Initial Setup menu - see Setting up for network use on page 21 for detailed instructions. For best performance, we recommend using a 100BASE-TX compatible PC and Ethernet hub. CONTROL IN IR IN SETTING 2 SETTING 1 IR RECEIVER HDMI OUT LAN(100) VIDEO OUT S Y PB PR COMPONENT VIDEO OUT DIGITAL AUDIO OUT COAXIAL OPTICAL AUDIO OUT (5.1ch) CENTER SURROUND FRONT L AUDIO OUT (2ch) L R R SUB WOOFER Connecting via an Ethernet hub If you already operate one or more PCs on a local area network, you can integrate this player by connecting it to the Ethernet hub using the included LAN cable. LAN(10/100) In the example configuration below, this player would be able to access content from either of the PCs. CONTROL IN IR IN SETTING 2 SETTING 1 IR RECEIVER HDMI OUT LAN(100) VIDEO OUT S Y PB PR COMPONENT VIDEO OUT DIGITAL AUDIO OUT COAXIAL OPTICAL AUDIO OUT (5.1ch) CENTER SURROUND FRONT L AUDIO OUT (2ch) L R R SUB WOOFER PC Controlling this player via another Pioneer component 1 2 3 4 Ethernet hub (router with hub functionality) The CONTROL IN jack allows you to control this player via the remote control sensor of another Pioneer component - typically an AV receiver - that has a CONTROL OUT jack. Remote control signals are passed through to the player from the remote sensor of the other component, allowing you greater freedom in the placement of your player. • Use a miniplug cord (not supplied) to connect the CONTROL IN jack of this player with the CONTROL OUT jack of your other Pioneer component. LAN(10/100) LAN(10/100) To CONTROL OUT AV Receiver PC 1 PC 2 CONTROL IN IR IN SETTING 2 SETTING 1 IR RECEIVER HDMI OUT LAN(100) VIDEO OUT S Y PB PR COMPONENT VIDEO OUT DIGITAL AUDIO OUT COAXIAL OPTICAL AUDIO OUT (5.1ch) CENTER SURROUND FRONT L AUDIO OUT (2ch) L R R SUB WOOFER • You will also need to connect a coaxial digital cable, analog audio cable, or video cable. • When connected via System Control, point the remote control toward the connected component (such as an AV receiver). The remote will not work correctly when pointed at this unit. • You cannot connect use System Control with components that do not have a System Control jack or with components manufactured by companies other than Pioneer. 16 En
-
 1
1 -
2
-
3
-
4
-
5
-
6
-
7
-
8
-
9
-
10
-
 11
11 -
 12
12 -
 13
13 -
 14
14 -
 15
15 -
 16
16 -
 17
17 -
 18
18 -
 19
19 -
 20
20 -
 21
21 -
22
-
23
-
24
-
25
-
26
-
27
-
28
-
29
-
30
-
31
-
32
-
33
-
34
-
35
-
36
-
37
-
38
-
39
-
40
-
41
-
42
-
43
-
44
-
45
-
46
-
47
-
48
-
49
-
50
-
51
-
52
-
53
-
54
-
55
-
56
-
57
-
58
-
59
-
60
-
61
-
62
-
63
-
64
-
65
-
66
 |
 |
