Pioneer BDP-95FD Owner's Manual - Page 20
Getting Started
 |
View all Pioneer BDP-95FD manuals
Add to My Manuals
Save this manual to your list of manuals |
Page 20 highlights
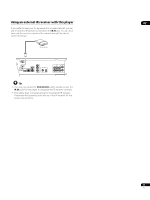
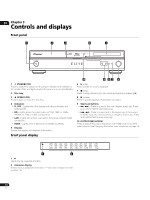
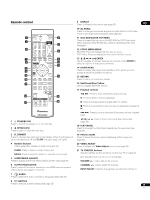
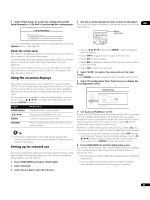
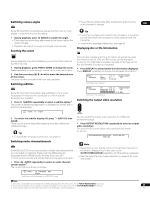
04 Chapter 4 Getting Started Switching on and setting up When you switch the player on for the first time the Setup Navigator screen appears. We recommend using this to make a few basic player settings. STANDBY/ON 4 Press ENTER to start setting up using the Setup Navigator. Setup Navigator Before using, make some simple settings for the BD player. Start Cancel Please use the Initial Setup if you want to make more detailed settings. If you don't want to use the Setup Navigator, press to select Cancel, then press ENTER to exit the Setup Navigator. 5 Use the / buttons to select the output video resolution then press ENTER. ENTER 1 Switch on your TV and set the video input to this player. 2 Press the STANDBY/ON button on the remote control or the front panel to switch on. • It can take up to one minute for the unit to turn on. • When you switch on for the first time, your TV should display the Setup Navigator screen. (If the Setup Navigator doesn't appear, you can also access it from the Initial Setup menu; see page 43). • When you have this unit connected to a plasma display that is compatible with HDMI Control, language settings are imported from the plasma display's OSD settings before Setup Navigator begins. 3 Use the / buttons to choose a language, then press ENTER. Setup Navigator Language English français Español Setup Navigator Output Video Resolution Auto 480i 480p 720p 1080i 1080p Source Direct If you connected this player to your TV using the HDMI connector, select from Auto, 480i (interlaced), 480p (progressive), 720p, 1080i, 1080p, or Source Direct, then skip to step 7 (the aspect ratio will automatically be set to 16:9 (Widescreen)). Generally, the Auto setting is recommended. Setup Navigator Output Video Resolution S-Video/Video only 480i 480p 720p 1080i Don't Know If you're using an S-Video or composite video connection, select SVideo/Video only. If you're using a component video connection, match the output setting with the capabilities of your TV. Select from: 480i, 480p, 720p, 1080i or Don't Know. If you select 720p or 1080i, skip the next step since the aspect ratio will automatically be set to 16:9 (Widescreen). 6 Use the / buttons to select the aspect ratio of your TV then press ENTER. Setup Navigator TV Aspect Ratio 16:9 (Widescreen) 4:3 (Standard) If you have a widescreen TV, select 16:9 (Widescreen); if you have a standard size TV, select 4:3 (Standard). 20 En
-
 1
1 -
2
-
3
-
4
-
5
-
6
-
7
-
8
-
9
-
10
-
11
-
12
-
13
-
14
-
 15
15 -
 16
16 -
 17
17 -
 18
18 -
 19
19 -
 20
20 -
 21
21 -
 22
22 -
 23
23 -
 24
24 -
 25
25 -
26
-
27
-
28
-
29
-
30
-
31
-
32
-
33
-
34
-
35
-
36
-
37
-
38
-
39
-
40
-
41
-
42
-
43
-
44
-
45
-
46
-
47
-
48
-
49
-
50
-
51
-
52
-
53
-
54
-
55
-
56
-
57
-
58
-
59
-
60
-
61
-
62
-
63
-
64
-
65
-
66
 |
 |
