Pioneer CDRB20 Owners Manual - Page 4
<ENGLISH>, Connecting, Units, Using, Connector
 |
View all Pioneer CDRB20 manuals
Add to My Manuals
Save this manual to your list of manuals |
Page 4 highlights
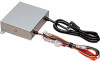
Connecting the Units • Before mounting, connect the units temporarily. Check that the units are connected correctly by operating the multi-CD controller. • Be sure to connect the ground lead (black) to the vehicle body or some other metal part that is properly grounded to the chassis. If the ground lead is not properly connected, noise may occur or the player or multi-CD controller may not operate correctly. • This unit is for vehicles with a 12-volt battery and negative grounding. Before installing it in a recreational vehicle, truck, or bus, check the battery voltage. • To avoid shorts in the electrical system, be sure to disconnect the battery (-) cable before beginning installation. • Check whether installation and wiring have been completed correctly. Replace the removed car components, then connect the end of the cable to the negative (-) terminal of the battery. • Secure the wiring with cable clamps or adhesive tape. To protect the wiring, wrap adhesive tape around them where they lie against metalparts. • Route and secure all wiring so it cannot touch any moving parts, such as the gear shift, handbrake, and seat rails. Do not route wiring in places that get hot, such as near the heater outlet. If the insulation of the wiring melts or gets torn, there is a danger of the wiring short-circuiting to the vehicle body. • Don't pass the orange lead through a hole into the engine compartment to connect to the battery. This will damage the lead insulation and cause a very dangerous short. • Do not shorten any leads. If you do, the protection circuit may fail to work when it should. • Never feed power to other equipment by cutting the insulation of the power supply lead of the unit and tapping into the lead. The current capacity of the lead will be exceeded, causing over heating. • Replace fuses only with the types stipulated on the fuse holder. (Fig. 2) [1] IP-BUS main unit [2] Connected to IP-BUS input (blue) [3] IP-BUS (blue) [4] This unit [5] External device with RCA output (car navi- gation units, VCRs, DAT decks, etc.) [6] RCA output [7] Red [8] White [9] IP-BUS multi-CD player [10] Fuse folder [11] Orange To a terminal always supplied with power regardless of ignition switch position. [12] Orange Connect to Multi-CD unswitched power supply. [13] Black (ground) To vehicle (metal) body. Using this Connector In order to listen to external devices attached to this connector, turn the external device's power on, put it,in play or other operational mode, and set the main unit's source selector switch to "AUX.". • If the main unit's source is a multi-CD, the sound signals from both the multi-CD and the external device will be heard simultaneously, mixed together. When listening to a multi-CD, make sure the power supply to the external device is switched off. • As the main unit does not control the power of external devices, they must be turned on and off independently of the main unit. • Do not connect any devices to this connector which have an RCA output of over 1V and do not have any volume control. They may damage this unit. Device which do have a volume control should have the volume adjusted to a point where the sound does not distort.
-
 1
1 -
 2
2 -
 3
3 -
 4
4 -
 5
5 -
 6
6 -
 7
7 -
 8
8 -
 9
9 -
 10
10 -
11
-
12
 |
 |
