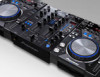
Pioneer DJM-400 - CDJ-400 Package Operating Instructions
Pioneer DJM-400 - CDJ-400 Package Manual
 |
View all Pioneer DJM-400 - CDJ-400 Package manuals
Add to My Manuals
Save this manual to your list of manuals |
Pioneer DJM-400 - CDJ-400 Package manual content summary:
- Pioneer DJM-400 - CDJ-400 Package | Operating Instructions - Page 1
DJ MIXER DJM-400 Operating Instructions - Pioneer DJM-400 - CDJ-400 Package | Operating Instructions - Page 2
to the presence of important operating and maintenance (servicing) instructions in the literature accompanying the appliance. D1-4-2-3_En-A 1) Read these instructions. 2) Keep these instructions. 3) Heed all warnings. 4) Follow all instructions. 5) Do not use this apparatus near water. 6) Clean - Pioneer DJM-400 - CDJ-400 Package | Operating Instructions - Page 3
TROUBLESHOOTING 13 SPECIFICATIONS 14 BLOCK DIAGRAM 15 CONFIRM ACCESSORIES Operating Instructions beat effects" so popular on the DJM-600 have been given further evolution track volume when microphone input is detected. 6 Other functions ¶ A control cable can be used to connect the unit to a Pioneer - Pioneer DJM-400 - CDJ-400 Package | Operating Instructions - Page 4
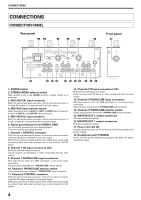
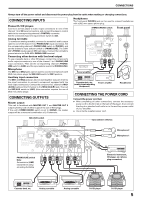
CONNECTIONS CONNECTIONS CONNECTION PANEL Rear panel 12 3 4 5 Front panel 6 18 POWER OFF ON AC IN MONO 1 MASTER OUT L R STEREO 2 MIC2 AUX(R) MIC MIC1 AUX(L) AUX PHONO LINE CD PHONO LINE L LINE PHONO R L LINE PHONO R CONTROL CD SIGNAL GND CONTROL 17 16 15 14 13 12 11 10 9 8 7 1. - Pioneer DJM-400 - CDJ-400 Package | Operating Instructions - Page 5
plug from its outlet when making or changing connections. CONNECTING INPUTS Pioneer DJ CD players Connect a DJ CD player's audio output PHONO/LINE]. The DJM400's PHONO inputs support MM cartridges. Connect the turntable's ground wire to the DJM-400's SIGNAL GND terminal. Connecting other devices - Pioneer DJM-400 - CDJ-400 Package | Operating Instructions - Page 6
NAMES AND FUNCTIONS OF PARTS NAMES AND FUNCTIONS OF PARTS 1 2 6 Channel equalizer low-range adjust dial (LOW) POWER Use to adjust the bass (low-range) frequency sound MIC MIC 1 LEVEL CD 1 PHONO 1 /LINE 1 CD 2 PHONO 2 /LINE 2 MASTER LEVEL 13 for each channel (includes kill function). ( - Pioneer DJM-400 - CDJ-400 Package | Operating Instructions - Page 7
Beat effect section 15 BPM display Displays the current track tempo as Beats Per Minute (BPM). ¶ The If the TAP button is tapped in the AUTO mode, the mode automatically switches to the TAP mode (manual input). 18 Beat select buttons (BEAT/PITCH -, +) + (Beat up): Doubles the calculated BPM. - Pioneer DJM-400 - CDJ-400 Package | Operating Instructions - Page 8
MIXER OPERATIONS (BASIC OPERATIONS) MIXER OPERATIONS BASIC OPERATIONS 2 MIC 3 TRIM 4 HI, MID, LOW 1 POWER MASTER BEAT EFFECTS 7 MASTER LEVEL HEADPHONES 5 [MIC] [AUX] MIC/AUX 1 MIC 3 MIC 1 LEVEL, MIC 2 LEVEL 4 EQ 2 STEREO/MONO MASTER BEAT EFFECTS [PHONES] 1 CH-1, CH-2, MASTER 2 LEVEL - Pioneer DJM-400 - CDJ-400 Package | Operating Instructions - Page 9
FUNCTION) FADER START FUNCTION By connecting the optional Pioneer DJ CD Player control cable, the channel fader released from the pause mode and automatically - and instantly - begins playback of the selected track. Also, when the fader lever is returned to its original position, the CD player - Pioneer DJM-400 - CDJ-400 Package | Operating Instructions - Page 10
echo to the microphone, the microphone sound repeats in synch with the music beat. If a 1/1 beat echo is applied to the vocal portion of a track, the song takes on an effect reminiscent of a "round". Example 1 beat 1 beat Cuts input sound 3. FILTER In units of 1/1, 2/1, 4/1, 8/1 or 16/1 beat, the - Pioneer DJM-400 - CDJ-400 Package | Operating Instructions - Page 11
ON, the function defaults to the [AUTO] mode. ¶ In the event the track's BPM cannot be detected automatically, the display's BPM counter will flash. ¶ The possible to measure some tracks accurately. In this case, use the TAP mode for manual BPM input. [Using the TAP Button for Manual BPM Input] If - Pioneer DJM-400 - CDJ-400 Package | Operating Instructions - Page 12
go out and the sample will be erased. 8. IN-LOOP SAMPLER This function allows you to store 4-beat sounds in up to 5 banks, then output them repeatedly. Example Bank 1 Present track BPM=125 Bank 1 ON Repeat EFFECT PARAMETERS Name BEAT/BANK button parameters Parameter 1 (BEAT button) Contents - Pioneer DJM-400 - CDJ-400 Package | Operating Instructions - Page 13
trouble cannot be rectified even after checking the following items, contact your dealer or nearest PIONEER service may not be correctly measurable with some tracks. ÷ Some differences may occur due to connect the CONTROL jacks of DJM-400 and CD player. ÷ Connect both to set BPM manually. ÷ No remedy - Pioneer DJM-400 - CDJ-400 Package | Operating Instructions - Page 14
jacks (Ø6.3 mm 2 MASTER output connectors RCA pin jacks 2 PHONES connectors Stereo phone jack (Ø6.3 mm 1 CONTROL connectors Mini-phone jacks (Ø3.5 mm 2 4. Accessories Operating Instructions 1 Power cord 1 Warranty card 1 Specifications and appearance are subject to change without notice. 14 - Pioneer DJM-400 - CDJ-400 Package | Operating Instructions - Page 15
BLOCK DIAGRAM BLOCK DIAGRAM [CH-1] PHONO /LINE RIAA PHONO1/LINE1 TRIM CD1 ADC CD PHONO LINE [CH-2] PHONO /LINE RIAA PHONO2/LINE2 TRIM CD2 ADC CD PHONO LINE [MIC/AUX] MIC 1/ AUX L MIC 1 LEVEL MIC 1 AUX L ADC MIC 2/ AUX R MIC 2 LEVEL MIC 2 AUX R CH-1 Master out CH-2 H.P - Pioneer DJM-400 - CDJ-400 Package | Operating Instructions - Page 16
, or if you wish to purchase replacement parts, operating instructions, service manuals, or accessories, please call the number shown below. 800 - 782 - 7210 Please do not ship your product to Pioneer without first calling the Customer Support Division at the above listed number for assistance
-
 1
1 -
 2
2 -
 3
3 -
 4
4 -
 5
5 -
 6
6 -
 7
7 -
8
-
9
-
10
-
11
-
12
-
13
-
14
-
15
-
16
 |
 |
Operating Instructions
DJ MIXER
DJM-400