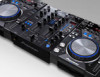
Pioneer DJM-400 - CDJ-400 Package Operating Instructions - Page 3

Cautions Regarding Handling, Contents, Confirm Accessories, Features - djm

Page 3 highlights

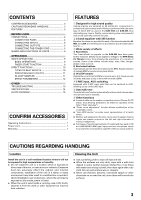
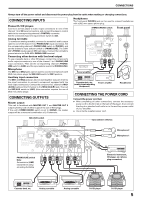
CONTENTS CONFIRM ACCESSORIES 3 CAUTIONS REGARDING HANDLING 3 FEATURES 3 BEFORE USING CONNECTIONS 4 CONNECTION PANEL 4 CONNECTING INPUTS 5 CONNECTING OUTPUTS 5 CONNECTING THE POWER CORD 5 NAMES AND FUNCTIONS OF PARTS 6 OPERATIONS MIXER OPERATIONS 8 BASIC OPERATIONS 8 FADER START FUNCTION 9 EFFECT FUNCTIONS 10 TYPES OF BEAT EFFECTS 10 PRODUCING BEAT EFFECTS 11 IN-LOOP SAMPLER 11 EFFECT PARAMETERS 12 OTHER TROUBLESHOOTING 13 SPECIFICATIONS 14 BLOCK DIAGRAM 15 CONFIRM ACCESSORIES Operating Instructions 1 Power cord 1 Warranty 1 FEATURES 1 Designed for high sound quality Analog signals are sampled at 96 kHz/24-bit, comparable to professional performance levels. Mixing is performed with the same type of 32-bit DSP as used in the DJM-1000 and DJM-800, thus eliminating any loss in fidelity, and producing clear and powerful club sound optimally suited for DJ play. 2 3-band equalizer with kill function Equalizer functions are provided for each of the three bandwidths HI, MID, and LOW, and a kill function is provided to drop the attenuation level to -∞. 3 Wide variety of effects 1) Beat effects The "beat effects" so popular on the DJM-600 have been given further evolution. Effects can be applied in linkage to the BPM (Beats Per Minute) count, thus allowing the production of a variety of sounds. Some of the effects include delay, echo, filter, flanger, phaser, robot, and roll. 2) Beat select buttons Automatically set the effect time linked to the BPM. Allows selection of desired BPM for synchronizing beat effects. 3) IN-LOOP sampler Detects the current track's BPM and records up to 5 of 4-beat sources in banks, and plays a loop in time with the track's BPM. 4 2 MIC input, AUX switching Equipped with 2 MIC input jacks that can be switched to AUX, allowing use as a third LINE input. 5 Auto talk-over The auto talk-over function automatically reduces track volume when microphone input is detected. 6 Other functions ¶ A control cable can be used to connect the unit to a Pioneer DJ CD player, thus allowing playback to be linked to operation of the fader ("fader start play"). ¶ "Fader curve adjustment" function allows modification of the cross fader curves. ¶ "Auto BPM counter" provides visual representation of a track's tempo. ¶ Monitor auto assignment function can be used to assign channel inputs and master outputs to the left and right channels of monitor headphones. ¶ Full lineup of input/output systems. Provided with two each of CD and LINE/PHONO (MM type) inputs and two microphone inputs for a total of six input systems, together with two output systems. CAUTIONS REGARDING HANDLING Location Install the unit in a well-ventilated location where it will not be exposed to high temperatures or humidity. ÷ Do not install the unit in a location which is exposed to direct rays of the sun, or near stoves or radiators. Excessive heat can adversely affect the cabinet and internal components. Installation of the unit in a damp or dusty environment may also result in a malfunction or accident. (Avoid installation near cookers etc., where the unit may be exposed to oily smoke, steam or heat.) ÷ When the unit is used inside a carrying case or DJ booth, separate it from the walls or other equipment to improve heat radiation. Cleaning the Unit ÷ Use a polishing cloth to wipe off dust and dirt. ÷ When the surfaces are very dirty, wipe with a soft cloth dipped in some neutral cleanser diluted five or six times with water and wrung out well, then wipe again with a dry cloth. Do not use furniture wax or cleaners. ÷ Never use thinners, benzene, insecticide sprays or other chemicals on or near this unit, since these will corrode the surfaces. 3

  • 1
  • 2
  • 3
  • 4
  • 5
  • 6
  • 7
  • 8
  • 9
  • 10
  • 11
  • 12
  • 13
  • 14
  • 15
  • 16

3
Location
Install the unit in a well-ventilated location where it will not
be exposed to high temperatures or humidity.
÷
Do not install the unit in a location which is exposed to
direct rays of the sun, or near stoves or radiators. Excessive
heat can adversely affect the cabinet and internal
components. Installation of the unit in a damp or dusty
environment may also result in a malfunction or accident.
(Avoid installation near cookers etc., where the unit may be
exposed to oily smoke, steam or heat.)
÷
When the unit is used inside a carrying case or DJ booth,
separate it from the walls or other equipment to improve
heat radiation.
CAUTIONS REGARDING HANDLING
Cleaning the Unit
÷
Use a polishing cloth to wipe off dust and dirt.
÷
When the surfaces are very dirty, wipe with a soft cloth
dipped in some neutral cleanser diluted five or six times
with water and wrung out well, then wipe again with a dry
cloth. Do not use furniture wax or cleaners.
÷
Never use thinners, benzene, insecticide sprays or other
chemicals on or near this unit, since these will corrode the
surfaces.
CONTENTS
CONFIRM ACCESSORIES
CONFIRM ACCESSORIES
...........................................
3
CAUTIONS REGARDING HANDLING
........................
3
FEATURES
...................................................................
3
BEFORE USING
CONNECTIONS
............................................................
4
CONNECTION PANEL
...........................................
4
CONNECTING INPUTS
..........................................
5
CONNECTING OUTPUTS
......................................
5
CONNECTING THE POWER CORD
......................
5
NAMES AND FUNCTIONS OF PARTS
......................
6
OPERATIONS
MIXER OPERATIONS
..................................................
8
BASIC OPERATIONS
.............................................
8
FADER START FUNCTION
....................................
9
EFFECT FUNCTIONS
.................................................
10
TYPES OF BEAT EFFECTS
..................................
10
PRODUCING BEAT EFFECTS
..............................
11
IN-LOOP SAMPLER
.............................................
11
EFFECT PARAMETERS
........................................
12
OTHER
TROUBLESHOOTING
................................................
13
SPECIFICATIONS
.......................................................
14
BLOCK DIAGRAM
......................................................
15
Operating Instructions
...........................................................
1
Power cord
.............................................................................
1
Warranty
.................................................................................
1
1
Designed for high sound quality
Analog signals are sampled at 96 kHz/24-bit, comparable to
professional performance levels. Mixing is performed with the same
type of 32-bit DSP as used in the
DJM-1000
and
DJM-800
, thus
eliminating any loss in fidelity, and producing clear and powerful
club sound optimally suited for DJ play.
2
3-band equalizer with kill function
Equalizer functions are provided for each of the three bandwidths
HI
,
MID
, and
LOW
, and a kill function is provided to drop the attenuation
level to –
.
3
Wide variety of effects
1)
Beat effects
The “beat effects” so popular on the
DJM-600
have been given
further evolution. Effects can be applied in linkage to the
BPM (Beats
Per Minute)
count, thus allowing the production of a variety of
sounds. Some of the effects include delay, echo, filter, flanger,
phaser, robot, and roll.
2)
Beat select buttons
Automatically set the effect time linked to the BPM. Allows selection
of desired BPM for synchronizing beat effects.
3)
IN-LOOP sampler
Detects the current track’s BPM and records up to 5 of 4-beat sources
in banks, and plays a loop in time with the track’s BPM.
4
2 MIC input, AUX switching
Equipped with 2 MIC input jacks that can be switched to AUX,
allowing use as a third LINE input.
5
Auto talk-over
The auto talk-over function automatically reduces track volume when
microphone input is detected.
6
Other functions
A control cable can be used to connect the unit to a Pioneer DJ CD
player, thus allowing playback to be linked to operation of the
fader (“fader start play”).
“Fader curve adjustment” function allows modification of the
cross fader curves.
“Auto BPM counter” provides visual representation of a track’s
tempo.
Monitor auto assignment function can be used to assign channel
inputs and master outputs to the left and right channels of
monitor headphones.
Full lineup of input/output systems. Provided with two each of CD
and LINE/PHONO (MM type) inputs and two microphone inputs
for a total of six input systems, together with two output systems.
FEATURES