Pioneer TS-A4672R Owner's Manual - Page 93
Changing Background Picture
 |
UPC - 012562846989
View all Pioneer TS-A4672R manuals
Add to My Manuals
Save this manual to your list of manuals |
Page 93 highlights
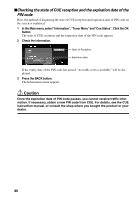
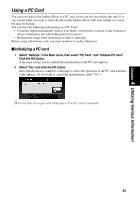
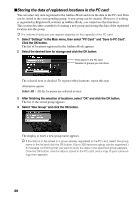
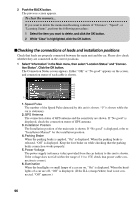
Chapter 4 Utilizing Various Information Changing Background Picture In the menu operation screen, you can indicate a picture you like on the background. Some pictures are already stored, but you can also use pictures (JPEG format data) created by a personal computer or a digital camera. The following two types of background pictures can be changed: • AV Background : Background for the screen during the operation of audio, or during playback • Navigation Background : Background of navigation menu screen Here, a method of changing background picture is described with an example of saving the picture stored in a PC card to the background picture of the navigation. ■Select a picture stored in PC Card 1 Insert a PC Card to the main unit. 2 Select "Settings","Background Picture Setting" from the Main menu, and click the OK button. Background Picture Setting menu is displayed. The picture selected at each screen is indicated on the right side of "AV Background" and "Navigation Background" items. 3 Select "Navigation Background" or "AV Background" and click the OK button. 4 Select "Import from PC card" and click the OK button. The list of the pictures stored in a PC card is displayed. On this screen, you can select the following item: Back to Original : The picture when purchased is selected. 5 Select a picture you want for the background, and click the OK button. The message asking how to arrange the image is indicated. 91
-
 1
1 -
2
-
3
-
4
-
5
-
6
-
7
-
8
-
9
-
10
-
11
-
12
-
13
-
14
-
15
-
16
-
17
-
18
-
19
-
20
-
21
-
22
-
23
-
24
-
25
-
26
-
27
-
28
-
29
-
30
-
31
-
32
-
33
-
34
-
35
-
36
-
37
-
38
-
39
-
40
-
41
-
42
-
43
-
44
-
45
-
46
-
47
-
48
-
49
-
50
-
51
-
52
-
53
-
54
-
55
-
56
-
57
-
58
-
59
-
60
-
61
-
62
-
63
-
64
-
65
-
66
-
67
-
68
-
69
-
70
-
71
-
72
-
73
-
74
-
75
-
76
-
77
-
78
-
79
-
80
-
81
-
82
-
83
-
84
-
85
-
86
-
87
-
 88
88 -
 89
89 -
 90
90 -
 91
91 -
 92
92 -
 93
93 -
 94
94 -
 95
95 -
 96
96 -
 97
97 -
 98
98 -
99
-
100
-
101
-
102
-
103
-
104
-
105
-
106
-
107
-
108
-
109
-
110
-
111
-
112
-
113
-
114
-
115
-
116
-
117
-
118
-
119
-
120
-
121
-
122
-
123
-
124
-
125
-
126
-
127
-
128
-
129
-
130
-
131
-
132
-
133
-
134
-
135
-
136
-
137
-
138
-
139
-
140
-
141
-
142
-
143
-
144
-
145
-
146
-
147
-
148
-
149
-
150
-
151
-
152
-
153
-
154
-
155
-
156
-
157
-
158
-
159
-
160
-
161
-
162
-
163
-
164
-
165
-
166
-
167
-
168
-
169
-
170
-
171
-
172
-
173
-
174
-
175
-
176
-
177
-
178
-
179
-
180
-
181
-
182
-
183
-
184
-
185
-
186
-
187
-
188
-
189
-
190
-
191
-
192
-
193
-
194
-
195
-
196
-
197
-
198
-
199
-
200
 |
 |
