ProForm 10.5qm Treadmill Uk Manual - Page 6
Assembly, How To Fold And Move The Treadmill, Warning
 |
View all ProForm 10.5qm Treadmill manuals
Add to My Manuals
Save this manual to your list of manuals |
Page 6 highlights
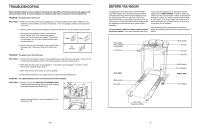
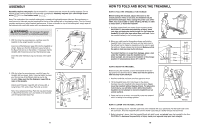
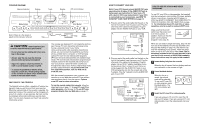
ASSEMBLY Assembly requires two people. Set the treadmill in a cleared area and remove all packing materials. Do not dispose of the packing materials until assembly is completed. Assembly requires your own Phillips screw- driver and rubber mallet . Note: The underside of the treadmill walking belt is coated with high-performance lubricant. During shipping, a small amount of lubricant may be transferred to the top of the walking belt or the shipping carton. This is a normal condition and does not affect treadmill performance. If there is lubricant on top of the walking belt, simply wipe off the lubricant with a soft cloth and a mild, non-abrasive cleaner. WARNING: Do not plug in the power 1 cord until the treadmill is completely assembled. 1. With the help of a second person, carefully raise the treadmill to the upright position as shown. Insert one of the Extension Legs (55) into the treadmill as shown. Make sure that the Extension Leg is turned so the Base Pad (44) is on the bottom. If necessary, tip the Uprights (64) forward as you insert the Extension Leg. Insert the other Extension Leg (not shown) in the same way. 64 55 44 2. With the help of a second person, carefully lower the Uprights (64) as shown. Note: It may be helpful to place 2 your foot on one of the Wheels (58) as you tip the Uprights. Make sure that the Extension Legs (55) re- main in the Uprights. Attach each Extension Leg (55) with a Screw (35), a Long Screw (107), and a Base Pad (44) as shown. Note: One replacement Base Pad (44) may be included. If a Base Pad becomes worn and needs to be replaced, use the replacement Base Pad. 64 35 55 107 44 58 35 55 107 44 6 HOW TO FOLD AND MOVE THE TREADMILL HOW TO FOLD THE TREADMILL FOR STORAGE 1 Before folding the treadmill, adjust the incline to the lowest position. If this is not done, the treadmill may be permanently damaged. Next, unplug the power cord. CAUTION: You must be able to safely lift 20 kg (45 lbs.) in order to raise, lower, or move the treadmill. 1. Hold the treadmill with your hands in the locations shown. CAUTION: To decrease the possibility of injury, bend your legs and keep your back straight. As you raise the treadmill, lift with your legs rather than your back. Raise the treadmill halfway to the vertical position. 2. Move your right hand to the position shown and hold the treadmill firmly. Using your left hand, pull the latch knob to 2 the left and hold it. Raise the treadmill until the catch is past the latch pin. Slowly release the latch knob. Make sure that the plate is held securely by the latch pin. To protect the floor or carpet from damage, place a mat under the treadmill. Keep the treadmill out of direct sunlight. Do not leave the treadmill in the storage position in temperatures above 30° C (85° F). Latch Knob Pin Plate Open Closed HOW TO MOVE THE TREADMILL Before moving the treadmill, convert the treadmill to the storage position as described above. Make sure that the plate is held securely by the latch pin. 1. Hold the handrails and place one foot against a wheel. 2. Tilt the treadmill back until it rolls freely on the wheels. Carefully move the treadmill to the desired location. Never move the treadmill without tipping it back. To reduce the risk of injury, use extreme caution whilst moving the treadmill. Do not attempt to move the treadmill over an uneven surface. 3. Place one foot on a wheel, and carefully lower the treadmill until it is resting in the storage position. Base Wheels HOW TO LOWER THE TREADMILL FOR USE 1. Refer to drawing 2 above. Hold the upper end of the treadmill with your right hand. Pull the latch knob to the left and hold it. Pivot the treadmill down until the frame is past the pin. Slowly release the latch knob. 2. Refer to drawing 1 above. Hold the treadmill firmly with both hands, and slowly lower the treadmill to the floor. CAUTION: To decrease the possibility of injury, bend your legs and keep your back straight. 19
-
 1
1 -
 2
2 -
 3
3 -
 4
4 -
 5
5 -
 6
6 -
 7
7 -
 8
8 -
 9
9 -
 10
10 -
 11
11 -
 12
12 -
13
-
14
 |
 |
