ProForm 10.5qm Treadmill Uk Manual - Page 9
Operation And Adjustment, Danger - workouts
 |
View all ProForm 10.5qm Treadmill manuals
Add to My Manuals
Save this manual to your list of manuals |
Page 9 highlights
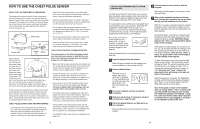
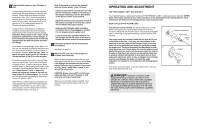
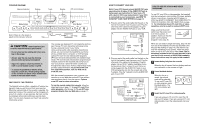
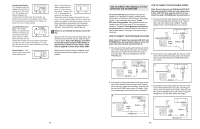
4 Press the PLAY button on your CD player or VCR. A moment after the button is pressed, your personal trainer will begin guiding you through your workout. Simply follow your personal trainer's instructions. Note: If the Time/Incline display is flashing, press the Start button or the Speed L button on the console. The treadmill will not respond to a CD or video program when the Time/Incline display is flashing. During the CD or video program, an electronic "chirping" sound will alert you when the speed and/or incline of the treadmill is about to change. CAUTION: Always listen for the "chirp" and be prepared for speed and/or incline changes. In some instances, the speed and/or incline may change before the personal trainer describes the change. If the speed or incline settings are too high or too low, you can manually override the settings at any time by pressing the Speed or Incline buttons on the console. However, when the next "chirp" is heard, the speed and/or incline will change to the next settings of the CD or video program. To stop the program at any time, press the Stop button on the console. The Time/Incline display will begin to flash. To restart the program, press the Start button or the Speed L button again. After a moment, the walking belt will begin to move at 1 mph. When the next "chirp" is heard, the speed and incline will change to the next settings of the CD or video program. The program can also be stopped by pressing the Stop button on your CD player or VCR. When the CD or video program is completed, the walking belt will stop and the Time/Incline display will begin to flash. Note: To use another CD or video program, press the Stop button or remove the key and go to step 1 on page 15. Note: If the speed or incline of the treadmill does not change when a "chirp" is heard: • make sure that the iFIT.com indicator is lit and that the Time/Incline display is not flashing. If the display is flashing, press the Start button or the Speed L button on the console. • adjust the volume of your CD player or VCR. If the volume is too high or too low, the console may not detect the program signals. • make sure that the audio cable is properly connected, that it is fully plugged in, and that it is not wrapped around a power cord. • if you are using your portable CD player and the CD skips, set the CD player on the floor or another flat surface instead of on the console. 5 Follow your progress with the track and the four displays. See step 5 on page 11. 6 When the iFIT.com CD or video program is finished, remove the key. Step onto the foot rails and remove the key from the console. Keep the key in a secure place. Note: If the displays and indicators on the console remain lit after the key is removed, the console is in the "demo" mode. Refer to page 18 and turn off the demo mode. CAUTION: Always remove iFIT.com CD's and videocassettes from your CD player or VCR when you are finished using them. When you are finished using the treadmill, move the on/off switch near the power cord to the off position. OPERATION AND ADJUSTMENT THE PERFORMANT LUBETM WALKING BELT Your treadmill features a walking belt coated with PERFORMANT LUBETM, a high-performance lubricant. IMPORTANT: Never apply silicone spray or other substances to the walking belt or the walking platform. Such substances will deteriorate the walking belt and cause excessive wear. HOW TO PLUG IN THE POWER CORD This product must be earthed. If it should malfunction or break down, earthing provides a path of least resistance for electric 1 current to reduce the risk of electric shock. This product is equipped with a cord having an equipment-earthing conductor and an earth- ing plug. Two power cords are included. Select the one that will fit your outlet. Refer to drawing 1, and plug the indicated end of the power cord into the socket on the treadmill. Next, lift the indi- cated tab on the ferrite box and clamp the ferrite box around the power cord. The ferrite box should not be allowed to slide 2 along the power cord. Please fasten the included plastic tie just behind the ferrite box and cut off the excess plastic tie. Refer to drawing 2. Plug the power cord into an appropriate outlet that is properly installed and earthed in accordance with all local codes and ordinances. Note: In Italy, an adaptor (not included) must be used between the power cord and the outlet. Important: The treadmill is not compatible with GFCI-equipped outlets. Socket on treadmill Ferrite Box Plastic Tie Tab Outlet If the power cord is damaged, it must be replaced with a manufacturer-recommended power cord. DANGER: Improper connection of the equipment-earthing conductor can result in an increased risk of electric shock. Check with a qualified electrician or serviceman if you are in doubt as to whether the product is properly earthed. Do not modify the plug provided with the product-if it will not fit the outlet, have a proper outlet installed by a qualified electrician. 16 9
-
 1
1 -
2
-
3
-
 4
4 -
 5
5 -
 6
6 -
 7
7 -
 8
8 -
 9
9 -
 10
10 -
 11
11 -
 12
12 -
 13
13 -
 14
14
 |
 |
