ProForm 10.5qm Treadmill Uk Manual - Page 7
The Information Mode/demo Mode - treadmill
 |
View all ProForm 10.5qm Treadmill manuals
Add to My Manuals
Save this manual to your list of manuals |
Page 7 highlights
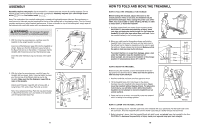
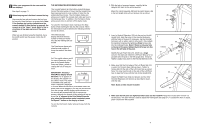
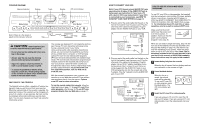
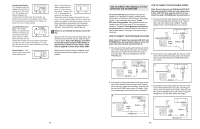
8 Follow your progress with the track and the four displays. See step 5 on page 11. 9 When the program is finished, remove the key. Step onto the foot rails and remove the key from the console. Keep the key in a secure place. Note: If the displays and various indicators on the console remain lit after the key is removed, the console is in the "demo" mode. Refer to the instructions at the right and turn off the demo mode. When you are finished using the treadmill, move the on/off switch near the power cord to the off position. THE INFORMATION MODE/DEMO MODE The console features an information mode that keeps track of the total number of hours that the treadmill has been operated and the total number of miles that the walking belt has moved. The information mode also allows you to switch the console from miles per hour to kilometres per hour. In addition, the information mode allows you to turn on and turn off the demo mode. To select the information mode, hold down the Stop button whilst inserting the key into the console. When the information mode is selected, the following information will be shown: The Distance/Laps display will show the total number of miles (or kilometres) that the walking belt has moved. The Time/Incline display will show the total number of hours the treadmill has been used. An E for english miles or an M for metric kilometres, will appear in the Speed display. Press the Speed L button to change the unit of measurement. IMPORTANT: The Cals./ Watts/Pulse display should be blank. If a "d" appears in the display, the console is in the "demo" mode. This mode is intended to be used only when a treadmill is displayed in a store. When the console is in the demo mode, the power cord can be plugged in, the key can be removed from the console, and the displays and indicators on the console will automatically light in a preset sequence, although the buttons on the console will not operate. If a "d" appears in the Cals./Watts/Pulse display when the information mode is selected, press the Speed M button so the display is blank. To exit the information mode, remove the key from the console. 18 3. With the help of a second person, carefully tip the Uprights (64) back to the vertical position. 3 Attach the Latch Assembly (32) and the Latch Spacer (46) to the left Upright (64) with two Screws (35) as shown. 46 32 64 35 4. Insert a Handrail Extension (34) into the post on the left Upright (64). Align the holes in the Handrail Extension with the holes in the post. If necessary, tap the Handrail Extension with a rubber mallet to fully insert it. Next, attach the Handrail Extension by tightening three Screws (35) into the indicated holes. Note: If there is only one hole in the top of the post, tighten the third Screw into the hole in the left side of the post. Identify the Left Foam Grip (31), which has a large cutout in the right side. Slide the Left Foam Grip as far as possible onto the post on the left Upright (64). It may be helpful to apply soapy water to the Handrail Extension (34). 4 Cutout 31 Post 35 34 35 64 5. Make sure that the front edge of the Left Foam Grip (31) is under the Console Base (38) as shown. Tighten a 5 Screw (35) into the side of the Left Foam Grip as shown. Note: You may need to pull on the side of the Left Foam Grip to align the Screw with the hole in the Upright (64). Attach the Right Foam Grip (not shown) and the other Handrail Extension (not shown) as described in step 4 and this step. Note: Extra screws may be included. 38 35 31 64 6. Make sure that all parts are tightened before you use the treadmill. Keep the included allen wrench in a secure place. The allen wrench is used to adjust the walking belt (see page 21). To protect the floor or carpet, place a mat under the treadmill. 7
-
 1
1 -
 2
2 -
 3
3 -
 4
4 -
 5
5 -
 6
6 -
 7
7 -
 8
8 -
 9
9 -
 10
10 -
 11
11 -
 12
12 -
13
-
14
 |
 |
