ProForm 290 Csr Bike English Manual - Page 9
Tip: Do not pinch the Game/Pulse Wire 58
 |
View all ProForm 290 Csr Bike manuals
Add to My Manuals
Save this manual to your list of manuals |
Page 9 highlights
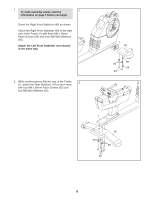
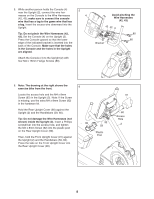
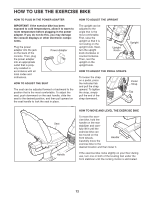
7. Identify and orient the Seat Handlebar (11) so that the controllers face upward. Make sure 7 that the hexagonal holes are in the indicated locations. Tip: Do not pinch the Game/Pulse Wire (58). Attach the Seat Handlebar (11) to the Seat Carriage (3) with two M10 x 32mm Button Bolts (78) and two M10 Locknuts (87). Do not fully tighten the Locknuts yet. Controller Avoid pinching the Game/Pulse Wire (58) 11 Hexagonal Holes Controller 58 87 3 78 8. Tip: Do not pinch the Game/Pulse Wire (58). Attach the Backrest (8) to the Seat Carriage (3) 8 with two M6 x 18mm Patch Screws (77) and two M6 x 42mm Patch Screws (51). 8 Tip: First tighten the M6 x 18mm Patch Screws (77), and then tighten the M6 x 42mm Patch Screws (51). See step 7. Tighten the M10 Locknuts (87). 51 77 3 58 9
-
 1
1 -
2
-
3
-
 4
4 -
 5
5 -
 6
6 -
 7
7 -
 8
8 -
 9
9 -
 10
10 -
 11
11 -
 12
12 -
 13
13 -
 14
14 -
15
-
16
-
17
-
18
-
19
-
20
-
21
-
22
-
23
-
24
-
25
-
26
-
27
-
28
 |
 |
