ProForm 380 P Treadmill Uk Manual
ProForm 380 P Treadmill Manual
 |
View all ProForm 380 P Treadmill manuals
Add to My Manuals
Save this manual to your list of manuals |
ProForm 380 P Treadmill manual content summary:
- ProForm 380 P Treadmill | Uk Manual - Page 1
are missing or damaged parts, please call: 08457 089 009 Or write: ICON Health & Fitness, Ltd. Unit 4 Revie Road Industrial Estate Revie Road, Beeston Leeds, LS11 8JG UK email: [email protected] CAUTION Read all precautions and instructions in this manual before using this equipment. Save this - ProForm 380 P Treadmill | Uk Manual - Page 2
6 OPERATION AND ADJUSTMENT 11 HOW TO FOLD AND MOVE THE TREADMILL 22 TROUBLESHOOTING 24 CONDITIONING GUIDELINES 26 ORDERING REPLACEMENT PARTS Back Cover Note: An EXPLODED DRAWING and a PART LIST are attached at the end of this manual. PROFORM is a registered trademark of ICON IP, Inc. 2 - ProForm 380 P Treadmill | Uk Manual - Page 3
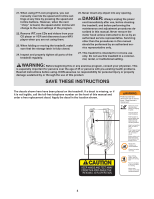
only as an exercise aid in determining heart rate trends in general. 18. Never leave the treadmill unattended whilst it is running. Always remove the key, unplug the power cord, and move the on/off switch to the "off" position when the treadmill is not in use. (See the drawing on page 5 for the - ProForm 380 P Treadmill | Uk Manual - Page 4
motor hood unless instructed to do so by an authorised service representative. Servicing other than the procedures in this manual should be performed by an authorised ser- vice representative only. 27. This treadmill is intended for in-home use only. Do not use this treadmill in a commercial - ProForm 380 P Treadmill | Uk Manual - Page 5
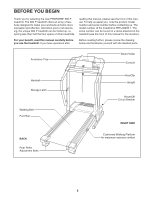
your benefit, read this manual carefully before you use the treadmill. If you have questions after Before reading further, please review the drawing below and familiarise yourself with the labelled parts. Accessory Tray Book Holder Console Handrail Storage Latch Walking Belt Foot Rail BACK Rear - ProForm 380 P Treadmill | Uk Manual - Page 6
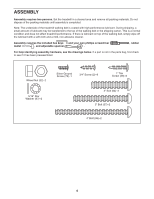
is a normal condition and does not affect treadmill performance. If there is lubricant on top of the walking belt, simply wipe off the lubricant with a soft cloth and a mild, non-abrasive cleaner. Assembly requires the included hex keys and your own phillips screwdriver mallet , and adjustable - ProForm 380 P Treadmill | Uk Manual - Page 7
) into the hole in the bottom of the Right Handrail and out of the large hole in the side. Note: It may be helpful to use needlenose pli- ers to pull the Upright Wire out of the hole. 37 Attach the upper end of the Right Handrail (72) to the right - ProForm 380 P Treadmill | Uk Manual - Page 8
4. Hold the Console Base (47) near the Left Handrail (71). 4 Attach the ends of the ground wires on the Console Base to the indicated small hole in the Left Handrail with the Silver Ground Screw (75). Ground Wires 47 Small Hole 75 71 5. Touch the Right Handrail (72) to discharge any static. - ProForm 380 P Treadmill | Uk Manual - Page 9
the Screws. 69 29 44 2 9. Make sure that all parts are properly tightened before you use the treadmill. Note: Extra hardware may be included. Keep the included hex keys in a secure place; the large hex key is used to adjust the walking belt (see page 25). To protect the floor or carpet, place - ProForm 380 P Treadmill | Uk Manual - Page 10
NOTES 10 - ProForm 380 P Treadmill | Uk Manual - Page 11
BELT Your treadmill features a walking belt coated with high-performance lubricant. IMPORTANT: Never apply silicone spray or other substances to the walking belt or the walking platform. Such substances will deteriorate the walking belt screw has been tightened before using the power cord. See - ProForm 380 P Treadmill | Uk Manual - Page 12
the treadmill. The first treadmill as it guides you through an effective workout. time the treadmill is used, observe the alignment of the The console also features iFIT interactive technology. Having iFIT technology is like having a personal trainer walking belt, and center the walking belt if - ProForm 380 P Treadmill | Uk Manual - Page 13
belt to slow to a stop. Test the clip by carefully taking a few steps backward until the key is pulled from the console. If the key is not pulled from the console, adjust the position of the clip as needed. HOW TO USE THE MANUAL MODE 1 Insert the key level of the treadmill. Distance/Laps display - ProForm 380 P Treadmill | Uk Manual - Page 14
hours that the treadmill has been used, and the Distance/Laps display will show the total number of miles or kilometers that the walking belt has moved. at any time, remove the key and then reinsert it. 6 Measure your heart rate if desired. Before using the handgrip pulse sensor, remove - ProForm 380 P Treadmill | Uk Manual - Page 15
HOW TO USE A PRESET PROGRAM 1 Insert the key into the console. See HOW TO second segment will then be shown in the flashing Current Segment column, and the treadmill will automatically adjust to the speed and incline settings for the second segment. Note The walking belt will then slow to a stop. 15 - ProForm 380 P Treadmill | Uk Manual - Page 16
time during the program, you can manually override the setting by pressing the Speed the next segment of the program begins, the treadmill will automatically adjust to the speed and incline rate if desired. See step 6 on page 14. 6 When you are finished exercising, remove the key. See step 7 - ProForm 380 P Treadmill | Uk Manual - Page 17
, or computer. See pages 17 to 19 for connecting instructions. To use iFIT.com programs directly from our Web site, the treadmill must be connected to your computer. See page 18 for connecting instructions. To use iFIT.com video programs, the treadmill must be connected to your VCR. See page 19 for - ProForm 380 P Treadmill | Uk Manual - Page 18
CONNECT YOUR HOME STEREO HOW TO CONNECT YOUR COMPUTER Note: If your stereo has an unused LINE OUT jack, see instruction A below. If the LINE OUT jack is being used, see instruction B. A. Plug one end of a long 3.5 mm to RCA stereo audio cable (available at electronics stores) into the input jack - ProForm 380 P Treadmill | Uk Manual - Page 19
button is pressed, your personal trainer will begin guiding you through your workout. Simply follow your personal trainer's instructions. Note: If the Time/Incline display is flashing, press the Start button or the Speed increase button on the console. The treadmill will not respond to an MP3, CD - ProForm 380 P Treadmill | Uk Manual - Page 20
can manually override the belt will stop. Note: To use another MP3, CD, or video program, press the Stop button or remove the key and go to step 1 on page 18. Note: If the speed and/or incline of the treadmill rate if desired. See step 6 on page 14. 6 When you are finished exercising, remove the key - ProForm 380 P Treadmill | Uk Manual - Page 21
service provider. A list of specific system requirements is found on our Web site. Follow the steps below to use a program from our Web site. 1 Insert the key belt will stop. Note: To use another program, press the Stop button and go to step 5. Note: If the speed and/or incline of the treadmill does - ProForm 380 P Treadmill | Uk Manual - Page 22
rather than your back. Raise the frame about halfway to the vertical position. 2. Move your right hand to the position shown and hold the treadmill firmly. Using your left thumb, press the storage latch to the left. Raise the frame until the storage latch closes over the catch. Make sure that the - ProForm 380 P Treadmill | Uk Manual - Page 23
HOW TO LOWER THE TREADMILL FOR USE 1. Hold the upper end of the treadmill with your right hand. Press the storage latch to the left. Pivot the frame down until the frame and foot rail are past the storage - ProForm 380 P Treadmill | Uk Manual - Page 24
TROUBLESHOOTING Most treadmill problems can be solved by following the steps below. Find the symptom that applies, and follow the steps listed. If further assistance is needed, see the front of this manual. PROBLEM: The power does not turn on SOLUTION: a. Make sure that the power cord is plugged - ProForm 380 P Treadmill | Uk Manual - Page 25
in the power cord, insert the key, and run the treadmill for a few minutes. Repeat until the walking belt is properly tightened. b 2"-3" Rear Roller Bolts c. If the walking belt still slows when walked on, see the front of this manual. PROBLEM: The walking belt is off-centre or slips when walked - ProForm 380 P Treadmill | Uk Manual - Page 26
. For aerobic exercise, adjust the speed and incline of the treadmill until your heart rate is near the highest number in your training zone. WORKOUT GUIDELINES Each workout should include the following three parts: A Warm-up-Start each workout with 5 to 10 minutes of stretching and light exercise - ProForm 380 P Treadmill | Uk Manual - Page 27
SUGGESTED STRETCHES The correct form for several basic stretches is shown at the right. Move slowly as you stretch-never bounce. 1. Toe Touch Stretch Stand with your knees bent slightly and slowly bend forward from 1 your hips. Allow your back and shoulders to relax as you reach down toward - ProForm 380 P Treadmill | Uk Manual - Page 28
Guide Belt Guide Screw Optic Disk Rear Roller Frame Walking Platform iFIT Wire Cable Tie Clamp Pulse Plate, Right Sensor Clip Rear Roller Adjustable Bolt Right Rear Endcap Hex Key Left Rear Endcap Walking Belt Yellow Wire, F/R 4" Green/Yellow Wire, F/R User's Manual #These parts are not illustrated. - ProForm 380 P Treadmill | Uk Manual - Page 29
EXPLODED DRAWING-Model No. PETL38905.1 EXPLODED DRAWING-Model No. PETL38905.1 R1205A 11 26 95 104 38 92 58 94 22 1 16 49 49 30 49 15 49 101 82 83 24 49 96 93 31 38 92 104 58 15 85 31 22 22 10 106 74 12 49 13 45 14 15 24 49 16 49 24 86 26 25 89 43 4 3 5 7 6 5 4 55 20 33 78 - ProForm 380 P Treadmill | Uk Manual - Page 30
(PETL38905.1) • the NAME of the product (PROFORM 380 P treadmill) • the SERIAL NUMBER of the product (see the front of this manual) • the KEY NUMBER AND DESCRIPTION OF THE PART(S) (see the PART LIST and the EXPLODED DRAWING in the centre of this manual) Part No. 231230 R1006A Printed in Canada
-
 1
1 -
 2
2 -
 3
3 -
 4
4 -
 5
5 -
 6
6 -
 7
7 -
8
-
9
-
10
-
11
-
12
-
13
-
14
-
15
-
16
-
17
-
18
-
19
-
20
-
21
-
22
-
23
-
24
-
25
-
26
-
27
-
28
-
29
-
30
 |
 |

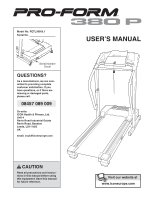
Model No. PETL38905.1
Serial No.
CAUTION
Read all precautions and instruc-
tions in this manual before using
this equipment. Save this manual
for future reference.
Serial Number
Decal
USER’S MANUAL
www.iconeurope.com
Visit our website at
QUESTIONS?
As a manufacturer, we are com-
mitted to providing complete
customer satisfaction. If you
have questions, or if there are
missing or damaged parts,
please call:
Or write:
ICON Health & Fitness, Ltd.
Unit 4
Revie Road Industrial Estate
Revie Road, Beeston
Leeds, LS11 8JG
UK
email: [email protected]
08457 089 009