ProForm 380 P Treadmill Uk Manual - Page 6
Assembly
 |
View all ProForm 380 P Treadmill manuals
Add to My Manuals
Save this manual to your list of manuals |
Page 6 highlights
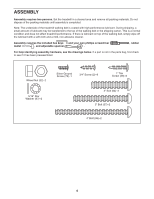
3/4" Tek Screw (58)-8 1/2" Screw (119)-1 ASSEMBLY 1/2" Screw (48)-6 Assembly requires two persons. Set the treadmill in a cleared area and remove all packing materials. Do not dispose of the packing materials until assembly is completed. Note: The underside of the treadmill walking belt is coated with high-performance lubricant. During shipping, a small amount of lubricant may be transferred to the top of the walking belt or the shipping carton. This is a normal condition and does not affect treadmill performance. If there is lubricant on top of the walking belt, simply wipe off the lubricant with a soft cloth and a mild, non-abrasive cleaner. Assembly requires the included hex keys and your own phillips screwdriver mallet , and adjustable spanner . , rubber For help identifying assembly hardware, see the drawings below. If a part is not in the parts bag, first check to see if it has been preassembled. Wheel Nut (32)-2 5/16" Star Washer (97)-2 Silver Ground Screw (75)-1 3/4" Screw (2)-9 1" Tek Screw (39)-6 2" Bolt (64)-2 3" Bolt (37)-2 4" Bolt (98)-2 6
-
 1
1 -
 2
2 -
 3
3 -
 4
4 -
 5
5 -
 6
6 -
 7
7 -
 8
8 -
 9
9 -
 10
10 -
 11
11 -
 12
12 -
13
-
14
-
15
-
16
-
17
-
18
-
19
-
20
-
21
-
22
-
23
-
24
-
25
-
26
-
27
-
28
-
29
-
30
 |
 |
