ProForm Ergo Strider 3.0 Elliptical English Manual - Page 10
Arm 9 and the right Upper Body Leg 6.
 |
View all ProForm Ergo Strider 3.0 Elliptical manuals
Add to My Manuals
Save this manual to your list of manuals |
Page 10 highlights
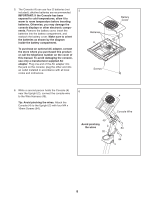
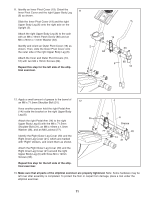
9. Identify the Left Upper Body Arm (8), which is marked with a "Left" sticker. Orient the Left Upper Body Arm and the left Upper Body Leg (6) as shown; make sure that the hexagonal holes are in the indicated location. Slide the Left Upper Body Arm (8) onto the left Upper Body Leg (6). Attach the Left Upper Body Arm with two M6 x 36mm Button Bolts (76) and two M6 Locknuts (77); make sure that the Locknuts are inside the hexagonal holes. Repeat this step for the Right Upper Body Arm (9) and the right Upper Body Leg (6). 9 8 76 77 Hexagonal Holes 76 9 77 6 6 10. Apply a generous amount of the included grease to the axles on the Upright (2). Then, apply a small amount of grease to two Wave Washers (88). Slide a Wave Washer (88) onto each axle. 10 88 Grease 2 Axle 88 Grease 10
-
 1
1 -
2
-
3
-
4
-
 5
5 -
 6
6 -
 7
7 -
 8
8 -
 9
9 -
 10
10 -
 11
11 -
 12
12 -
 13
13 -
 14
14 -
 15
15 -
16
-
17
-
18
-
19
-
20
-
21
-
22
-
23
-
24
 |
 |
