ProForm Ers 10.0 Pt English Manual - Page 7
ProForm Ers 10.0 Pt Manual
 |
View all ProForm Ers 10.0 Pt manuals
Add to My Manuals
Save this manual to your list of manuals |
Page 7 highlights
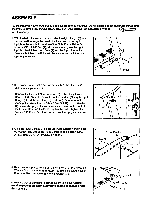
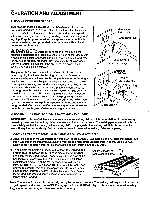
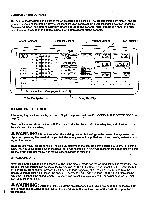
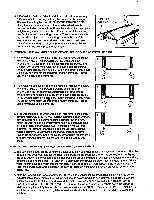
Press the SPEED increase button until the walking belt begins to move at slow speed. When the walking belt begins to move, hold the handrails and step carefully onto the walking belt. Change the speed of the walking belt as desired by pressing the SPEED buttons. To stop the walking belt, hold down the SPEED decrease button. The walking belt can be stopped quickly, if desired, by pressing the STOP bar. To vary the intensity of your exercise, the incline of the treadmill can be changed by pressing the INCLINE buttons. Each time the INCLINE increase button is pressed, the incline will increase by 0.5%. Each time the INCLINE decrease button is pressed, the incline will decrease by 0.5%. The INCLINE buttons can be held down to change the incline rapidly. The incline can be set at a minimum of 1%, up to a maximum of 12%. Note: After the INCLINE buttons are pressed, it will take a few seconds for the treadmill to reach the selected incline. PROGRAM OPERATION In the program mode, the console will automatically control either the speed or the incline of the treadmill. The console offers a selection of preset programs, each designed to guide you through a different type of workout. In addition, you can create custom programs, and save them in memory for future workouts. CREATING A CUSTOM PROGRAM Press the CUSTOM 1 or CUSTOM 2 button. The indicator on the button you press will light. Next, press the MODE button to select the WALK, RUN or INCLINE mode. An indicator will light to show which mode you have selected. If you select the WALK mode, the speed range of the treadmill will be 1.0 mile per hour to 3.6 miles per hour during the program. If you select the RUN mode, the speed range of the treadmill will be 3.0 miles per hour to 9.5 miles per hour during the program. If you select the INCLINE mode, the incline range of the treadmill will be 1% to 12% during the program. All programs are divided into twenty equal time periods, called segments. If the WALK or RUN mode was selected, a spcsed-tetting should now be programmed for each of the twenty segments: If the INCLINE mode was selected, an incline setting should now be programmed for each of the twenty segments. The segments are displayed in the vertical columns of indicators on the left side of the console. Seven segments are displayed at a time-the first segment is displayed in the CURRENT SEGMENT column, and the next six segments are displayed in the columns to the right of the CURRENT SEGMENT column. (See the paragraph below for an explanation of the column to the left of the CURRENT SEGMENT column.) To program a setting for the first segment, displayed in the CURRENT SEGMENT column, press the SEGMENT increase or decrease button. Each time the SEGMENT increase button is pressed, an additional indicator will light. Each time the SEGMENT decrease button is pressed, an additional indicator will darken. The M.P.H. scales or the PERCENT OF GRADE scale will show the setting you have programmed. After you have programmed a setting for the first segment, press the SEGMENT left button. All segments will move one column to the left-the first segment will disappear, the second segment will be displayed in the CURRENT SEGMENT column, and the next six segments will be displayed in the columns to the right of the CURRENT SEGMENT column. Program a setting for the second segment as described above. Repeat until you have programmed a setting for each of the twenty segments. The lighted indicators in the column to the left of the CURRENT SEGMENT column show the range of settings you have programmed-the lower indicator shows the lowest setting, and the upper indicator shows the highest setting. If desired, the difficulty level of the program can be increased or decreased by pressing the FITNESS LEVEL buttons. If the WALK mode was selected, the speed settings of all segments will change by 0.2 miles per hour each time one of the buttons is pressed. If the RUN mode was selected, the speed settings of all segments will change by 0.5 miles per hour each time one of the buttons is pressed. If the INCLINE mode was selected, the incline settings of all segments will change by 1% each time one of the buttons is pressed. Note: The difficulty level of the program can be increased or decreased only until the upper or lower indicator reaches the top or bot- tom of the column. Next, set the length of time you want the program to last by pressing the TIME buttons. The length of time will be displayed in the TIME display. Each time one of the buttons is pressed, the length of time will change by twenty seconds. The buttons can be held down to change the length of time rapidly. The program can be set to last for a minimum of 5 minutes, up to a maximum of 80 minutes. (The length of time each segment will last will be dis- played in the SEGMENT TIMER display. Each segment will last for 1/20 of the length of time shown in the TIME display.) 7
-
 1
1 -
 2
2 -
 3
3 -
 4
4 -
 5
5 -
 6
6 -
 7
7 -
 8
8 -
 9
9 -
 10
10 -
 11
11 -
 12
12 -
13
-
14
-
15
-
16
 |
 |
