ProForm Ers 10.0 Pt English Manual - Page 8
ProForm Ers 10.0 Pt Manual
 |
View all ProForm Ers 10.0 Pt manuals
Add to My Manuals
Save this manual to your list of manuals |
Page 8 highlights
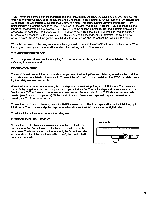
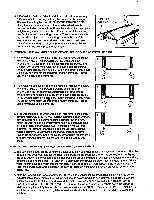
To start the program, press the PROGRAM START button. The first segment will be displayed in the CURRENT SEGMENT column, and the treadmill will automatically adjust to the first speed or incline setting. Hold the handrails, step carefully onto the walking belt and begin exercising. The time remaining in the first segment will be shown in the SEGMENT TIMER display. When no time remains, all segments will move one column to the left-the first segment will disappear, the second segment will be displayed in the CURRENT SEGMENT column, and the treadmill will automatically adjust to the second setting. The program will continue in this manner until all twenty segments have been displayed. A tone will then sound, the walking belt will slow to a stop and the program will be completed. (If the WALK or RUN mode was selected, the incline can be controlled during the program by pressing the INCLINE buttons. If the INCLINE mode was selected, the walking belt will begin to move at 1.0 mile per hour when the program is started. The speed of the walking belt can be controlled during the program by pressing the SPEED buttons.) While the program is running, the setting of the current segment can be changed, if desired, by pressing the SEGMENT increase and decrease buttons. If desired, the difficulty level of the entire program can be changed by pressing the FITNESS LEVEL buttons. The length of time the program will last can be changed by pressing the TIME buttons. To stop the program before the program has ended, press the STOP bar. The console will then be in the same state as if the program had been completed. When the program is completed, a different program can be selected or the console can be switched to the manual mode by pressing the MANUAL CONTROL button. The current settings of the program will be saved in memory. The settings will be saved in memory even when the power cord is unplugged. SELECTING A PRESET PROGRAM Press one of the eight PROGRAM buttons. The indicator on the button you press will light. Next, press the MODE button to select the WALK, RUN or INCLINE mode. An indicator will light to show which mode you have selected. The speed or incline settings of the selected program will be displayed in the vertical columns of indicators on the left side of the console. Seven segments are displayed at a time. If desired, the setting of any segment can be changed. Press the SEGMENT left or right button until the segment you want to change is displayed in the CURRENT SEGMENT column. Press the SEGMENT increase or decrease buttons to change the setting of the segment. If desired, the difficulty level of the program can be increased or decreased by pressing the FITNESS LEVEL buttons. This is done in the same manner as for a custom program. Next, set the length of time you want the program to last by pressing the TIME buttons. This is done in the same manner as for a custom program. To start the program, press the PROGRAM START button. The program will run in exactly the same manner as a custom program. When the program is completed, a different program can be selected or the console can be switched to the manual mode by pressing the MANUAL CONTROL button. Although the settings of a preset program can be changed, only the original program settings will be saved in memory. OPERATING THE MONITOR MODES PULSE: To use the pulse mode of the console, the pulse earclip must be plugged into the pulse jack. Attach the earclip to your left ear lobe and slide the metal clothes clip onto your collar. When your pulse is detected, the PULSE indicator will flash with each heartbeat. After a few seconds, your pulse will be shown in the PULSE display. If your pulse is not shown, rub your ear lobe and reposition the earclip. It may be helpful to stand still while measuring your pulse. DISTANCE: The DISTANCE display will show the total distance you have walked or run, in miles. CALORIE: For an accurate measurement of your Calorie expenditure, your weight should be entered into the console. To enter your weight, press the WEIGHT SET buttons. Each time one of the buttons is pressed, the weight displayed will increase or decrease by 1 pound. The buttons can be held down to enter your weight 8 quickly.
-
 1
1 -
2
-
 3
3 -
 4
4 -
 5
5 -
 6
6 -
 7
7 -
 8
8 -
 9
9 -
 10
10 -
 11
11 -
 12
12 -
 13
13 -
14
-
15
-
16
 |
 |