ProForm Fusion 3.0 Xt Bench Uk Manual - Page 7
Nylon Locknut; the Locking Pin must pivot - press
 |
View all ProForm Fusion 3.0 Xt Bench manuals
Add to My Manuals
Save this manual to your list of manuals |
Page 7 highlights
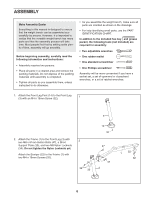
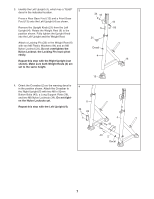
3. Identify the Left Upright (4), which has a "G580" 3 decal in the indicated location. Press a Rear Base Foot (15) and a Front Base Foot (13) onto the Left Upright (4) as shown. Remove the Upright Knob (21) from the Left Upright (4). Rotate the Weight Rest (6) to the position shown. Fully tighten the Upright Knob into the Left Upright and the Weight Rest. Attach a Locking Pin (26) to the Weight Rest (6) with two M8 Plastic Washers (44) and an M8 Nylon Locknut (34). Do not overtighten the Nylon Locknut; the Locking Pin must pivot easily. Repeat this step with the Right Upright (not shown). Make sure both Weight Rests (6) are set to the same height. 34 44 6 21 Decal 4 44 26 15 13 4. Orient the Crossbar (2) so the warning decal is in the position shown. Attach the Crossbar to the Right Upright (5) with two M8 x 92mm Button Bolts (43), a Long Support Plate (29), and two M8 Nylon Locknuts (34). Do not tighten the Nylon Locknuts yet. Repeat this step with the Left Upright (4). 4 5 34 29 4 43 43 2 Decal 7
-
 1
1 -
 2
2 -
 3
3 -
 4
4 -
 5
5 -
 6
6 -
 7
7 -
 8
8 -
 9
9 -
 10
10 -
 11
11 -
 12
12 -
13
-
14
-
15
-
16
 |
 |
