ProForm Power 575i Instruction Manual - Page 9
Make sure not to pinch the Upright
 |
View all ProForm Power 575i manuals
Add to My Manuals
Save this manual to your list of manuals |
Page 9 highlights
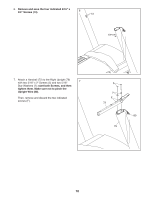
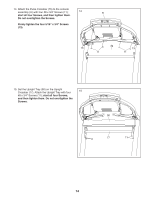
4. Set the Right Upright (79) on the Base (88) as shown. Make sure not to pinch the Upright 4 Wire (80). Then, slide the Right Upright so that the 3/8" x 2 3/8" Screw (2) in the Base is inserted into the slot (E) in the Right Upright. Do not tighten the Screw yet. 5. Attach the Right Upright (79) to the Base (88) with a 3/8" x 2 3/8" Screw (2), a 3/8" x 1 1/4" 5 Screw (3), a 3/8" x 1 1/2" Screw (4), and three 3/8" Star Washers (6) as shown; do not fully tighten the Screws yet. Attach the Left Upright (not shown) as instructed in steps 4 and 5. Note: There are no wires on the left side. 80 2 E 79 88 2 6 88 6 3 79 4 6 9
-
 1
1 -
2
-
3
-
 4
4 -
 5
5 -
 6
6 -
 7
7 -
 8
8 -
 9
9 -
 10
10 -
 11
11 -
 12
12 -
 13
13 -
 14
14 -
15
-
16
-
17
-
18
-
19
-
20
-
21
-
22
-
23
-
24
-
25
-
26
-
27
-
28
-
29
-
30
-
31
-
32
-
33
-
34
-
35
-
36
-
37
-
38
-
39
-
40
 |
 |

9
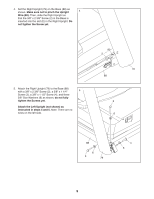
5.
Attach the Right Upright (79) to the Base (88)
with a 3/8" x 2 3/8" Screw (2), a 3/8" x 1 1/4"
Screw (3), a 3/8" x 1 1/2" Screw (4), and three
3/8" Star Washers (6) as shown;
do not fully
tighten the Screws yet.
Attach the Left Upright (not shown) as
instructed in steps 4 and 5.
Note: There are no
wires on the left side.
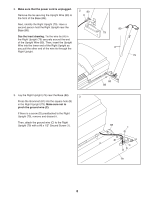
4.
Set the Right Upright (79) on the Base (88) as
shown.
Make sure not to pinch the Upright
Wire (80).
Then, slide the Right Upright so
that the 3/8" x 2 3/8" Screw (2) in the Base is
inserted into the slot (E) in the Right Upright.
Do
not tighten the Screw yet.
5
4
3
4
88
6
88
6
79
79
E
2
6
2
80