ProForm Xp400r Bike Canadian English Manual
ProForm Xp400r Bike Manual
 |
View all ProForm Xp400r Bike manuals
Add to My Manuals
Save this manual to your list of manuals |
ProForm Xp400r Bike manual content summary:
- ProForm Xp400r Bike | Canadian English Manual - Page 1
or missing, PLEASE CONTACT OUR CUSTOMER SERVICE DEPARTMENT DIRECTLY. CALL TOLL-FREE: 1-888-936-4266 Mon.-Fri., 8:00 until 17:00 ET (excluding holidays) OR E-MAIL US: [email protected] CAUTION Read all precautions and instructions in this manual before using this equipment. Keep this - ProForm Xp400r Bike | Canadian English Manual - Page 2
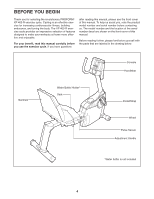
ASSEMBLY 5 HOW TO USE THE EXERCISE CYCLE 13 MAINTENANCE AND TROUBLESHOOTING 19 EXERCISE GUIDELINES 20 PART LIST 21 cover of this manual and request a free replacement decal. Apply the decal in the location shown. Note: The decal(s) may not be shown at actual size. PROFORM is a registered - ProForm Xp400r Bike | Canadian English Manual - Page 3
instructions in this manual and all warnings on your exercise cycle before using your exercise problems. 2. Use the exercise cycle only as described in this manual. 7. Keep children under the age of 12 and pets away from the exercise cycle at all times. 8. Wear appropriate clothes while exercising - ProForm Xp400r Bike | Canadian English Manual - Page 4
make your workouts at home more effective and enjoyable. For your benefit, read this manual carefully before you use the exercise cycle. If you have questions after reading this manual, please see the front cover of this manual. To help us assist you, note the product model number and serial number - ProForm Xp400r Bike | Canadian English Manual - Page 5
Assembly requires two persons. Place all parts of the exercise cycle in a cleared area and remove the packing materials drawing is the key number of the part, from the PART LIST near the end of this manual. The number following the parentheses is the quantity needed for assembly. Note: If a part is - ProForm Xp400r Bike | Canadian English Manual - Page 6
1. To make assembly easier, read the 1 information on page 5 before you begin. With the help of another person, lift the Frame (1) and place a packing insert (not shown) under the Frame. Have the other person hold the Frame to prevent it from moving from side to side until you complete this step. - ProForm Xp400r Bike | Canadian English Manual - Page 7
3. Identify the Right and Left Stabilizer Covers (12, 13), which are marked with "R" and "L" stickers. 3 Attach each Stabilizer Cover (12, 13) to the Rear Stabilizer (2) with two M4 x 16mm Screws (62). 62 13 62 2 4. Identify the Top Shield (14) and the Upright (4). 4 With the help of another - ProForm Xp400r Bike | Canadian English Manual - Page 8
5. Tip: Avoid pinching the Wire Harness (40) during this step. Have another person hold the Upright (4) and the Top Shield (14) near the Frame (1). Locate the wire tie in the Upright and the Wire Harness (40) in the Frame. See the inset drawing. Tie the wire tie to one of the connectors on the Wire - ProForm Xp400r Bike | Canadian English Manual - Page 9
compartments. To purchase an optional AC adapter, contact the store where you purchased this product or call the telephone number on the cover of this manual. To avoid damaging the console, use only a manufacturer-supplied AC adapter. Plug one end of the AC adapter into the jack on the console; plug - ProForm Xp400r Bike | Canadian English Manual - Page 10
9. Tip: Avoid pinching the Pulse Wire (38) during this step. 9 Orient the Pulse Bar (7) as shown. Attach the Pulse Bar to the Seat Carriage (6) with two M10 7 x 36mm Screws (57) and two M10 Locknuts (58). Do not tighten the Screws yet. Avoid pinching the Pulse Wire (38) 38 58 6 57 57 10. - ProForm Xp400r Bike | Canadian English Manual - Page 11
11. Orient the Seat (9) as shown. Attach the Seat to 11 the Seat Carriage (6) with four 1/4" x 38mm Patch Screws (61) and four M6 Washers (63). Note: The Patch Screws and the Washers may be preattached to the underside of the 9 Seat. 6 12. Attach the Pulse Bar Cover (15) to the Seat 12 - ProForm Xp400r Bike | Canadian English Manual - Page 12
Tighten the Left Pedal (not shown) counterclockwise into the left side of the Crank. IMPORTANT: Tighten both Pedals as firmly as possible. After using the exercise cycle for one week, retighten the Pedals. Adjust the strap on the Right Pedal (44) to the desired position, and press the ends of - ProForm Xp400r Bike | Canadian English Manual - Page 13
ends of the straps onto the tabs. Pedal Strap Tab HOW TO MOVE THE EXERCISE CYCLE To move the exercise cycle, lift the rear stabilizer until the exercise cycle can be moved on the front wheels. Carefully move the exercise cycle to the desired location and then lower it to the floor. HOW TO - ProForm Xp400r Bike | Canadian English Manual - Page 14
manual mode of the console, you can change the resistance of the pedals with a touch of the dial. As you exercise, the console will provide continuous exercise workout. iFit workouts control the resistance of the pedals while guiding you through your workouts. iFit cards are available separately. To - ProForm Xp400r Bike | Canadian English Manual - Page 15
the manual mode. Each time you turn on the console, the manual mode will be selected. If you have selected a workout, reselect the manual mode by hold the contacts for at least 15 seconds. 6. When you are finished exercising, the console will turn off automatically. If the pedals do not move for - ProForm Xp400r Bike | Canadian English Manual - Page 16
. Note: If you continue to pedal after the workout is completed, the display will continue to show exercise feedback; however, the display will not show the elapsed time until you select the manual mode or a new workout. During the workout, the workout profile will show your progress. The flashing - ProForm Xp400r Bike | Canadian English Manual - Page 17
. Note: If you continue to pedal after the workout is completed, the display will continue to show exercise feedback; however, the display will not show the elapsed time until you select the manual mode or a new workout. Each workout is divided into 30 one-minute segments. One resistance level and - ProForm Xp400r Bike | Canadian English Manual - Page 18
MODE The console features an information mode that allows you to select a unit of measurement for the console and to view usage information for the exercise cycle. To select the information mode, press and hold down the Workout button for a few seconds. The display will show the selected unit of - ProForm Xp400r Bike | Canadian English Manual - Page 19
and keep the console out of direct sunlight. CONSOLE TROUBLESHOOTING If the console display becomes dim, the batteries should be replaced; most console problems are the result of low batteries. See assembly step 7 on page 9 for replacement instructions. If the handgrip pulse sensor does not function - ProForm Xp400r Bike | Canadian English Manual - Page 20
cardiovascular system, exercising at the proper intensity is the key to achieving results. You can use your heart rate as a guide to find Stretching increases the flexibility of your muscles and helps to prevent post-exercise problems. To find the proper intensity level, find your age at the bottom - ProForm Xp400r Bike | Canadian English Manual - Page 21
M10 x 90mm Button Screw 1/4" x 14mm Screw M8 Washer M6 Split Washer M4 x 22mm Screw Assembly Tool 15 1/2" Zip Tie 8" Zip Tie Panel Fastener Grommet Userʼs Manual Note: Specifications are subject to change without notice. For information about ordering replacement parts, see the back cover of this - ProForm Xp400r Bike | Canadian English Manual - Page 22
22 37 36 35 7 63 63 53 61 58 57 62 57 64 72 64 63 58 6 59 60 59 60 9 37 36 35 53 31 8 29 40 38 25 26 72 63 64 32 34 64 63 33 72 34 63 64 64 72 27 63 72 63 72 70 15 30 55 56 5 39 62 54 4 30 55 54 56 54 28 54 14 R1009A EXPLODED DRAWING A-Model No. 30480.0 - ProForm Xp400r Bike | Canadian English Manual - Page 23
23 62 13 62 42 45 62 62 2 45 73 62 58 65 11 16 51 52 43 62 46 41 21 62 22 49 20 66 24 62 23 21 50 50 43 62 68 71 67 1 19 69 18 62 12 62 42 3 48 47 41 46 44 17 10 44 62 62 62 R1009A EXPLODED DRAWING B-Model No. 30480.0 - ProForm Xp400r Bike | Canadian English Manual - Page 24
(s) (see the PART LIST and the EXPLODED DRAWING near the end of this manual) LIMITED WARRANTY ICON of Canada, Inc. (ICON) warrants this product to be free from defects in workmanship and material, under normal use and service conditions. The frame is warranted for seven (7) years from the date of
-
 1
1 -
 2
2 -
 3
3 -
 4
4 -
 5
5 -
 6
6 -
 7
7 -
8
-
9
-
10
-
11
-
12
-
13
-
14
-
15
-
16
-
17
-
18
-
19
-
20
-
21
-
22
-
23
-
24
 |
 |
CAUTION
Read all precautions and instruc-
tions in this manual before using
this equipment. Keep this manual
for future reference.
Serial Number
Decal
Model No. 30480.0
Serial No.
Write the serial number in the
space above for reference.
QUESTIONS?
If you have questions, or if parts
are damaged or missing,
PLEASE
CONTACT OUR CUSTOMER
SERVICE DEPARTMENT
DIRECTLY.
CALL TOLL-FREE:
1-888-936-4266
Mon.–Fri., 8:00 until 17:00 ET
(excluding holidays)
OR E-MAIL US:
www.proform.com
USERʼS MANUAL