Pyle PLD43MU PLD43MU Manual 1 - Page 15
APS, DISPLAY FUNCTIONS using the SELECT knob, MU MUTE BUTTON, ANGLE Screen position, CH 1-6, BUTTON
 |
View all Pyle PLD43MU manuals
Add to My Manuals
Save this manual to your list of manuals |
Page 15 highlights
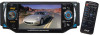
Control Panel 7. APS, DISPLAY FUNCTIONS (using the SELECT knob) Scan Function In Radio mode, swing the SEL knob briefly in the APS/DISP direction , the radio briefly plays all the preset stations of the frequency band . Automatic Preset Setup In Radio mode, swing the SEL knob in direction of the APS/DISP for approximately 2 seconds to active automatic station storage. The radio searches within the current frequency band, e.g. Fm1, for the stronger signal level until the search cycle has finished . The six strongest stations are then allocated to the corresponding storage locations . Then the station of the first storage location is set . Display ON/OFF Function: In Disc mode, swing the SEL knob briefly in the direction of APS/DISP to turn off the display image (the monitor on the unit only) , the sound will stay on. (Swing it again to resume the playback picture mode.) You can press SEL knob briefly to select the "BG COLOR" by repeatedly pressing the SEL knob, then rotate the VOL+/- to select the background color among of the "AUTO, BG COLOR: 01........BG COLOR: 11", in " AUTO" mode, the monitor of unit will change the background color automatically. 8. MU (MUTE) BUTTON Press this button briefly to turn off the audio. Press again to restore the volume to prior level. You can also disable the MUTE function by turning the VOL +/- knob. 9. ANGLE (Screen position) This button allows you to change the angle of the screen module in four steps. Press this button repeatedly to cycle through the different positions. 10. /CH 1-6 (RADIO PRESET)BUTTON a). In Disc Playback Mode Press this button to pause playback, press it again to resume playback. b). In Radio Mode Press this button repeatedly to preset station. With this system a total of 30 stations can be stored in the memory . The operation as below: - store in memory press and hold the desired memory location for several seconds, the current listening station will be stored into the number location. - retrieve a preset station press it button repeatedly to retrieve a station which had been stored in the memory in advance the chosen number is shown on display. 11. / BUTTONS (TUNE, SEEK, TRACK, SKIP UP/DOWN) a) In DISC, USB mode: if you wish to jump forwards or backwards press the SEL button (4) briefly in the or direction. (Note: in DVD mode, press the SEL button continually twice in direction to skip back one track during playback.) To wind through the tracks keep the SEL button pressed in the or direction for about 2 seconds. FF X2 appears in the display. Operating the SEL button again, 14
-
 1
1 -
2
-
3
-
4
-
5
-
6
-
7
-
8
-
9
-
 10
10 -
 11
11 -
 12
12 -
 13
13 -
 14
14 -
 15
15 -
 16
16 -
 17
17 -
 18
18 -
 19
19 -
 20
20 -
21
-
22
-
23
-
24
-
25
-
26
-
27
-
28
-
29
-
30
-
31
-
32
-
33
-
34
-
35
 |
 |
