Ridgid WD1851 Owners Manual
Ridgid WD1851 Manual
 |
View all Ridgid WD1851 manuals
Add to My Manuals
Save this manual to your list of manuals |
Ridgid WD1851 manual content summary:
- Ridgid WD1851 | Owners Manual - Page 1
SP6733-2 Ridgid WD1851 ES 2/3/12 2:04 PM Page 1 OWNER'S MANUAL 16 U.S. GALLON/60 LITER PROFESSIONAL WET/DRY VAC WD18510 WD1851EX0 FOR QUESTIONS OR INFORMATION CONTACT US AT 1-800-4-RIDGID (1-800-474-3443) from the US and Canada 01-800-701-9811 from Mexico www.ridgidvacs.com ! WARNING: To reduce - Ridgid WD1851 | Owners Manual - Page 2
Vac 11 Blowing Feature 12 Accessory and Hose Storage 13 Cord Wrap 13 Maintenance 13 Filter 13 Cleaning and Disinfecting the Wet/Dry Vac . . . . 14 Cord Maintenance 14 Storage 14 Casters & Wheels 14 Frame & Handles 14 Repair Parts 16 Warranty 20 IMPORTANT SAFETY INSTRUCTIONS - Ridgid WD1851 | Owners Manual - Page 3
, eliminating the need for a separate grounding system. Use only identical replacement parts. Read the instructions for Servicing Double-Insulated Wet/Dry Vacs. • Do not put any object into ventilation openings. Do not vacuum with any ventilation openings blocked; keep free of dust, lint, hair - Ridgid WD1851 | Owners Manual - Page 4
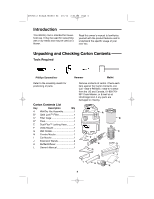
SP6733-2 Ridgid WD1851 ES 2/3/12 2:04 PM Page 4 Introduction This Wet/Dry Vac is intended for household use. It may be used for vacuuming wet or dry media and may be used as a blower. Read this owner's manual to familiarize yourself with the product features and to understand the specific usage of - Ridgid WD1851 | Owners Manual - Page 5
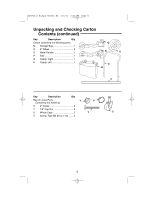
SP6733-2 Ridgid WD1851 ES 2/3/12 2:04 PM Page 5 Unpacking and Checking Carton Contents (continued) Key Description Qty Carton containing the following parts: M Storage Bag 1 N 8" Wheel 2 O Metal Handle 1 P Axle 1 Q Caddy, Right 1 R Caddy, Left 1 Q R N O M P Key Description - Ridgid WD1851 | Owners Manual - Page 6
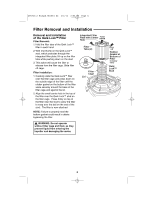
SP6733-2 Ridgid WD1851 ES 2/3/12 2:04 PM Page 6 Filter Removal and Installation Removal and Installation of the Qwik Lock™ Filter Filter Removal: 1. Hold the filter tabs of the Qwik Lock™ filter in each hand. 2. With one thumb on the Qwik Lock™ stud, which protrudes through the integrated filter - Ridgid WD1851 | Owners Manual - Page 7
SP6733-2 Ridgid WD1851 ES 2/3/12 2:04 PM Page 7 Drum/Caddy Assembly If any parts are missing or damaged contact Customer Service. Do not assemble until you have all the parts. 1. Insert caddy left and caddy right into the bottom of drum as shown. Light taps with a mallet or hammer may be needed to - Ridgid WD1851 | Owners Manual - Page 8
SP6733-2 Ridgid WD1851 ES 2/3/12 2:04 PM Page 8 Drum/Caddy Assembly (continued) 4. Slide open end of axle through caddy left making sure the leg slot lines up with - Ridgid WD1851 | Owners Manual - Page 9
SP6733-2 Ridgid WD1851 ES 2/3/12 2:04 PM Page 9 Drum/Caddy Assembly (continued) Installing Tool Holder Tote Snaps Install tool holder as shown with extension wand holders facing unit. Tote Straps (4) Handle Wet/Dry Vac Assembly 1. Position the powerhead assembly on the drum/caddy assembly as - Ridgid WD1851 | Owners Manual - Page 10
with the Vac. Each accessory may be used in various ways for vacuuming and blowing debris. Here is a list of the accessories and their uses. Utility Nozzle - General purpose nozzle for most vacuuming applications. Wet Nozzle - Used for wet pickup on smooth surfaces to pick up liquid and dry the - Ridgid WD1851 | Owners Manual - Page 11
SP6733-2 Ridgid WD1851 ES 2/3/12 2:04 PM Page 11 Operation (continued) Vacuuming Dry Materials 1. The filter must always be in correct position to reduce the risk of leaks and possible damage to Vac. 2. Your Wet/Dry Vac comes with the VF5000 Filter installed. When using your Vac to pick up very - Ridgid WD1851 | Owners Manual - Page 12
SP6733-2 Ridgid WD1851 ES 2/3/12 2:04 PM Page 12 Operation (continued) Blowing Feature Your Vac features a blowing port. It can blow sawdust and other debris. Follow the steps below to use your Vac as a blower. ! WARNING: Always wear safety eyewear complying with ANSI Z87.1 (or in Canada, CSA Z94 - Ridgid WD1851 | Owners Manual - Page 13
, unplug power cord before changing or cleaning filter. ! WARNING: Do not operate without filter cage and float, as they prevent liquid from entering the impeller and damaging the motor. WD1851 Professional Wet/Dry Vac is supplied with RIDGID's best Qwik Lock™ Fine Dust Filter. Replacement Qwik - Ridgid WD1851 | Owners Manual - Page 14
smell is gone. Allow drum to dry completely before sealing the motor on the drum. Cord Maintenance When vacuuming is complete, unplug the cord and wrap it around the motor cover. If the power cord is damaged, it must be replaced by the manufacturer or their service agent or by similarly qualified - Ridgid WD1851 | Owners Manual - Page 15
SP6733-2 Ridgid WD1851 ES 2/3/12 2:04 PM Page 15 Notes 15 - Ridgid WD1851 | Owners Manual - Page 16
Parts 16 Gallon Professional Wet/Dry Vac Catalog Number WD1851 includes Model Numbers WD18510/WD1851EX0 RIDGID parts are available on-line at www.ridgidparts.com Always order by Part Number - Not by Key Number ! WARNING SERVICING OF DOUBLE-INSULATED WET/DRY VAC In a double-insulated Wet/Dry Vac - Ridgid WD1851 | Owners Manual - Page 17
SP6733-2 Ridgid WD1851 ES 2/3/12 2:04 PM Page 17 Repair Parts (continued) RIDGID parts are available on-line at www.ridgidparts.com 1 4 3 9 5 10 2 14 6 7 8 11 12 13 15 17 - Ridgid WD1851 | Owners Manual - Page 18
SP6733-2 Ridgid WD1851 ES 2/3/12 2:04 PM Page 18 Repair Parts (continued) Parts List for Wet/Dry Vac Cart RIDGID parts are available on-line at www.ridgidparts.com Always order by Part Number - Not by Key Number Key No. Part No. 1 830686 2 830683 3 73185 4 830611 5 813836-1 6 830682 - Ridgid WD1851 | Owners Manual - Page 19
SP6733-2 Ridgid WD1851 ES 2/3/12 2:04 PM Page 19 Repair Parts (continued) 1 11 2 3 45 7 6 9 10 12 6 7 8 54 12 10 19 - Ridgid WD1851 | Owners Manual - Page 20
warranty for RIDGID® Wet/Dry Vacs. No employee, agent, dealer, or other person is authorized to alter this warranty or make any other warranty on behalf of Ridge Tool Company. Stock No. WD1851 or WD1851EX Model No. WD18510 or WD1851EX0 Model and serial number may be found on the back of power head - Ridgid WD1851 | Owners Manual - Page 21
SP6733-2 Ridgid WD1851 ES 2/3/12 2:04 PM Page 21 MANUAL DEL USUARIO ASPIRADORA PARA MOJADO/SECO PROFESIONAL DE 16 GALONES EE.UU./60 LITROS WD18510 WD1851EX0 ¿PREGUNTAS O COMENTARIOS? COMUNÍQUESE CON NOSOTROS EN 1-800-4-RIDGID (1-800-474-3443) desde los EE.UU. y Canadá 01-800-701-9811 desde México - Ridgid WD1851 | Owners Manual - Page 22
SP6733-2 Ridgid WD1851 ES 2/3/12 2:04 PM Page 22 Indice Sección Página aspiradora con un filtro desgarrado o sin tener el filtro instalado, excepto cuando recoja con ella líquidos de la manera que se describe en este manual. Los residuos secos absorbidos por el impulsor podrían dañar el motor - Ridgid WD1851 | Owners Manual - Page 23
a que contiene líquido o residuos. Saque parte del contenido de la aspiradora o drénela parcialmente. • Para reducir el riesgo de lesiones corporales o daños a la aspiradora, utilice únicamente accesorios recomendados por Ridgid. • Cuando utilice la aspiradora como soplador : - Dirija la descarga - Ridgid WD1851 | Owners Manual - Page 24
SP6733-2 Ridgid WD1851 ES 2/3/12 2:04 PM Page 24 Introducción Esta aspiradora para mojado/seco está diseñada solamente para uso doméstico. Se puede utilizar para recoger materiales mojados o secos y se puede usar como soplador. Lea este manual del usuario para familiarizarse con las caracterí - Ridgid WD1851 | Owners Manual - Page 25
SP6733-2 Ridgid WD1851 ES 2/3/12 2:04 PM Page 25 Desempaquetado y comprobación del contenido de la caja de cartón (continuación) Clave Descripción Cant. Caja de cartón que contiene las - Ridgid WD1851 | Owners Manual - Page 26
Ridgid WD1851 hasta que el empaque de goma ubicado en la parte inferior del filtro se asiente firmemente alrededor de la del filtro. Presione firmemente sobre la parte de arriba del filtro cerca del PIlanctaegderafitlterod Filter EMPUJE No utilice la aspiradora sin la jaula del - Ridgid WD1851 | Owners Manual - Page 27
Ridgid WD1851 ES 2/3/12 2:04 PM Page 27 Ensamblaje del tambor/base de soporte Si cualquiera de las piezas falta o está dañada, póngase en contacto con Servicio al Cliente. No monte la aspiradora base de soporte, sujetándolos firmemente a la parte inferior del tambor. Apriete los tornillos sólo - Ridgid WD1851 | Owners Manual - Page 28
SP6733-2 Ridgid WD1851 ES 2/3/12 2:04 PM Page 28 Ensamblaje del tambor/base de soporte (cont con un mazo para introducir completamente el eje. 5. Instale la segunda rueda en el eje con la parte lisa de la rueda orientada hacia afuera. 6. Instale la segunda tuerca de tapa. Golpee ligeramente la - Ridgid WD1851 | Owners Manual - Page 29
SP6733-2 Ridgid WD1851 ES 2/3/12 2:04 PM Page 29 Ensamblaje del tambor/base de soporte ( bolsa CToortreeas de lSatbroalpsas(4(4) ) AHsaa ndle Ensamblaje de la aspiradora para mojado/seco 1. Posicione el ensamblaje del cabezal del motor sobre el ensamblaje del tambor/base de soporte, de la manera - Ridgid WD1851 | Owners Manual - Page 30
Ridgid WD1851 ES 2/3/12 2:04 PM Page 30 Funcionamiento ! ADVERTENCIA: Para reducir el riesgo de incendio, explosión o daños a la aspiradora: • No deje la aspiradora No exponga la aspiradora a la lluvia ni deje que entre líquido en el compartimiento del motor. Almacene la aspiradora en un lugar - Ridgid WD1851 | Owners Manual - Page 31
para cortar el flujo de aire. Cuando esto suceda, apague la aspiradora, desenchufe el cordón de energía y vacíe el tambor. Sabrá que el flotador ha subido porque el flujo de aire de la aspiradora cesará y subirá el tono del ruido del motor debido a que se producirá un aumento de la velocidad del - Ridgid WD1851 | Owners Manual - Page 32
SP6733-2 Ridgid WD1851 ES 2/3/12 2:04 PM Page 32 Funcionamiento (continuación) Dispositivo de soplado La aspiradora cuenta con un orificio de soplado. Puede soplar aserrín y otros residuos. Siga los pasos que se indican a continuación para usar la aspiradora como soplador. ! ADVERTENCIA: Use - Ridgid WD1851 | Owners Manual - Page 33
en el impulsor y dañe el motor. para polvo fino Qwik Lock™ de repuesto están disponibles en el establecimiento donde usted compró su aspiradora. Pida el filtro para polvo fino Qwik Lock™ de RIDGID VF5000. Remoción del filtro Consulte la sección de este manual "Remoción e instalación del filtro" en - Ridgid WD1851 | Owners Manual - Page 34
SP6733-2 Ridgid WD1851 ES asegurándose de mojar todas las superficies interiores del tambor. 3. Vacíe el tambor después de 20 minutos. Enjuáguelo con agua se haya completado la limpieza con la aspiradora, desenchufe el cordón y enróllelo alrededor de la cubierta del motor. Si el cordón de energía - Ridgid WD1851 | Owners Manual - Page 35
SP6733-2 Ridgid WD1851 ES 2/3/12 2:04 PM Page 35 Notas 35 - Ridgid WD1851 | Owners Manual - Page 36
ES 2/3/12 2:04 PM Page 36 Piezas de repuesto Aspiradora para mojado/seco profesional de 16 galones El número de catálogo WD1851 incluye los números de modelo WD18510/WD1851EX0 Las piezas RIDGID se encuentran disponibles en línea conectándose a www.ridgidparts.com Pida siempre por número de pieza - Ridgid WD1851 | Owners Manual - Page 37
SP6733-2 Ridgid WD1851 ES 2/3/12 2:04 PM Page 37 Piezas de repuesto Las piezas RIDGID se encuentran disponibles en línea conectándose a www.ridgidparts.com 1 4 3 9 5 10 2 14 6 7 8 11 12 13 15 37 - Ridgid WD1851 | Owners Manual - Page 38
SP6733-2 Ridgid WD1851 ES 2/3/12 2:04 PM Page 38 Piezas de repuesto (continuación) Lista de piezas para el carrito de la aspiradora para mojado/seco Las piezas RIDGID se encuentran disponibles en línea conectándose a www.ridgidparts.com Pida siempre por número de pieza -no por número de clave No. - Ridgid WD1851 | Owners Manual - Page 39
SP6733-2 Ridgid WD1851 ES 2/3/12 2:04 PM Page 39 Piezas de repuesto (continuación) 1 11 2 3 45 7 6 9 10 12 6 7 8 54 12 10 39 - Ridgid WD1851 | Owners Manual - Page 40
y exclusiva de las aspiradoras para mojado/seco RIDGID®. Ningún empleado, agente, distribuidor u otra persona está autorizado a alterar esta garantía ni a dar ninguna otra garantía en nombre de Ridge Tool Company. No. de existencias WD1851 o WD1851EX No. de modelo WD18510 o WD1851EX0 Los números - Ridgid WD1851 | Owners Manual - Page 41
DE LIQUIDES ET DE POUSSIÈRES PROFESSIONNEL DE 16 GALLONS DES ÉTATS-UNIS / 60 LITRES WD18510 WD1851EX0 EN CAS DE QUESTIONS OU POUR OBTENIR DES INFORMATIONS, VEUILLEZ NOUS CONTACTER AU : 1-800-4-RIDGID (1-800-474-3443) depuis les États-Unis et le Canada 01-800-701-9811 depuis le Mexique www - Ridgid WD1851 | Owners Manual - Page 42
Ridgid WD1851FR 2/3/12 2:05 PM Page 2 Table des matières Section Page Introduction 4 Déballage et contrôle du contenu du carton . . . . . 4 Outils nécessaires 4 Liste Cadre et poignées 14 Pièces de rechange 16 Garantie 20 INSTRUCTIONS IMPORTANTES RELATIVES À LA SÉCURITÉ La sécurité - Ridgid WD1851 | Owners Manual - Page 43
s'il est tombé dans de l'eau, téléphonez au service d'assistance à la clientèle. • Ne tirez pas ont un calibre inférieur à 16 AWG. Pour réduire la perte rechange identiques. Lisez les instructions concernant l'entretien des aspirateurs des accessoires recommandés par Ridgid. • En cas d'utilisation - Ridgid WD1851 | Owners Manual - Page 44
Se référer au croquis d'assemblage pour le positionnement des pièces. Liste du contenu de la boîte en carton Légende Description Qté en le comparant à la liste incluse dans la boîte en carton. Téléphonez au 1-800-4-RIDGID (1-800-474-3443) depuis les États-Unis et le Canada, 01-800-701-9811 - Ridgid WD1851 | Owners Manual - Page 45
SP6733-2 Ridgid WD1851FR 2/3/12 2:05 PM Page 5 Déballage et contrôle du contenu du carton (suite) Légende Description Qté Boîte en carton contenant les pièces - Ridgid WD1851 | Owners Manual - Page 46
SP6733-2 Ridgid WD1851FR 2/3/12 2:05 PM Page 6 Retrait et installation du filtre Retrait et installation du filtre Qwik Lock™ Retrait du filtre : 1. Saisissez les deux languettes du - Ridgid WD1851 | Owners Manual - Page 47
SP6733-2 Ridgid WD1851FR 2/3/12 2:05 PM Page 7 Assemblage du tambour/chariot Veuillez contacter le service clientèle si de quelconques pièces sont endommagées ou manquantes. Ne commencez pas le montage si vous ne disposez pas de toutes les - Ridgid WD1851 | Owners Manual - Page 48
SP6733-2 Ridgid WD1851FR 2/3/12 2:05 PM Page 8 Assemblage du tambour/chariot (suite) 4. Faites glisser l'extrémité libre de l'essieu à travers le composant gauche du chariot en veillant à - Ridgid WD1851 | Owners Manual - Page 49
SP6733-2 Ridgid WD1851FR 2/3/12 2:05 PM Page 9 Assemblage du tambour/chariot (suite) Mise en place du porte-outils Installez le porte-outils de la façon illustrée, les supports des tiges de rallonge faisant face à l'appareil. BTooutteonS-pnreaspsison du fourre-tout LTaontièere du fSoutrraep-tsou - Ridgid WD1851 | Owners Manual - Page 50
SP6733-2 Ridgid WD1851FR l'eau, rapportez-le dans un centre de réparation indépendant ou téléphonez au service d'assistance à la clientèle. • Lorsque vous utilisez un cordon de rallonge, n' l'aspiration ou le soufflage de débris. Voici une liste des accessoires et des divers moyens de les utiliser : - Ridgid WD1851 | Owners Manual - Page 51
SP6733-2 Ridgid WD1851FR 2/3/12 2:05 PM Page 11 Fonctionnement (suite) Aspiration de matériaux secs 1. Le filtre doit toujours être dans la position correcte afin de réduire - Ridgid WD1851 | Owners Manual - Page 52
SP6733-2 Ridgid WD1851FR 2/3/12 2:05 PM Page 12 Fonctionnement (suite) Fonction de soufflante Votre aspirateur est muni d'un orifice de soufflante qui permet de chasser de la - Ridgid WD1851 | Owners Manual - Page 53
rangement sur l'ensemble de chariot. Les tubes de rallonge rigides peuvent aussi être rangés à cet endroit en ins situés sur le chariot. Accessory Storage Compartiment de rangCeommenpt adertsmacecnestsoires res WD1851 est fourni avec le meilleur filtre à poussières fines Qwik Lock™ de RIDGID. - Ridgid WD1851 | Owners Manual - Page 54
SP6733-2 Ridgid WD1851FR 2/3/12 2:05 usées), vous devez désinfecter le tambour. Pour désinfecter le tambour : 1. Versez un gallon (presque 4 litres) d'eau et une cuillerée à thé de produit à blanchir à és par des centres agréés de service après-vente en utilisant toujours des pièces de rechange - Ridgid WD1851 | Owners Manual - Page 55
SP6733-2 Ridgid WD1851FR 2/3/12 2:05 PM Page 15 Remarques 15 - Ridgid WD1851 | Owners Manual - Page 56
Pièces de rechange Aspirateur de liquides et de poussières professionnel de 16 gallons Le catalogue Numéro WD1851 inclut les modèles numéros WD18510/WD1851EX0 Les pièces RIDGID sont disponibles sur notre site Web à l'adresse suivante : www.ridgidparts.com Pour commander, utiliser toujours le numéro - Ridgid WD1851 | Owners Manual - Page 57
SP6733-2 Ridgid WD1851FR 2/3/12 2:05 PM Page 17 Pièces de rechange (suite) Les pièces RIDGID sont disponibles sur notre site Web à l'adresse suivante : www.ridgidparts.com 1 4 3 9 5 10 2 14 6 7 8 11 12 13 15 17 - Ridgid WD1851 | Owners Manual - Page 58
2/3/12 2:05 PM Page 18 Pièces de rechange (suite) Liste des pièces pour le chariot d'aspirateur de liquides et de poussières Les pièces RIDGID sont disponibles sur notre site Web à l'adresse suivante : www.ridgidparts.com Pour commander, utiliser toujours le numéro de pièce - pas le num - Ridgid WD1851 | Owners Manual - Page 59
SP6733-2 Ridgid WD1851FR 2/3/12 2:05 PM Page 19 Pièces de rechange (suite) 1 11 2 3 45 7 6 9 10 12 6 7 8 54 12 10 19 - Ridgid WD1851 | Owners Manual - Page 60
unique et exclusive concernant les produits RIDGID®. Aucun salarié, agent, distributeur ou autre n'est autorisé à modifier cette garantie ou à offrir une quelconque autre garantie de la part de Ridge Tool Company. Stock N° WD1851 ou WD1851EX Numéros de modèle WD18510 ou WD1851EX0 Numéro de série
-
 1
1 -
 2
2 -
 3
3 -
 4
4 -
 5
5 -
 6
6 -
 7
7 -
8
-
9
-
10
-
11
-
12
-
13
-
14
-
15
-
16
-
17
-
18
-
19
-
20
-
21
-
22
-
23
-
24
-
25
-
26
-
27
-
28
-
29
-
30
-
31
-
32
-
33
-
34
-
35
-
36
-
37
-
38
-
39
-
40
-
41
-
42
-
43
-
44
-
45
-
46
-
47
-
48
-
49
-
50
-
51
-
52
-
53
-
54
-
55
-
56
-
57
-
58
-
59
-
60
 |
 |
WD18510
WD1851EX0
16 U.S. GALLON/60 LITER
PROFESSIONAL WET/DRY VAC
FOR QUESTIONS OR INFORMATION CONTACT US AT
1-800-4-RIDGID (1-800-474-3443) from the US and Canada
01-800-701-9811 from Mexico
www.ridgidvacs.com
Part No. SP6733
Printed in Mexico
OWNER’S MANUAL
SAVE THIS MANUAL FOR FUTURE REFERENCE
WARNING:
To reduce the risk of injury, the user must read and understand the owner’s manual
before using this product.
!
Thank you for buying a RIDGID product.
•
Español - página 21
SP6733-2 Ridgid WD1851 ES
2/3/12
2:04 PM
Page 1