Rocketfish RF-HTMF19 User Manual
Rocketfish RF-HTMF19 Manual
 |
View all Rocketfish RF-HTMF19 manuals
Add to My Manuals
Save this manual to your list of manuals |
Rocketfish RF-HTMF19 manual content summary:
- Rocketfish RF-HTMF19 | User Manual - Page 1
32" to 55" TV WALL MOUNT MONTAJE DE PARED PARA TELEVISOR DE 32 A 55 PULG.(Spanish - FPO) RF-HTMF19 ASSEMBLY GUIDE/GUÍA DE ENSAMBLAJE Before using your new product, please read these instructions to prevent any damage. Antes de usar su producto nuevo, lea este instructivo para prevenir cualquier da - Rocketfish RF-HTMF19 | User Manual - Page 2
3 Specifications 3 Tools needed 5 Package contents 6 Installation instructions 9 STEP 1 - Determine whether your TV has a flat, irregular, or obstructed back 9 STEP 2 - Select screws, washers, and spacers 10 STEP 3 - Attach the horizontal brackets to your - Rocketfish RF-HTMF19 | User Manual - Page 3
Congratulations on your purchase of a high-quality Rocketfish product. Your RF-HTMF19 represents the state of the art in TV wall-mount design and is designed for reliable and trouble-free performance. IMPORTANT SAFETY INSTRUCTIONS SAVE THESE INSTRUCTIONS • This product is designed ONLY to be - Rocketfish RF-HTMF19 | User Manual - Page 4
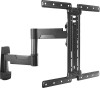
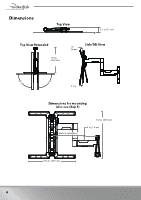
Dimensions Top View 2.2 in. (5.7 cm) Top View Extended 19.2in. (48.8 cm) Side/Tilt View 15° Down 90° 90° 5° Up Dimensions for mounting (also see Step 5) Vertical centerline 17.2 in. (43.6 cm) .6 in. (1.6 cm) 17.2 in. (43.6 cm) 4 - Rocketfish RF-HTMF19 | User Manual - Page 5
Tools needed You need the following tools to assemble your new TV wall mount: RF-HTMF19 Tape measure Pencil Level Drill Phillips screwdriver Socket wrench with 1/2" (13 mm) socket or adjustable wrench Tape Wood Stud Wall Concrete or Concrete Block Wall - Rocketfish RF-HTMF19 | User Manual - Page 6
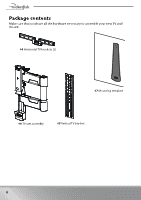
Package contents Make sure that you have all the hardware necessary to assemble your new TV wall mount: 04 Horizontal TV brackets (2) 07 Mounting template 08 TV arm assembly 05 Vertical TV bracket 6 - Rocketfish RF-HTMF19 | User Manual - Page 7
RF-HTMF19 TV Hardware Lbl. Hardware # Lbl. M4 × 12 mm screw 02 M4 × 35 mm screw M6 × 12 mm screw M6 × 20 mm screw 03 01 M6 × - Rocketfish RF-HTMF19 | User Manual - Page 8
Concrete Installation Kit CMK1 (not included) Contact customer service at 1-800-620-2790 to have these additional parts shipped directly to you. Lbl. Hardware # C1 Concrete anchors (Fischer UX10 x 60R) 2 8 - Rocketfish RF-HTMF19 | User Manual - Page 9
RF-HTMF19 Installation instructions STEP 1 - Determine whether your TV has a flat, irregular, or a table-top stand attached, remove the stand. See the documentation that came with your TV for instructions. 3 Temporarily lay the horizontal brackets (04) on the back of your TV. 4 Align the screw - Rocketfish RF-HTMF19 | User Manual - Page 10
the brackets to your TV. If you encounter resistance, stop immediately and contact customer service. Use the shortest screw and spacer combination to accommodate your TV. Using hardware that is too long may damage your TV. However, using a screw that is too short may cause your TV to fall from the - Rocketfish RF-HTMF19 | User Manual - Page 11
RF-HTMF19 STEP 3 - Attach the horizontal brackets to your TV CAUTION: To avoid personal injury or property damage, do not use power tools. 1 Align the holes you noted on the horizontal brackets (04) with the screw holes on the back of your TV. 2 Place the washers ( - Rocketfish RF-HTMF19 | User Manual - Page 12
STEP 4 - Attach the vertical bracket to your TV CAUTION: To avoid personal injury or property damage, do not use power tools. 1 Lay the vertical bracket (05) on top of the horizontal brackets (04). Make sure that the bracket is centered. 2 Secure the vertical bracket ( - Rocketfish RF-HTMF19 | User Manual - Page 13
RF-HTMF19 STEP 5 - Determine the wall-mount location Note: Your TV should be high enough so your is HIGHER than the center of the TV arm assembly. When the center slot of the Vertical TV bracket is used, the top hole in the TV arm assembly will be 0.6 in below the center of the Vertical TV bracket - Rocketfish RF-HTMF19 | User Manual - Page 14
STEP 6 - Option 1: Install on a wood stud wall 1 Locate the stud, then verify the center of the stud with an edge-to-edge stud finder or an awl. Caution: Drywall covering the wall must not exceed 5/8 in. (1.6 cm). Minimum wood stud size: nominal 2 × 4 in. (5.1 × 10.2 cm) actual 1 1/2 × 3 1/2 in. - Rocketfish RF-HTMF19 | User Manual - Page 15
RF-HTMF19 2 Align the center of the mounting template (07) at the height you determined in the previous step and make sure that it is level. Tape the mounting template to the wall. 3 Drill two pilot holes through the mounting template to a depth of 2 3/4 in. (70 mm) using a 7/32 in. (5.5 mm) - Rocketfish RF-HTMF19 | User Manual - Page 16
5 Align the TV arm assembly (08) with the pilot holes, insert the lag screws (09) through washers (10) and into the holes in the wall plate, then tighten the lag screws only until they are firm against the wall plate. CAUTION: Avoid potential injuries or property damage! DO NOT over-tighten the lag - Rocketfish RF-HTMF19 | User Manual - Page 17
RF-HTMF19 STEP 6 - Option 2: Install on mounting template to the wall, then drill pilot holes to a depth of 3 in. (76 mm) using a 3/8 in. (10 mm) diameter masonry drill bit, then remove the mounting template. Note: Installation Kit (CMK1) is not included. Contact Customer Service to request it. 17 - Rocketfish RF-HTMF19 | User Manual - Page 18
2 Insert the concrete wall anchors (C1) (see Concrete Installation Kit CMK1 (not included) on page 8) into the pilot holes and use a hammer to make sure that the anchors are flush with the concrete surface. C C 3 Move the wall plate cover out away from the wall plate. 18 - Rocketfish RF-HTMF19 | User Manual - Page 19
RF-HTMF19 4 Align the TV arm assembly (08) with the anchors (C1), insert the lag screws (09) through the washers (10) and into the holes in the - Rocketfish RF-HTMF19 | User Manual - Page 20
STEP 7 - Attach the TV 1 Move the cover in to cover the arm assembly wall plate, then extend the arm out from the wall. You'll need 11 Locking screw (1) Phillips screwdriver 20 - Rocketfish RF-HTMF19 | User Manual - Page 21
RF-HTMF19 2 Hang your TV on the arm assembly. Select the height you want by choosing the appropriate slot in TV arm assembly with the locking screw (11). CAUTION: To avoid possible personal injury or equipment damage, you must use the locking screw (11) to secure your TV to the TV arm assembly. 21 - Rocketfish RF-HTMF19 | User Manual - Page 22
9 - Adjust the tilt Note: After your TV is in place, tighten the tilt tension knob to prevent unwanted movement. Additional tension can be applied by using a 3/16 in. hex key (not provided). • Loosen the tension knob with your fingers, adjust the tilt angle, then tighten the knob to keep your TV - Rocketfish RF-HTMF19 | User Manual - Page 23
STEP 10 - Adjust the level 1 Loosen the locking screw (11) with a Phillips screwdriver. RF-HTMF19 2 Level your TV. 23 - Rocketfish RF-HTMF19 | User Manual - Page 24
3 Retighten the locking screw (11) with a Phillips screwdriver. Remove your TV from the wall mount 1 Disconnect all cables. 24 - Rocketfish RF-HTMF19 | User Manual - Page 25
2 Remove the locking screw (11) with a Phillips screwdriver. RF-HTMF19 08 3 Lift your TV off the arm assembly. 11 HEAVY! You may need assistance with this step. For customer service, call: 1-800-620-2790 (U.S. and Canada) 25 - Rocketfish RF-HTMF19 | User Manual - Page 26
coverage last? The Warranty Period lasts for the useful life of the Product beginning on the date become the property of Rocketfish and are not returned to you. If service of Products or parts cover? This warranty does not cover: • Customer instruction/education • Installation • Set up adjustments • - Rocketfish RF-HTMF19 | User Manual - Page 27
RF-HTMF19 • Negligence • Commercial purposes/use, including but not limited to use in a place of business or in communal areas of a multiple dwelling condominium or apartment complex, or otherwise used repair by any person not authorized by Rocketfish to service the Product • Products sold "as is - Rocketfish RF-HTMF19 | User Manual - Page 28
ESPAÑOL Introducción Felicitaciones por su compra de un producto de alta calidad de Rocketfish. Su RF-HTMF19 representa el más moderno diseño de montaje en pared para televisor y está diseñado para brindar un rendimiento confiable y sin problemas. INSTRUCCIONES IMPORTANTES DE SEGURIDAD GUARDE - Rocketfish RF-HTMF19 | User Manual - Page 29
Dimensiones Vista superior RF-HTMF19 5.7 cm (2.2 pulg.) Vista superior extendido 48.8 cm (19.2 pulg.) Vista lateral/inclinado 15° Abajo 90° 90° 5° Arriba Dimensiones para el montaje (ver también paso 5) Línea - Rocketfish RF-HTMF19 | User Manual - Page 30
Herramientas requeridas Necesitará las siguientes herramientas para ensamblar su montaje de pared nuevo para el televisor: Cinta métrica Lápiz Nivel Taladro Destornillador Phillips Llave de tubos con tubo de 1/2 pulg. (13 mm) o llave ajustable Cinta adhesiva Pared con vigas de madera Hormig - Rocketfish RF-HTMF19 | User Manual - Page 31
RF-HTMF19 Contenido del paquete Asegúrese de que tenga todos los herrajes necesarios para instalar su montaje de pared nuevo para el televisor: 04 Soportes de televisor horizontales (2) 07 Plantilla de montaje 08 Montaje del brazo del televisor 05 Soporte de televisor vertical 31 - Rocketfish RF-HTMF19 | User Manual - Page 32
Ferretería para el televisor N.° Ferretería N. N.° ° Tornillo M4 de 12 mm 02 Tornillo M4 de 35 mm Tornillo M6 de 12 mm Tornillo M6 de 20 mm 03 Tornillo M6 de 35 mm 01 4 Tornillo M8 de 16 mm 06 Ferretería N. ° Arandela M4 4 Arandela M6/M8 4 Espaciador (2.5 mm) 4 Espaciador (5 - Rocketfish RF-HTMF19 | User Manual - Page 33
RF-HTMF19 Kit de instalación para concreto CMK1 (no se incluye) Contacte el servicio al cliente al 1-800-620-2790 para tener estas partes adicionales enviadas directamente a usted. N.° Ferretería N. ° C1 Anclajes para concreto (Fischer UX10 x 60R) 2 33 - Rocketfish RF-HTMF19 | User Manual - Page 34
Instrucciones de instalación PASO 1 - Determine si su televisor tiene una parte posterior plana, irregular u obstruida. 1 Coloque cuidadosamente el televisor con la pantalla hacia abajo, sobre una superficie acolchonada y limpia para proteger la pantalla de daños y rayones. 2 Si su televisor tiene - Rocketfish RF-HTMF19 | User Manual - Page 35
RF-HTMF19 PASO 2 - Selección de los tornillos, arandelas y espaciadores 1 Seleccione los herrajes para su televisor (tornillos, arandelas y espaciadores). Ciertos televisores vienen con ferretería de montaje incluida. (si - Rocketfish RF-HTMF19 | User Manual - Page 36
PASO 3: Colocación de los soportes horizontales en su televisor CUIDADO: Para evitar lesiones personales o daños materiales, no utilice herramientas eléctricas. 1 Alinee los agujeros que identificó en el soportes horizontales (04) con los agujeros para los tornillos en la parte posterior del - Rocketfish RF-HTMF19 | User Manual - Page 37
RF-HTMF19 Necesitará O O O O O O 01 Tornillos (4) 02 Arandelas (4) 04 Soportes de televisor horizontales (2) Destornillador Phillips Espaciadores 03 (4) 37 - Rocketfish RF-HTMF19 | User Manual - Page 38
PASO 4: Colocación del soporte horizontal a su televisor CUIDADO: Para evitar lesiones personales o daños materiales, no utilice herramientas eléctricas. 1 Coloque el soporte vertical (05) encima de los soportes horizontales (04). Asegúrese de que el soporte esté en el centro. 2 Fije el soporte - Rocketfish RF-HTMF19 | User Manual - Page 39
RF-HTMF19 PASO 5 - Determine la ubicación del montaje en pared Nota: Su televisor debe estar lo suficientemente alto para que sus ojos estén a la altura de la - Rocketfish RF-HTMF19 | User Manual - Page 40
PASO 6 - Opción 1: Instale en una pared con viga de madera 1 Localice la viga, luego verifique el centro de la viga con un detector de vigas de borde a borde o la pared. Cuidado: El panel de yeso que cubra la pared no debe exceder 5/8 pulg. (1.6 cm). Tamaño mínimo de la viga de madera: nominal 5.1 × - Rocketfish RF-HTMF19 | User Manual - Page 41
RF-HTMF19 2 Alinee en centro de la plantilla de montaje (07) a la altura que determinó en el paso anterior y asegúrese de que esté a nivel. Pegue con - Rocketfish RF-HTMF19 | User Manual - Page 42
5 Alinee el brazo de montaje del televisor (08) con los agujeros pilotos, inserte los pernos de retraso (09) a través de las arandelas (10) y en los agujeros del ensamblado de la placa para pared y luego apriete los pernos de retraso hasta que se encuentren firmemente contra la placa para pared. - Rocketfish RF-HTMF19 | User Manual - Page 43
RF-HTMF19 PASO 6 - Opción 2: Instalación en una pared de concreto sólido o de bloques de concreto CUIDADO: Para evitar daños materiales o lesiones a personas, nunca taladre en la - Rocketfish RF-HTMF19 | User Manual - Page 44
2 Inserte los anclajes de pared para concreto (C1) (refiérase a Concrete Installation Kit CMK1 (not included) en la página 8) en los agujeros guías y con un martillo asegúrese de que los anclajes estén al ras con la superficie de concreto. C C 3 Mueva la cubierta de la placa de pared hacia afuera, - Rocketfish RF-HTMF19 | User Manual - Page 45
RF-HTMF19 4 Alinee el brazo de montaje del televisor (08) con los anclajes (C1), inserte los pernos de retraso (09) a través de las arandelas (10) y en los - Rocketfish RF-HTMF19 | User Manual - Page 46
PASO 7: Coloque el televisor 1 Mueva la cubierta hacia adentro para cubrir la placa de pared del juego del brazo, luego extienda el brazo hacia afuera de la pared. Necesitará 11 Tornillo de bloqueo (1) Destornillador Phillips 46 - Rocketfish RF-HTMF19 | User Manual - Page 47
RF-HTMF19 2 Cuelgue su televisor en el juego de brazos. Seleccione la altura que desee eligiendo la ranura adecuada en el soporte vertical del televisor. Seleccione la - Rocketfish RF-HTMF19 | User Manual - Page 48
Paso 8 - Organización de los cables • Extienda completamente el juego del brazo del televisor (08) para que quede lo suficientemente flojo, luego pase los cables a lo largo de los brazos e introdúzcalos en los canales de los brazos para dar un aspecto limpio a su instalación. PASO 9: Ajuste de la - Rocketfish RF-HTMF19 | User Manual - Page 49
RF-HTMF19 PASO 10 - Ajuste el nivel 1 Afloje el tornillo de bloqueo (11) con un destornillador Phillips. 2 Nivele su televisor. 49 - Rocketfish RF-HTMF19 | User Manual - Page 50
3 Vuelva a apretar el tornillo de bloqueo (11) con un destornillador Phillips. Retire su televisor del montaje en pared. 1 Desconecte todos los cables 50 - Rocketfish RF-HTMF19 | User Manual - Page 51
RF-HTMF19 2 Retire el tornillo de bloqueo (11) con un destornillador Phillips. 08 11 3 Levante el televisor del juego del brazo. ¡PESADO! Se puede que necesitará ayuda con este paso. 51 - Rocketfish RF-HTMF19 | User Manual - Page 52
Para el servicio al cliente llame al: 1-800-620-2790 (EE.UU. y Canadá) 52 - Rocketfish RF-HTMF19 | User Manual - Page 53
RF-HTMF19 GARANTÍA LIMITADA DE POR VIDA Descripción: El distribuidor* de los productos de la marca Rocketfish le garantiza a usted, el comprador original de este producto nuevo de la marca Rocketfish ("Producto"), que el Producto estará libre de defectos de material o de mano de obra en su fabricaci - Rocketfish RF-HTMF19 | User Manual - Page 54
PERO SIN LIMITARSE A ELLO, LA PÉRDIDA DE DATOS, LA IMPOSIBILIDAD DE USO DE SU PRODUCTO, LA PÉRDIDA DE NEGOCIOS O DE GANANCIAS. ROCKETFISH PRODUCTS NO OFRECE NINGUNA OTRA GARANTÍA EXPRESA E IMPLÍCITA RELACIONADA CON ESTE PRODUCTO, INCLUYENDO PERO SIN LIMITARSE A, CUALQUIER GARANTÍA IMPLÍCITA - Rocketfish RF-HTMF19 | User Manual - Page 55
, LLC 7601 Penn Ave South, Richfield, MN 55423 U.S.A. ©2022 Best Buy. All rights reserved. www.rocketfishproducts.com 1-800-620-2790 (EE.UU. y Canadá) ROCKETFISH es una marca comercial de Best Buy y sus compañías asociadas. Registrada en ciertos países. Distribuida por Best Buy Purchasing, LLC 7601
-
 1
1 -
 2
2 -
 3
3 -
 4
4 -
 5
5 -
 6
6 -
 7
7 -
8
-
9
-
10
-
11
-
12
-
13
-
14
-
15
-
16
-
17
-
18
-
19
-
20
-
21
-
22
-
23
-
24
-
25
-
26
-
27
-
28
-
29
-
30
-
31
-
32
-
33
-
34
-
35
-
36
-
37
-
38
-
39
-
40
-
41
-
42
-
43
-
44
-
45
-
46
-
47
-
48
-
49
-
50
-
51
-
52
-
53
-
54
-
55
 |
 |
ASSEMBLY GUIDE/GUÍA DE ENSAMBLAJE
Before using your new product, please read these instructions to prevent any damage.
Antes de usar su producto nuevo, lea este instructivo para prevenir cualquier daño.
32" to 55" TV WALL MOUNT
MONTAJE DE PARED PARA TELEVISOR
DE 32 A 55 PULG.
(Spanish - FPO)
RF-HTMF19