Rocketfish RF-HTMF19 User Manual - Page 14
STEP 6 - Option 1: Install on a wood stud wall
 |
View all Rocketfish RF-HTMF19 manuals
Add to My Manuals
Save this manual to your list of manuals |
Page 14 highlights
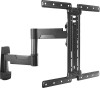
STEP 6 - Option 1: Install on a wood stud wall 1 Locate the stud, then verify the center of the stud with an edge-to-edge stud finder or an awl. Caution: Drywall covering the wall must not exceed 5/8 in. (1.6 cm). Minimum wood stud size: nominal 2 × 4 in. (5.1 × 10.2 cm) actual 1 1/2 × 3 1/2 in. (3.8 × 8.9 cm). You'll need 7/32" wood drill bit 07 Mounting template 08 TV arm assembly 1/2" socket wrench Level 09 Lag screw (2) 10 Washer (2) Awl Drill Tape Edge-to edge stud finder 14
-
 1
1 -
2
-
3
-
4
-
5
-
6
-
7
-
8
-
 9
9 -
 10
10 -
 11
11 -
 12
12 -
 13
13 -
 14
14 -
 15
15 -
 16
16 -
 17
17 -
 18
18 -
 19
19 -
20
-
21
-
22
-
23
-
24
-
25
-
26
-
27
-
28
-
29
-
30
-
31
-
32
-
33
-
34
-
35
-
36
-
37
-
38
-
39
-
40
-
41
-
42
-
43
-
44
-
45
-
46
-
47
-
48
-
49
-
50
-
51
-
52
-
53
-
54
-
55
 |
 |

14
STEP 6 - Option 1: Install on a wood stud wall
1
Locate the stud, then verify the center of the stud with an edge-to-edge stud
finder or an awl.
Caution:
Drywall covering the wall must not exceed 5/8 in. (1.6 cm).
Minimum wood stud size: nominal 2 × 4 in. (5.1 × 10.2 cm) actual 1 1/2 × 3 1/2 in. (3.8 × 8.9 cm).
You’ll need
Edge-to edge
stud finder
09
Lag screw (2)
Drill
7/32" wood drill bit
1/2" socket wrench
07
Mounting
template
Tape
08
TV arm assembly
Level
10
Washer (2)
Awl