Ryobi BS904 Operation Manual - Page 11
Operation, Assembly - fence
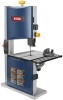 |
View all Ryobi BS904 manuals
Add to My Manuals
Save this manual to your list of manuals |
Page 11 highlights
ASSEMBLY WARNING: The blade guides have been preset at the factory. These settings are functional for some applications. We recommend that you check and adjust blade guide settings before first use of your saw. Refer to Adjusting Blade Guide Support and Thrust Bearings procedures explained in the ADJUSTMENTS section of this operator's manual. OPERATION WARNING: Do not allow familiarity with tools to make you careless. Remember that a careless fraction of a second is sufficient to inflict serious injury. WARNING: Always wear eye protection with side shields marked to comply with ANSI Z87.1. Failure to do so could result in objects being thrown into your eyes, resulting in possible serious injury. WARNING: Do not use any attachments or accessories not recommended by the manufacturer of this tool. The use of attachments or accessories not recommended can result in serious personal injury. WARNING: To avoid blade contact, adjust the blade guide assembly to just clear the workpiece. Failure to do so could result in serious personal injury. WARNING: Never operate saw without the blade guard secured and the front covers locked. To do so could result in possible serious personal injury. APPLICATIONS You may use this tool for the purposes listed below: Scroll cutting and circle cutting of wood and wood composition products Various straight line cutting operations in wood and wood composition products BASIC OPERATION OF THE BAND SAW A band saw is basically a "curve cutting" machine that can also be used for straight-line cutting operations like cross cutting, mitering, beveling, compound cutting, and resawing. When using the band saw for straight line cutting, the user can install a fence using an appropriately sized piece of wood clamped to the table with "C" clamps. It is not capable of making inside or non-through cuts. Before starting a cut, watch the saw run. If you experience excessive vibration or unusual noise, stop immediately. Turn the saw off, remove the switch key, and unplug the saw. Do not restart until locating and correcting the problem. CUTTING PROCEDURES Hold the workpiece firmly against the saw table. Use gentle pressure and both hands when feeding the work into the blade. Do not force the work; allow the blade to cut. The smallest diameter circle that can be cut is determined by blade width. A 1/4 in. wide blade will cut a minimum diameter of 1-1/2 in.; a 1/8 in. wide blade will cut a minimum diameter of 1/2 in. Keep your hands away from the blade. Do not hand hold pieces so small your fingers will go under the blade guard. Avoid awkward operations and hand positions where a sudden slip could cause serious injury from contact with the blade. Never place hands in blade path. Use extra supports (tables, saw horses, blocks, etc.) when cutting large, small, or awkward workpieces. 11 - English
-
 1
1 -
2
-
3
-
4
-
5
-
 6
6 -
 7
7 -
 8
8 -
 9
9 -
 10
10 -
 11
11 -
 12
12 -
 13
13 -
 14
14 -
 15
15 -
 16
16 -
17
-
18
-
19
-
20
-
21
-
22
-
23
-
24
-
25
-
26
-
27
-
28
-
29
-
30
-
31
-
32
-
33
-
34
-
35
-
36
-
37
-
38
-
39
-
40
-
41
-
42
-
43
-
44
-
45
-
46
-
47
-
48
-
49
-
50
-
51
-
52
-
53
-
54
-
55
-
56
 |
 |
