Ryobi P125 Operation Manual - Page 4
Symbols, Features - battery charger
 |
View all Ryobi P125 manuals
Add to My Manuals
Save this manual to your list of manuals |
Page 4 highlights
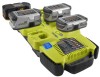
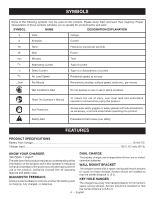
SYMBOLS Some of the following symbols may be used on this product. Please study them and learn their meaning. Proper interpretation of these symbols will allow you to operate the product better and safer. SYMBOL NAME DESIGNATION/EXPLANATION V Volts Voltage A Amperes Current Hz Hertz Frequency (cycles per second) W Watt Power min Minutes Time Alternating Current Type of current Direct Current no No Load Speed Type or a characteristic of current Rotational speed, at no load .../min Per Minute Revolutions, strokes, surface speed, orbits etc., per minute Wet Conditions Alert Do not expose to rain or use in damp locations. Read The Operator's Manual Eye Protection To reduce the risk of injury, user must read and understand operator's manual before using this product. Always wear safety goggles or safety glasses with side shields and, as necessary, a full face shield when operating this product. Safety Alert Precautions that involve your safety. FEATURES PRODUCT SPECIFICATIONS Battery Pack Voltage...18 Volt DC Charger Input...120 V, AC only, 60 Hz KNOW YOUR charger DUAL CHARGE See Figure 1, page 8 The battery charger can charge either lithium-ion or nickel- The safe use of this product requires an understanding of the cadmium batteries. information on the product and in this operator's manual as well as a knowledge of the project you are attempting. Before use of this product, familiarize yourself with all operating features and safety rules. DIAGNOSTIC FEEDBACK LEDs provide feedback to indicate whether the battery pack is charging, fully charged, or defective. WALL MOUNT BRACKET The charger comes with a space-saving wall mount bracket for quick and easy storage. Screws should be installed so that the center distance is 15 in. KEY HOLE HANGER The charger has a key hole hanging feature for convenient, space saving storage. Screws should be installed so that the center distance is 8-3/4 in. 4 - English
-
 1
1 -
 2
2 -
 3
3 -
 4
4 -
 5
5 -
 6
6 -
 7
7 -
 8
8 -
 9
9 -
 10
10 -
11
-
12
-
13
-
14
-
15
-
16
-
17
-
18
-
19
-
20
-
21
-
22
-
23
-
24
 |
 |
