Ryobi P125 Operation Manual - Page 5
Assembly, Operation - battery
 |
View all Ryobi P125 manuals
Add to My Manuals
Save this manual to your list of manuals |
Page 5 highlights
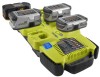
ASSEMBLY UNPACKING This product has been shipped completely assembled. n Carefully remove the product and any accessories from the box. Make sure that all items listed in the packing list are included. n Inspect the product carefully to make sure no breakage or damage occurred during shipping. n Do not discard the packing material until you have carefully inspected and satisfactorily operated the product. n If any parts are damaged or missing, please call 1-800-525-2579 for assistance. PACKING LIST Charger Wall Mount Bracket Operator's Manual Assembling wall mount bracket See Figures 2 - 3, page 8 n Find desired location indoors and away from any objects that could block vents on charger. Locate a wall stud to securely mount bracket. n You will need two #8 - 2 1/2 in. screws (not included) n Use a level to be sure that bracket is in a vertical position. Use a pencil to mark screw hole placement. Screws should be installed so that the center distance is 15 in. n Install screws to securely attach bracket. n Place bottom end of charger into bracket then snap top of charger securely into bracket. n Charger should fit snugly and securely in bracket. WARNING: If any parts are damaged or missing do not operate this product until the parts are replaced. Failure to heed this warning could result in serious personal injury. WARNING: Do not attempt to modify this product or create accessories not recommended for use with this product. Any such alteration or modification is misuse and could result in a hazardous condition leading to possible serious personal injury. OPERATION WARNING: Do not allow familiarity with products to make you careless. Remember that a careless fraction of a second is sufficient to inflict serious injury. WARNING: Always wear safety goggles or safety glasses with side shields when operating products. Failure to do so could result in objects being thrown into your eyes, resulting in possible serious injury. APPLICATIONS You may use this product for the following purpose: Charging and maintaining Ryobi One+ 18 V battery packs at peak charge over time. NOTE: Charger charges batteries one at a time, charger does NOT charge multiple batteries simultaneously. CAUTION: Charge in a well ventilated area. Do not block charger vents. Keep them clear to allow proper ventilation. CAUTION: If at any point during the charging process none of the LEDs are lit, remove the battery pack from the charger to avoid damaging the product. DO NOT insert another battery. Take the charger and battery to your nearest service center for service or replacement. BATTERY PROTECTION FEATURES Ryobi One+ 18 V lithium-ion batteries are designed with features that protect the lithium-ion cells and maximize battery life. If the tool stops during use, release the trigger to reset and resume operation. If the tool still does not work, the battery needs to be recharged. 5 - English
-
 1
1 -
 2
2 -
 3
3 -
 4
4 -
 5
5 -
 6
6 -
 7
7 -
 8
8 -
 9
9 -
 10
10 -
 11
11 -
12
-
13
-
14
-
15
-
16
-
17
-
18
-
19
-
20
-
21
-
22
-
23
-
24
 |
 |
