Ryobi TS1346 Operation Manual
Ryobi TS1346 Manual
 |
View all Ryobi TS1346 manuals
Add to My Manuals
Save this manual to your list of manuals |
Ryobi TS1346 manual content summary:
- Ryobi TS1346 | Operation Manual - Page 1
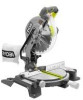
OPERATOR'S MANUAL 10 in. (254 mm) Compound Miter Saw Model TS1340 - Double Insulated Your new Miter Saw has been engineered and manufactured to Ryobi's high standards for dependability, ease of operation, and operator safety. Properly cared for, it will give you years of rugged, trouble-free - Ryobi TS1346 | Operation Manual - Page 2
...18-25 I Maintenance ...26 I Parts Ordering/Service ...28 INTRODUCTION Your saw has many features for making cutting operations saw making it easy to maintain and operate. WARNING: Do not attempt to use the tool until you have read thoroughly and understand completely the operator's manual - Ryobi TS1346 | Operation Manual - Page 3
tool to your nearest RYOBI AUTHORIZED SERVICE CENTER for repair. When servicing use only identical Ryobi replacement parts. WARNING: Do not attempt to operate this tool until you have read thoroughly and understand completely all instructions, safety rules, etc., contained in this manual. Failure to - Ryobi TS1346 | Operation Manual - Page 4
how your miter saw works. READ ALL INSTRUCTIONS I KNOW YOUR POWER TOOL. Read the operator's manual carefully. Learn the saw's applications and its operation. A guard or other part that is damaged must be properly repaired or replaced by an authorized service center to avoid risk of personal injury - Ryobi TS1346 | Operation Manual - Page 5
complete stop. Disconnect your saw from the power supply and securely retighten the blade bolt. I REPLACEMENT PARTS. All repairs, whether electrical or mechanical, should be made at your nearest authorized service center. I WHEN SERVICING, use only identical Ryobi replacement parts. Use of any other - Ryobi TS1346 | Operation Manual - Page 6
a power source. I TURN OFF TOOL and wait for saw blade to come to a complete stop before moving workpiece or changing settings. I ALWAYS carry the saw only by the carrying handle. I SAVE THESE INSTRUCTIONS. Refer to them frequently and use them to instruct other users. If you loan someone this tool - Ryobi TS1346 | Operation Manual - Page 7
blade, miter lock handle, dust guide or dust bag, table extensions, work clamp, and stop block. I Remove all loose parts from the carton. Separate and check with the list of loose parts. See Figure 1. I Remove the packing materials from around your saw. I Carefully lift saw from the carton by the - Ryobi TS1346 | Operation Manual - Page 8
LOOSE PARTS LIST The following items are included with your Compound Miter Saw: I 10 in. (254 mm) Saw Blade I Work Clamp I Miter Lock Handle I Blade Wrench I Dust Bag I Operator's Manual I Dust Guide I Warranty Registration Card DUST BAG BLADE WRENCH SAW BLADE DUST GUIDE 5 MITER LOCK - Ryobi TS1346 | Operation Manual - Page 9
Maximum dimensional lumber sizes: 4 x 4 2 x 6 When the miter angle (miter table) is set at 45°: Maximum dimensional lumber size: 2 x 4 UPPER BLADE GUARD DUST GUIDE SAW ARM SWITCH TRIGGER LOWER BLADE GUARD BEVEL LOCK KNOB BEVEL SCALE MITER FENCE MITER TABLE "NO HANDS ZONE" LABEL "NO HANDS ZONE - Ryobi TS1346 | Operation Manual - Page 10
angles. SPINDLE LOCK BUTTON See Figure 4. A spindle lock button has been provided for locking the spindle which keeps the blade in your saw from rotating. Depress and hold the lock button while installing, changing, or removing blade only. SWITCH TRIGGER SWITCH TRIGGER SPINDLE LOCK BUTTON Fig - Ryobi TS1346 | Operation Manual - Page 11
protection from each side of the blade. It retracts over the upper blade guard as the saw is lowered into the workpiece. WARNING: To avoid serious personal injury, always assure saw is fully supported and securely attached to a level work surface. WARNING: Do not attempt to modify this tool or - Ryobi TS1346 | Operation Manual - Page 12
are secure before connecting saw to power supply. Saw should never be connected to power supply when you are assembling parts, making adjustments, TIGHTEN MITER LOCK HANDLE CONTROL ARM MITER TABLE UPPER BLADE GUARD DUST GUIDE EXHAUST PORT DUST BAG Fig.7 Fig. 8 WARNING: In some operations - Ryobi TS1346 | Operation Manual - Page 13
ASSEMBLY TO INSTALL BLADE See Figures 11 and 12. WARNING: A 10 in. (254 mm) blade is the maximum blade capacity of your saw. Never use a blade that is too thick to allow outer blade washer to engage with the flats on the spindle. Larger blades will come in - Ryobi TS1346 | Operation Manual - Page 14
when blade is rotating. Note: Many of the illustrations in this manual show only portions of your compound miter saw. This is intentional so that we can clearly show points being made in the illustrations. Never operate your saw without all guards securely in place and in good operating condition - Ryobi TS1346 | Operation Manual - Page 15
. Place one leg of the square against the fence. Slide the other leg of the square against the flat part of saw blade. Note: Make sure that the square contacts the flat part of the saw blade, not the blade teeth. 45 31.6 30 15 22.5 15 45 31.6 30 FRAMING SQUARE ZERO CLEARANCE - Ryobi TS1346 | Operation Manual - Page 16
figure 17. I If the front or back edge of the saw blade angles away from the square as shown in figures 18 miter fence left or right until the saw blade is parallel with the square. I Retighten the screws securely and recheck the bladeto-fence alignment. Your saw has two scale indicators, one on the - Ryobi TS1346 | Operation Manual - Page 17
set 90° to miter table). Tighten bevel lock knob. I Place a combination square against the miter table and the flat part of saw blade. Note: Make sure that the square contacts the flat part of the saw blade, not the blade teeth. I Rotate the blade by hand and check the blade-to-table alignment at - Ryobi TS1346 | Operation Manual - Page 18
or if there is play in the pivot joints, have saw repaired by at your nearest RYOBI AUTHORIZED SERVICE CENTER. WARNING: Do not start your compound miter saw without checking for interference between the blade and the miter table support. Damage could result to the blade if it strikes the miter - Ryobi TS1346 | Operation Manual - Page 19
end of the cut, jamming the blade. See Figures 32 and 33. I When cutting long pieces of lumber or molding, support the opposite end of the stock with a roller stand or with a work surface level with the saw table. See Figure 30. I Align cutting line on the workpiece with the edge of - Ryobi TS1346 | Operation Manual - Page 20
operation just to make sure that no problems will occur when the cut is made. I Grasp the saw handle firmly then squeeze the switch trigger. long pieces of lumber or molding, support the opposite end of the stock with a roller stand or with a work surface level with the saw table. See Figure 30. I - Ryobi TS1346 | Operation Manual - Page 21
the workpiece if it slips or twists. COMPOUND MITER CUT I Before turning on the saw, perform a dry run of the cutting operation just to make sure that no problems will occur when the cut is made. I Grasp the saw handle firmly then squeeze the switch trigger. Allow several seconds for the blade to - Ryobi TS1346 | Operation Manual - Page 22
pieces of lumber or molding, support the opposite end of the stock with a roller stand or with a work surface level with the saw table. See Figure 29. I on the saw, perform a dry run of the cutting operation just to make sure that no problems will occur when the cut is made. I Grasp the saw handle - Ryobi TS1346 | Operation Manual - Page 23
OPERATION CUTTING COMPOUND MITERS To aid in making the correct settings, the compound angle setting chart below has been provided. Since compound cuts are the most difficult to accurately obtain, trial cuts should be made in scrap material, and much thought and planning made, prior to making your - Ryobi TS1346 | Operation Manual - Page 24
molding with 52° and 38° angles. The crown molding is placed flat on the miter table using the compound features of your miter saw. 52° 38° CEILING W A L L FENCE INSIDE CORNER TOP EDGE AGAINST FENCE = LEFT SIDE, INSIDE CORNER RIGHT SIDE, OUTSIDE CORNER MITER TABLE FENCE OUTSIDE CORNER - Ryobi TS1346 | Operation Manual - Page 25
45 45 45 45 OPERATION Bevel Angle Setting 33.85° 33.85° 33.85° 33.85° Type of Cut Left side, inside corner 1. Top edge of molding against fence 2. Miter table set right 31.62° 3. Save left end of cut Right side, inside corner 1. Bottom edge of molding against fence 2. Miter table set left 31.62° - Ryobi TS1346 | Operation Manual - Page 26
MAINTENANCE WARNING: When servicing, use only identical Ryobi replacement parts. Use of any other part may create a hazard or cause product damage. GENERAL Avoid using solvents when cleaning plastic parts. Most plastics are susceptible to damage from various types of commercial solvents and may be - Ryobi TS1346 | Operation Manual - Page 27
NOTES Page 27 - Ryobi TS1346 | Operation Manual - Page 28
OPERATOR'S MANUAL 10 in. (254 mm) Compound Miter Saw Model TS1340 - Double Insulated EXTENSION CORD CAUTION 20 amp circuit. • SERVICE Now that you have purchased your tool, should a need ever exist for repair parts or service, simply contact your nearest Ryobi Authorized Service Center. Be sure to
-
 1
1 -
 2
2 -
 3
3 -
 4
4 -
 5
5 -
 6
6 -
 7
7 -
8
-
9
-
10
-
11
-
12
-
13
-
14
-
15
-
16
-
17
-
18
-
19
-
20
-
21
-
22
-
23
-
24
-
25
-
26
-
27
-
28
 |
 |

OPERATOR'S MANUAL
10 in. (254 mm) Compound Miter Saw
Model TS1340 - Double Insulated
Your new Miter Saw has been engineered and manufactured to Ryobi's high standards for dependability, ease of
operation, and operator safety. Properly cared for, it will give you years of rugged, trouble-free performance.
WARNING:
To reduce the risk of injury, the user must read and understand the operator's manual before using
this product.
Thank you for buying a Ryobi tool.
SAVE THIS MANUAL FOR FUTURE REFERENCE