Ryobi TS1346 Operation Manual - Page 18
Adjustments, Operation
 |
View all Ryobi TS1346 manuals
Add to My Manuals
Save this manual to your list of manuals |
Page 18 highlights
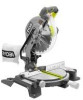
ADJUSTMENTS POSITIVE STOP ADJUSTMENT SCREW FOR 0° ANGLES POSITIVE STOP ADJUSTMENT SCREW FOR 45° ANGLES BEVEL PIVOT ADJUSTMENT I Your compound miter saw should bevel easily by loosening the bevel lock knob and tilting the saw arm to the left. I If movement is tight or if there is play in the pivot, have saw repaired by at your nearest RYOBI AUTHORIZED SERVICE CENTER. LOCK NUT(S) Fig. 24 PIVOT ADJUSTMENTS Note: These adjustments were made at the factory and normally do not require readjustment. TRAVEL PIVOT ADJUSTMENT I The saw arm should rise completely to the up position by itself. I If the saw arm does not raise by itself or if there is play in the pivot joints, have saw repaired by at your nearest RYOBI AUTHORIZED SERVICE CENTER. WARNING: Do not start your compound miter saw without checking for interference between the blade and the miter table support. Damage could result to the blade if it strikes the miter table support during operation of the saw. APPLICATIONS (Use only for the purposes listed below) I Cross cutting wood and plastic. I Cross cutting miters, joints, etc. for picture frames, moldings, door casings, and fine joinery. Note: The blade provided is fine for most wood cutting operations, but for fine joinery cuts or cutting plastic, use one of the accessory blades available from your Ryobi dealer. OPERATION WARNING: Before starting any cutting operation, clamp or bolt your miter saw to a workbench. Never operate your miter saw on the floor or in a crouched position. Failure to heed this warning can result in serious personal injury. WARNING: To avoid serious personal injury, keep your hands outside the no hands zone; at least 3 in. (7.6 cm) from blade. Never perform any cutting operation freehand (without holding workpiece against the fence). The blade could grab the workpiece if it slips or twists. CUTTING A SLOT IN THE ZERO CLEARANCE THROAT PLATE In order to use your compound miter saw, you must cut a slot through the zero clearance throat plate to allow for blade clearance. To cut the slot, set your saw at 0° miter, turn saw on and allow the blade to reach full speed, then carefully make a straight cut as far as it will go through the throat plate. Turn your saw off and allow the blade to come to a complete stop before raising the saw arm. Next, adjust the bevel angle to 45°, turn your saw on and allow the blade to reach full speed, then carefully make another cut through the zero clearance throat plate. The slot in the throat plate will then be wide enough to allow the blade to pass through it at any angle from 0° to 45°. Page 18
-
 1
1 -
2
-
3
-
4
-
5
-
6
-
7
-
8
-
9
-
10
-
11
-
12
-
 13
13 -
 14
14 -
 15
15 -
 16
16 -
 17
17 -
 18
18 -
 19
19 -
 20
20 -
 21
21 -
 22
22 -
 23
23 -
24
-
25
-
26
-
27
-
28
 |
 |
