Ryobi TS1355LA English Manual
Ryobi TS1355LA Manual
 |
View all Ryobi TS1355LA manuals
Add to My Manuals
Save this manual to your list of manuals |
Ryobi TS1355LA manual content summary:
- Ryobi TS1355LA | English Manual - Page 1
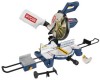
OPERATOR'S MANUAL 10 in. Compound Miter Saw TS1355LA - Double Insulated Your miter saw has been engineered and manufactured to our high standard for dependability, ease of operation, and operator safety. When properly cared for, it will give you years of rugged, trouble-free performance. WARNING: To - Ryobi TS1355LA | English Manual - Page 2
� Symbols...6-7 � Electrical ...8 � Glossary of Terms...9 � Features...10-12 � Tools Needed...12 � Loose Parts List...13 � Assembly ...14-21 � Operation...22-28 Adjustments...29-30 � Maintenance ...30-31 � Parts Ordering / Service ...32 INTRODUCTION This tool has many features for making - Ryobi TS1355LA | English Manual - Page 3
function. Check for alignment of moving parts, binding of moving parts, breakage of parts, mounting and any other conditions that may affect its operation. A guard or other part that is damaged must be properly repaired or replaced by an authorized service center to avoid risk of personal injury - Ryobi TS1355LA | English Manual - Page 4
. WHEN SERVICING use only identical replacement parts. Use of any other parts may create a hazard or cause product damage. USE ONLY RECOMMENDED ACCESSORIES listed in this manual or addendums. Use of accessories that are not listed may cause the risk of personal injury. Instructions for safe use - Ryobi TS1355LA | English Manual - Page 5
way, or should any electrical component fail to perform properly, shut off the power switch, remove the miter saw plug from the power source and have damaged, missing, or failed parts replaced before resuming operation. ALWAYS STAY ALERT! Do not allow familiarity (gained from frequent use of the - Ryobi TS1355LA | English Manual - Page 6
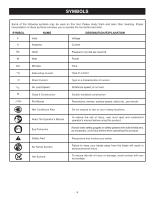
minute Wet Conditions Alert Do not expose to rain or use in damp locations. Read The Operator's Manual Eye Protection To reduce the risk of injury, user must read and understand operator's manual before using this product. Always wear safety goggles or safety glasses with side shields and, as - Ryobi TS1355LA | English Manual - Page 7
repair. When servicing, use only identical replacement parts. WARNING: To avoid serious personal injury, do not attempt to use this product until you read thoroughly and understand completely the operator's manual. If you do not understand the warnings and instructions in the operator's manual, do - Ryobi TS1355LA | English Manual - Page 8
replacement parts when servicing. ELECTRICAL CONNECTION This tool has a precision-built electric motor. It should be connected to a power supply that is 120 V, 60 Hz, AC only (normal household current). Do not operate jacketed cords listed by Underwriter's 100' 16 16 14 12 10 - **Used on 12 gauge - Ryobi TS1355LA | English Manual - Page 9
part of the end) is angled rather than at 90°. Compound Cut A cross cut made with both a miter and a bevel angle. Cross Cut A cutting or shaping operation a guide for drilling large holes accurately. Resaw A cutting operation to reduce properly supported. Through Sawing Any cutting operation where - Ryobi TS1355LA | English Manual - Page 10
10 in. No Load Speed 5,000 r/min. (RPM) Input 120 V, AC only, 60 Hz, 15 Amps Cutting Capacity with Miter at 0°/Bevel 0°: Maximum nominal lumber sizes 2 x 6, 4 x 4 Cutting Capacity with Miter DUST GUIDE SWITCH TRIGGER LOWER BLADE GUARD TABLE EXTENSION "NO HANDS ZONE" BOUNDARY LINE SLIDING MITER - Ryobi TS1355LA | English Manual - Page 11
operating features and safety rules. 15 AMP MOTOR The saw has a powerful 15 amp motor with sufficient power to handle tough cutting jobs. It is made with all ball bearings, and has externally accessible brushes for ease of servicing. 10 in. BLADE A 10 in. blade is included with the compound miter - Ryobi TS1355LA | English Manual - Page 12
lowered into the workpiece. SLIDING MITER FENCE The miter fence on the compound miter saw has been provided to hold your workpiece securely against when making all cuts. The left side is larger providing additional support. It has a sliding feature for clearance of the saw arm when making bevel or - Ryobi TS1355LA | English Manual - Page 13
PARTS LIST The following items are included with your Compound Miter Saw: Miter Lock Handle Adjustable Table Dust Bag Dust Guide Blade Washer Blade Bolt Blade Operator's Manual INSTALLED ON TOOL HEX BOLT mn LASER GUIDE BLADE BOLT BLADE WASHER BLADE WORK CLAMP DUST BAG - Ryobi TS1355LA | English Manual - Page 14
the settings, refer to specific procedures explained in this manual. If any parts are damaged or missing, please call 1-800-525-2579 for assistance. WARNING: If any parts are damaged or missing do not operate this product until the parts are replaced. Failure to heed this warning could result in - Ryobi TS1355LA | English Manual - Page 15
clamp provides greater control by clamping the workpiece to the fence or the saw table. It also prevents the workpiece from creeping toward the saw blade. This is very helpful when cutting compound miters. Depending on the cutting operation and the size of the workpiece, it may be necessary to use - Ryobi TS1355LA | English Manual - Page 16
any necessary adjustments. ADJUSTABLE TABLE SMALL WING SCREW STOP BLOCK TABLE EXTENSION CLAMP BRACKET BASE CLAMP BRACKET SCREW Fig. 12 16 TABLE EXTENSION MITER SAW BASE SAW VIEWED FROM BOTTOM MITER SAW BASE Fig. 13 BRACKET SUPPORT CLAMP BRACKET ASSEMBLED Fig. 14 STOP BLOCK Fig. 15 - Ryobi TS1355LA | English Manual - Page 17
INSTALL / REPLACE THE BLADE See Figures 16 - 17. WARNING: A 10 in. blade is the maximum blade capacity of the saw. Never saw as shown in figure 17. Replace outer blade washer (or laser guide). Double "D" flats on blade washers align with flats on spindle. Depress spindle lock button and replace - Ryobi TS1355LA | English Manual - Page 18
Make sure inner blade washer is in place before positioning saw blade on the spindle of the saw. NOTE: The laser guide replaces the outer blade washer. Place the laser guide onto the spindle, aligning the double "D" flats in the laser guide with the flats on the spindle. Position flat surface of - Ryobi TS1355LA | English Manual - Page 19
of the illustrations in this manual show only portions of the compound miter saw. This is intentional so that we can clearly show points being made in the illustrations. Never operate the saw without all guards securely in place and in good operating condition. SQUARING THE MITER TABLE TO THE FENCE - Ryobi TS1355LA | English Manual - Page 20
handle. Lay a framing square flat on the miter table. Place one leg of the square against the fence. Slide the other leg of the square against the flat part of saw blade. NOTE: Make sure that the square contacts the flat part of the saw blade, not the blade teeth. The edge of the square - Ryobi TS1355LA | English Manual - Page 21
. Loosen bevel lock knob and set saw arm at 0° bevel (blade set 90° to miter table). Tighten bevel lock knob. Place a combination square against the miter table and the flat part of saw blade. NOTE: Make sure that the square contacts the flat part of the saw blade, not the blade teeth. Rotate - Ryobi TS1355LA | English Manual - Page 22
joinery cuts or cutting plastic, use one of the accessory blades available from the Ryobi dealer. WARNING: Before starting any cutting operation, clamp or bolt the compound miter saw to a workbench. Never operate the miter saw on the floor or in a crouched position. Failure to heed this warning can - Ryobi TS1355LA | English Manual - Page 23
clamp or a C-clamp to secure the workpiece when possible. Before turning on the saw, perform a dry run of the cutting operation just to make sure that no problems will occur when the cut is made. Grasp the saw handle firmly then squeeze the switch trigger. Allow several seconds for the blade to - Ryobi TS1355LA | English Manual - Page 24
saw, perform a dry run of the cutting operation just to make sure that no problems will occur when the cut is made. Grasp the saw arm until the pointer aligns with the desired angle on the miter scale. Release the miter lock plate. COMPOUND MITER CUT WORK CLAMP Fig. 34 NOTE: You can quickly - Ryobi TS1355LA | English Manual - Page 25
be placed along the workpiece so it does not sag. The support should let the workpiece lay flat on the base of the saw and work table during the cutting operation. Use the optional work clamp or a C-clamp to secure the workpiece. 45° X 45° COMPOUND MITER CUT Fig. 35 0 LONG WORKPIECE WORKPIECE - Ryobi TS1355LA | English Manual - Page 26
OPERATION CUTTING COMPOUND MITERS To aid in making the correct settings, the compound angle setting chart below has been provided. Since compound 3.53° B- 2.94° M- 44.56° M- 35.58° B- 7.05° B- 5.86° M- 44.01° M- 35.06° B- 10.55° B- 8.75° M- 43.22° M- 34.32° B- 14.00° B- 11.60° M- 42.19° M- 33.36° - Ryobi TS1355LA | English Manual - Page 27
OPERATION CUTTING CROWN MOLDING This compound miter saw does an excellent job of cutting crown molding. In general, compound miter saws do a better job of cutting crown molding than any other tool made. In order to fit properly, crown molding must be compound mitered with extreme accuracy. The two - Ryobi TS1355LA | English Manual - Page 28
. Place the stop in the hole on the left side of the saw's base. See Figure 38. With the bottom of the molding (wall side) against the miter fence and the top of the molding (ceiling side) against the miter table, align with the desired mark on the throat plate then spin the - Ryobi TS1355LA | English Manual - Page 29
OPERATION CUTTING WARPED MATERIAL See Figures 40 - 41. When cutting warped material, always make sure it is positioned on the miter table with the convex side against the fence as shown in figure 40. If the warped material is positioned the wrong way as shown in - Ryobi TS1355LA | English Manual - Page 30
PIVOT ADJUSTMENT The compound miter saw should bevel easily by loosening the bevel lock knob and tilting the saw arm to the left. If movement is tight or if there is play in the pivot, have saw repaired at your nearest RYOBI AUTHORIZED SERVICE CENTER. TO ADJUST THE LASER GUIDE See Figure 43 - Ryobi TS1355LA | English Manual - Page 31
miter table support before starting the saw. Make adjustments if needed. DEPTH STOP ADJUSTMENTS See Figure 44. Unplug the saw. To adjust the depth stop use a 10 . Square the blade to the miter table as described in the Assembly section of this manual. Retighten bevel lock knob. Next - Ryobi TS1355LA | English Manual - Page 32
servicing, use only identical replacement parts. Use of any other parts may create a hazard or cause product damage. WARNING: Always wear safety goggles or safety glasses with side shields during power tool operation or when blowing dust. If operation , wallboard, spackling compounds, or plaster are - Ryobi TS1355LA | English Manual - Page 33
is activated by means of a centrifugal switch only while the saw motor is running and the laser guide is mounted on the saw. After cleaning the laser guide and replacing the batteries, secure the laser guide cover to laser guide support using the two phillips head screws. For proper assembly, be - Ryobi TS1355LA | English Manual - Page 34
OPERATOR'S MANUAL 10 in. Compound Miter Saw TS1355LA - Double Insulated WARNING: Some dust created by power sanding, sawing, grinding, drilling, and other construction activities contains chemicals known to cause cancer, birth defects or other reproductive harm. Some examples of these chemicals are
-
 1
1 -
 2
2 -
 3
3 -
 4
4 -
 5
5 -
 6
6 -
 7
7 -
8
-
9
-
10
-
11
-
12
-
13
-
14
-
15
-
16
-
17
-
18
-
19
-
20
-
21
-
22
-
23
-
24
-
25
-
26
-
27
-
28
-
29
-
30
-
31
-
32
-
33
-
34
 |
 |
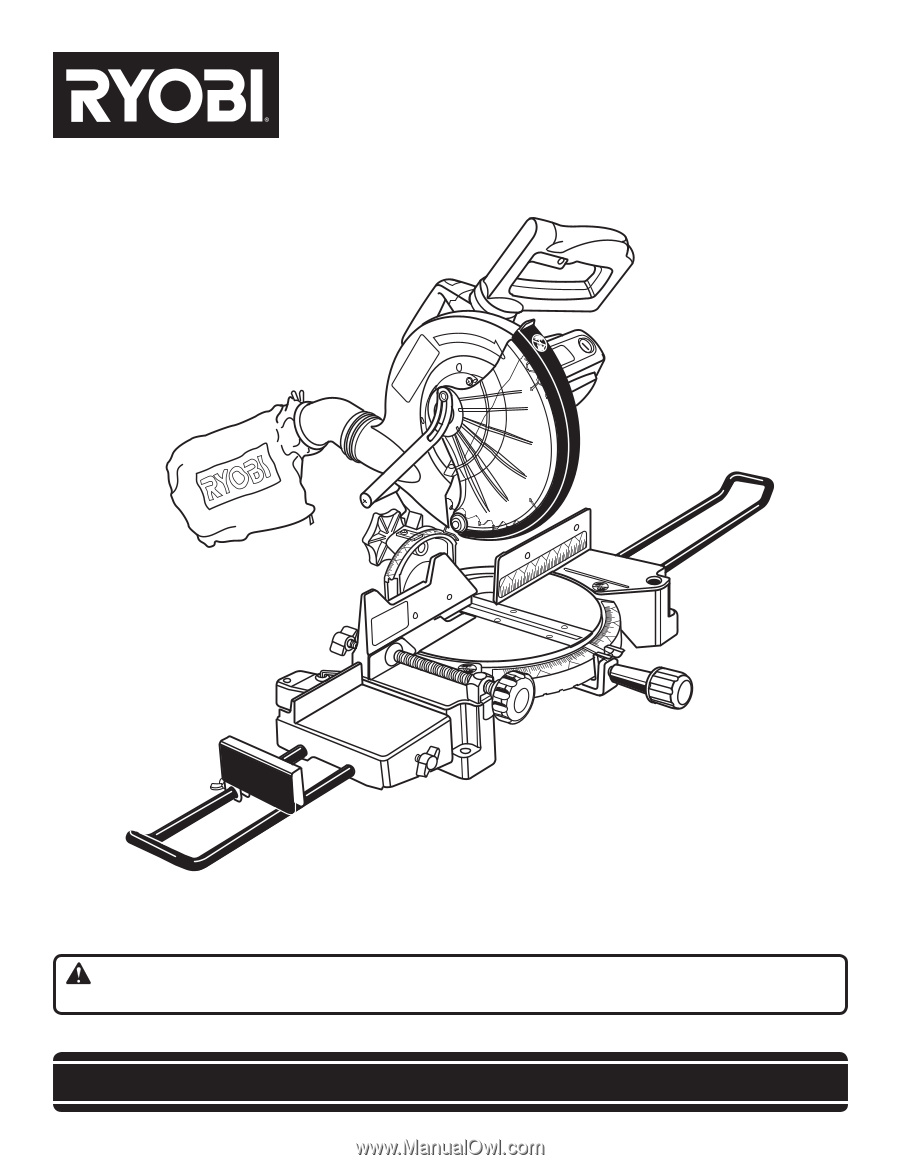
SAVE THIS MANUAL FOR FUTURE REFERENCE
Your miter saw has been engineered and manufactured to our high standard for dependability, ease of operation, and
operator safety. When properly cared for, it will give you years of rugged, trouble-free performance.
WARNING:
To reduce the risk of injury, the user must read and understand the operator’s manual before using
this product.
Thank you for purchase.
OPERATOR’S MANUAL
10 in. Compound Miter Saw
TS1355LA - Double Insulated