Ryobi TS1355LA English Manual - Page 28
Cutting Molding Using The Crown, Molding Stop
 |
View all Ryobi TS1355LA manuals
Add to My Manuals
Save this manual to your list of manuals |
Page 28 highlights
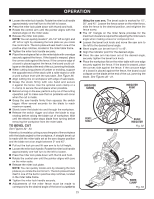
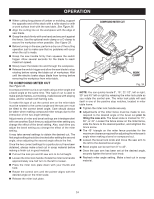
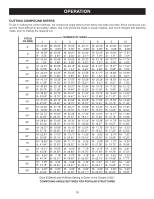
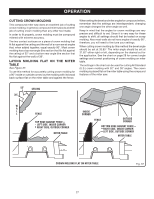
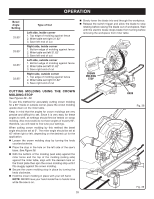
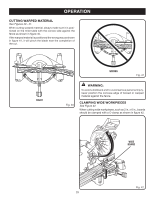
OPERATION Bevel Angle Setting 33.85° 33.85° 33.85° 33.85° Type of Cut Left side, inside corner 1. Top edge of molding against fence 2. Miter table set right 31.62° 3. Save left end of cut Right side, inside corner 1. Bottom edge of molding against fence 2. Miter table set left 31.62° 3. Save left end of cut Left side, outside corner 1. Bottom edge of molding against fence 2. Miter table set left 31.62° 3. Save right end of cut Right side, outside corner 1. Top edge of molding against fence 2. Miter table set right 31.62° 3. Save right end of cut Slowly lower the blade into and through the workpiece. Release the switch trigger and allow the blade to stop rotating before raising the blade out of workpiece. Wait until the electric brake stops blade from turning before removing the workpiece from miter table. CROWN MOLDING STOP CUTTING MOLDING USING THE CROWN MOLDING STOP See Figures 38 - 39. To use this method for accurately cutting crown molding for a 90° inside or outside corner, place the crown molding upside down on the miter table. Keep in mind that the angles for crown moldings are very precise and difficult to set. Since it is very easy for these angles to shift, all settings should first be tested on scrap molding. Also most walls do not have angles of exactly 90°, therefore, you will need to fine tune your settings. When cutting crown molding by this method the bevel angle should be set at 0°. The miter angle should be set at 45° either right or left, depending on the desired cut for the application. Loosen the crown molding stop by turning the knob counterclockwise. Place the stop in the hole on the left side of the saw's base. See Figure 38. With the bottom of the molding (wall side) against the miter fence and the top of the molding (ceiling side) against the miter table, align with the desired mark on the throat plate then spin the crown molding stop until it fits snuggly against the crown molding. Secure the crown molding stop in place by turning the knob clockwise. Hold the crown molding in place with your left hand. NOTE: NEVER have your hand inside the no hands zone while the saw is on. 28 KNOB Fig. 38 Fig. 39
-
 1
1 -
2
-
3
-
4
-
5
-
6
-
7
-
8
-
9
-
10
-
11
-
12
-
13
-
14
-
15
-
16
-
17
-
18
-
19
-
20
-
21
-
22
-
 23
23 -
 24
24 -
 25
25 -
 26
26 -
 27
27 -
 28
28 -
 29
29 -
 30
30 -
 31
31 -
 32
32 -
 33
33 -
34
 |
 |
