Ryobi TS1355LA English Manual - Page 33
Changing Th, Warning
 |
View all Ryobi TS1355LA manuals
Add to My Manuals
Save this manual to your list of manuals |
Page 33 highlights
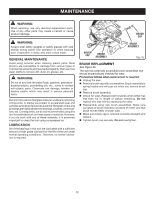
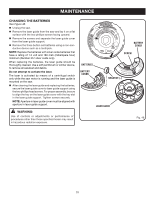
MAINTENANCE CHANGING THE BATTERIES See Figure 46. Unplug the saw. Remove the laser guide from the saw and lay it on a flat surface with the two phillips screws facing upward. Remove the screws and separate the laser guide cover from the laser guide support. Remove the three button cell batteries using a non-con- ductive device such as a toothpick. NOTE: Replace the batteries with silver oxide batteries that have a rating of 1.5 volt and 180 mah (milliampere hour) minimum (Number 357 silver oxide only). When replacing the batteries, the laser guide should be thoroughly cleaned. Use a soft paintbrush or similar device, to remove all sawdust and debris. Do not attempt to activate the laser. The laser is activated by means of a centrifugal switch only while the saw motor is running and the laser guide is mounted on the saw. After cleaning the laser guide and replacing the batteries, secure the laser guide cover to laser guide support using the two phillips head screws. For proper assembly, be sure to align the key on the laser guide cover with the key slot in the laser guide support. Tighten screws securely. NOTE: Aperture in laser guide cover must be aligned with aperture in laser guide support. WARNING: Use of controls or adjustments or performance of procedures other than those specified herein may result in hazardous radiation exposure. BATTERIES BATTERY COVER BATTERY COVER SCREW WITH 21 CFR and 10 4011 No D460 86P2A7RT2SO71MP0Pa4tLI0e1Ent0S RECT 635 SER RXIAMUDIMATOIUOTPNUT LA MA WAVELENGTAVHOIO DI 5mW 5 No DANGER OPENBAFTOTSREEREBYAOCTPOTEMERRPAYATRROETRMPSLEANMCTAENMUEANLT C Patent NEGATIVE (-) LASER GUIDE Fig. 46 33
-
 1
1 -
2
-
3
-
4
-
5
-
6
-
7
-
8
-
9
-
10
-
11
-
12
-
13
-
14
-
15
-
16
-
17
-
18
-
19
-
20
-
21
-
22
-
23
-
24
-
25
-
26
-
27
-
 28
28 -
 29
29 -
 30
30 -
 31
31 -
 32
32 -
 33
33 -
 34
34
 |
 |
