Ryobi TSS101L English Manual - Page 16
Work Clamp, Warning, Table Extensions
 |
View all Ryobi TSS101L manuals
Add to My Manuals
Save this manual to your list of manuals |
Page 16 highlights
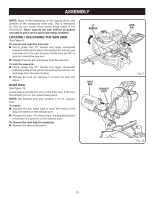
ASSEMBLY WORK CLAMP See Figure 11. WARNING: In some operations, the work clamp assembly may interfere with the operation of the blade guard assembly. Always make sure there is no interference with the blade guard prior to beginning any cutting operation to reduce the risk of serious personal injury. The work clamp provides greater control by clamping the workpiece to the fence or the saw table. It also prevents the workpiece from creeping toward the saw blade. This is very helpful when cutting compound miters. Depending on the cutting operation and the size of the workpiece, it may be necessary to use a C-clamp instead of the work clamp to secure the workpiece prior to making the cut. To install the work clamp: Place the work clamp shaft in one of the holes located behind the miter fence. Tighten work clamp knob securely. Rotate the knob on the work clamp to move it up or down as needed. TABLE EXTENSIONS See Figures 12 - 13. To install table extensions, insert the ends of extensions into the holes in the sides of the base. Adjust the extensions to the desired length. Secure extensions in place by positioning a clamp bracket under each table extension beneath the miter table. Orient each clamp bracket as shown in figure 13. Secure each clamp bracket in place with a clamp bracket screw. The clamp bracket screw threads through the clamp bracket and tightens against bracket support on bottom of miter table, securing clamp bracket against table extension. TABLE EXTENSION BASE TABLE EXTENSION SAW VIEWED FROM BOTTOM BASE Fig. 12 Work shaft knob Work Clamp CLAMP BRACKET Base Fig. 11 16 CLAMP BRACKET Fig. 13
-
 1
1 -
2
-
3
-
4
-
5
-
6
-
7
-
8
-
9
-
10
-
 11
11 -
 12
12 -
 13
13 -
 14
14 -
 15
15 -
 16
16 -
 17
17 -
 18
18 -
 19
19 -
 20
20 -
 21
21 -
22
-
23
-
24
-
25
-
26
-
27
-
28
-
29
-
30
-
31
-
32
-
33
-
34
-
35
-
36
 |
 |
