Samsung DVD-N501/XAA User Manual (user Manual) (ver.1.0) (English) - Page 5
Description-Rear Panel Description-Front Panel
 |
View all Samsung DVD-N501/XAA manuals
Add to My Manuals
Save this manual to your list of manuals |
Page 5 highlights
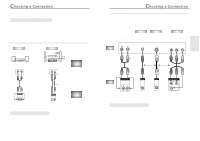
Description-Front Panel HDCD 12 3 4 56 7 8 9 Front Panel Controls 1 STANDBY/ON 5 OPEN/CLOSE • When the unit is first plugged in, • Press to open and close the disc tray. this indicator lights. 2 NUON PORTS • Allow you to plug in a joystick or other peripherals. 3 DISPLAY • Operation indicators are displayed here. 4 DISC TRAY • Press OPEN/CLOSE to open and close the disc tray. 6 SCREEN FIT • Allows you to eliminate the black bars of the screen and fill any TV screen completely with the picture. 7 PLAY/PAUSE • Begin or pause disc play. 8 STOP • Stops disc play. 9 SKIP • Use to skip chapters or tracks. 2 5 67 8 9 10 1 11 12 34 Front Panel Display 1 Angle indicator. You can select multiple angles of a scene recorded by different cameras. 2 Disc type indicators 3 Reverse play / Pause / Forward play 4 Lights when 3D surround is turned on. 5 Title number 6 Chapter number. 7 Video/Audio CD : Track number 8 Repeat play mode 9 Linear PCM audio output 10 Dolby Digital Audio output 11 DTS (Digital Theater System) output 8 14 13 12 MP3 indicator 13 MPEG-2 Audio output 14 Displays various messages concerning operations such as PLAY, STOP, LOAD, ... no DISC : No disc loaded. OPEN : The disc tray is open. LOAD : Player is loading disc information. HDCD : When an HDCD® recording is detected, the letters "HDCD" will flash for about 10 seconds at the beginning of every track. Description-Rear Panel 1 2 34 5 Rear Panel Jacks 1 DIGITAL AUDIO OUT JACK • Use an optical or coxial digital cable to connect to a compatible Dolby Digital receiver. Use to connect to an A/V Amplifier that contains a Dolby Digital decoder or DTS decoder. 2 ANALOG AUDIO OUT JACKS • Connect to the Audio input jacks of your television, audio/video receiver, or VCR. 3 VIDEO OUT JACK • Use a video cable to connect to the Video input jack on your television. 4 S-VIDEO OUT JACK • Use the S-Video cable to connect this jack to the S-Video jack on your television for a higher quality picture. 5 COMPONENT VIDEO OUT JACKS • Use these jacks if you have a TV with Component Video in jacks. These jacks provide Pr, Pb and Y video. Along with S-Video, Component Video provides the best picture quality. 9 SETUP
-
 1
1 -
 2
2 -
 3
3 -
 4
4 -
 5
5 -
 6
6 -
 7
7 -
 8
8 -
 9
9 -
 10
10 -
 11
11 -
12
-
13
-
14
-
15
-
16
-
17
-
18
-
19
-
20
-
21
-
22
 |
 |
