Samsung HP-P5071 User Manual (user Manual) (ver.1.0) (English) - Page 11
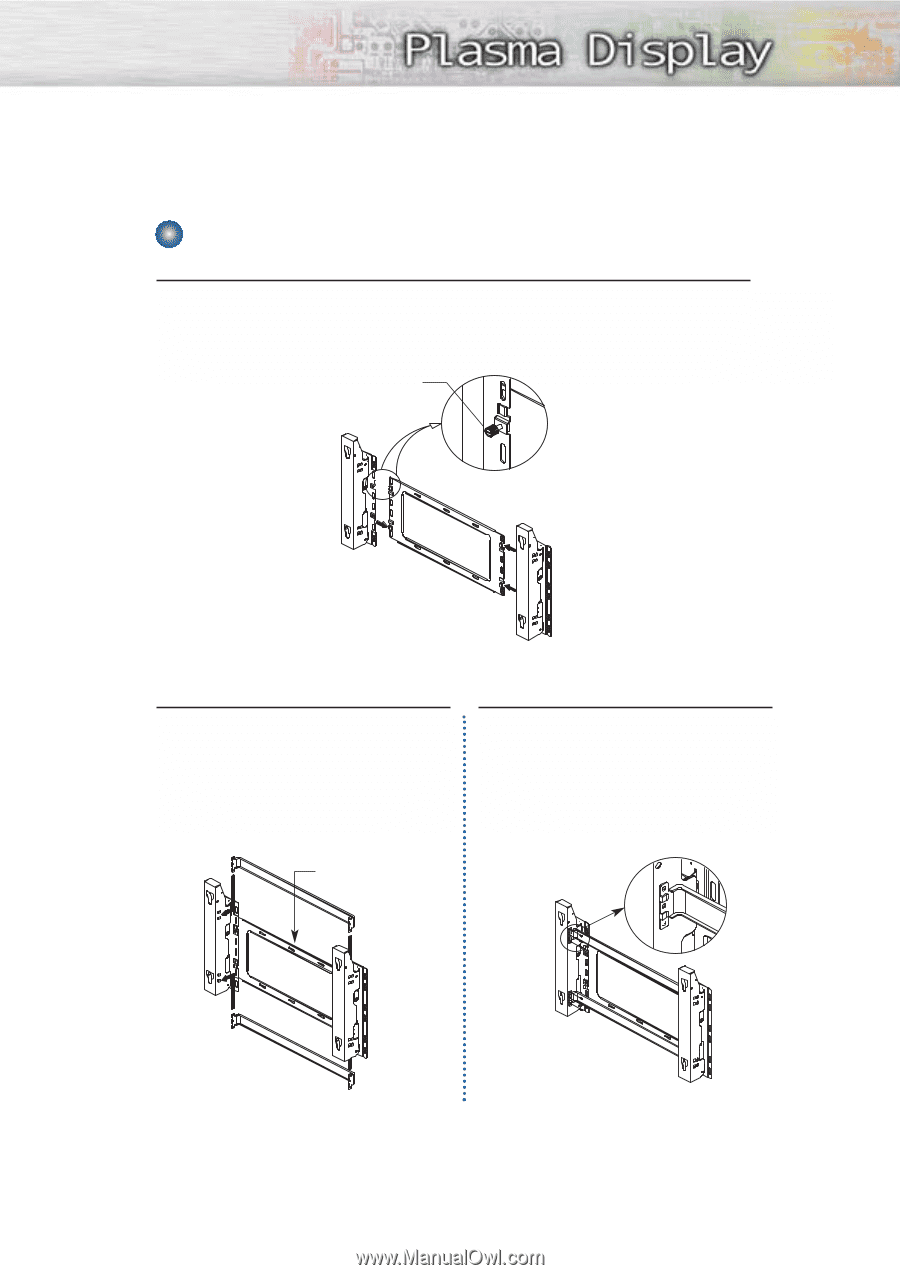
How to assemble the Wall Mount Bracket
 |
View all Samsung HP-P5071 manuals
Add to My Manuals
Save this manual to your list of manuals |
Page 11 highlights
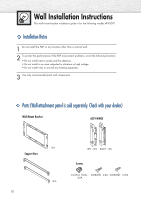
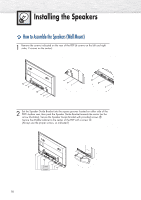
How to assemble the Wall Mount Bracket 1 The wall mount comes packaged in 3 parts. These parts must be assembled together. Please tighten the captive screw in the direction of the arrow after assembling the bracket. Install the Wall Mount Bracket after the screws are securely inserted into the wall. Captive Screws ASSY-HINGE (LEFT) Separate ASSY-HINGE into Left and Right. Wall Mount Bracket ASSY-HINGE (RIGHT) 2 After installing the Wall Mount Bracket, assemble the support bars and hinges (as illustrated) using screws provided. (12 screws(@) are provided. For safety reasons, make sure all 12 screws are firmly attached.) 3 After securing the screws, be sure that every part is firmly attached (as shown in the illustration). ASSY-HINGE (LEFT) Wall Mount Bracket Support Bars ASSYHINGE (LEFT) Support Bars ASSY-HINGE (RIGHT) ASSY-HINGE (RIGHT) 11
-
 1
1 -
2
-
3
-
4
-
5
-
 6
6 -
 7
7 -
 8
8 -
 9
9 -
 10
10 -
 11
11 -
 12
12 -
 13
13 -
 14
14 -
 15
15 -
 16
16 -
17
-
18
-
19
-
20
-
21
-
22
-
23
-
24
-
25
-
26
-
27
-
28
-
29
-
30
-
31
-
32
-
33
-
34
-
35
-
36
-
37
-
38
-
39
-
40
-
41
-
42
-
43
-
44
-
45
-
46
-
47
-
48
-
49
-
50
-
51
-
52
-
53
-
54
-
55
-
56
-
57
-
58
-
59
-
60
-
61
-
62
-
63
-
64
-
65
-
66
-
67
-
68
-
69
-
70
-
71
-
72
-
73
-
74
-
75
-
76
-
77
-
78
-
79
-
80
-
81
-
82
-
83
-
84
-
85
-
86
-
87
-
88
-
89
-
90
-
91
-
92
-
93
-
94
-
95
-
96
-
97
-
98
-
99
-
100
-
101
-
102
-
103
-
104
-
105
-
106
-
107
-
108
-
109
-
110
-
111
-
112
-
113
-
114
-
115
-
116
 |
 |