Samsung HT-DB660 User Manual (user Manual) (ver.1.0) (English) - Page 30
Setting the RRSS(Rear Reflecting Surround System
 |
View all Samsung HT-DB660 manuals
Add to My Manuals
Save this manual to your list of manuals |
Page 30 highlights
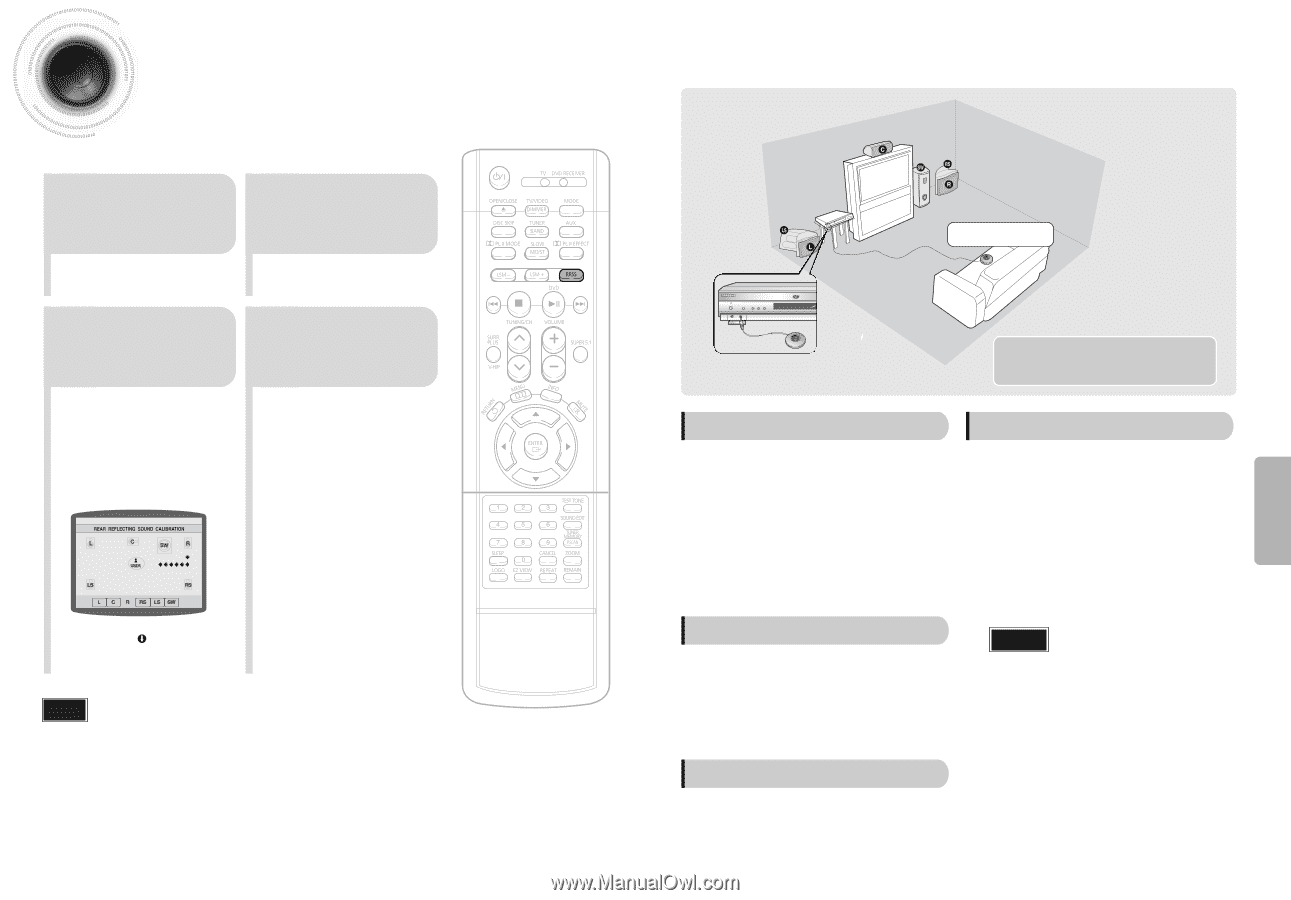
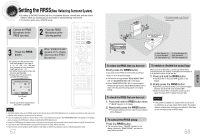
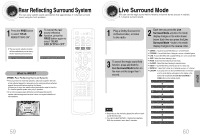
Setting the RRSS(Rear Reflecting Surround System) • By setting up the RRSS function just once, the speaker distance, channel level, and rear sound reflection effect are automatically set and create an optimal listening environment. • This function works only in DVD/CD mode. 1 Connect the RRSS Microphone to the RRSS input jack. 2 Place the RRSS Microphone at the listening position. 3 Press the RRSS button. • A speaker tone will be heard once from each speaker in the order of L ➝ C ➝ R ➝ RS ➝ LS ➝ SW, and then the newly set error tone will be heard again from L ➝ R. • An optimal listening environment will be set up automatically. • It takes about 3 to 4 minutes to complete the RRSS setup. 4 When "REMOVE MIC" appears on the display, disconnect the RRSS Microphone. Tone Output A piano sound will be heard and the setup will be completed. Note • The RRSS button works as the RRSS setup function shown above if the RRSS Microphone is connected, and works as the rear sound reflection effect function if the microphone is removed. • If you are installing the system for the first time or if you have initialized the system, "NO MEASURED DATA" will appear on the display when you press the RRSS button without connecting the RRSS Microphone. • During the RRSS setup, the output volume of the tone is fixed and you cannot use the volume control buttons to adjust the output level. • If you remove the RRSS Microphone during the RRSS setup, the setup will be cancelled. • Place the front and left speakers (L/R) toward the side walls so that the rear speaker sound is reflected against the walls. 57 * The following images are for illustrative purposes only and may differ from the actual product. Auto Sound Calibration Microphone L: Front Speaker (L) C: Center Speaker LS: Rear Speaker (L) R: Front Speaker (R) SW: Subwoofer RS: Rear Speaker (R) To select the RRSS that you have set To enable or disable the sound logo Briefly press the RRSS button. (If you have set the RRSS for the first time according to Steps 1 to 3 on the previous page) • Your selection will toggle between "REAR REFLECTING ON" and "REAR REFLECTING OFF" on the display. • Select "REAR REFLELTING ON" to listen using the RRSS setting and select "REAR REFLECTING OFF" to listen to the disc currently being played in its original setting. When you turn on the power, a sound logo will be heard, indicating that the disc reading is completed and the player is in its optimal condition to play the disc. 1. Press and hold the RRSS button. • "S.LOGO ON" or "S.LOGO OFF" appears on the display. 2. Briefly press the RRSS button. • Each time you press the button, your selection toggles between "S.LOGO ON" and "S.LOGO OFF". • Select "S.LOGO ON" to enable the sound logo and select "S.LOGO OFF" to disable the sound logo. To check the RRSS that you have set 1. Press and hold the RRSS button twice. • "CHECK" appears on the display. 2. Next,briefly press the RRSS button. • The speaker distance and level value for each channel will be displayed. Caution • If the system is installed at a location where sound cannot be reflected (e.g., an open space without walls), the speaker distance, channel level, and rear sound reflection effect may be set incorrectly during the RRSS setup. To cancel the RRSS setup Press the RRSS button. • The tone output stops, "CANCEL" appears on the display, followed by "REMOVE MIC", and then the setup will be cancelled. 58 SETUP
-
 1
1 -
2
-
3
-
4
-
5
-
6
-
7
-
8
-
9
-
10
-
11
-
12
-
13
-
14
-
15
-
16
-
17
-
18
-
19
-
20
-
21
-
22
-
23
-
24
-
 25
25 -
 26
26 -
 27
27 -
 28
28 -
 29
29 -
 30
30 -
 31
31 -
 32
32 -
 33
33 -
 34
34 -
 35
35 -
36
-
37
-
38
 |
 |