Samsung MultiXpress SCX-8623 User Manual Ver.1.03 (English) - Page 103
Graphics tab, Finishing tab, Document Type, Color Mode, Font/Text
 |
View all Samsung MultiXpress SCX-8623 manuals
Add to My Manuals
Save this manual to your list of manuals |
Page 103 highlights
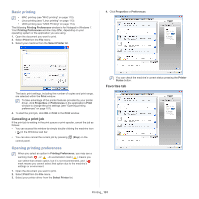
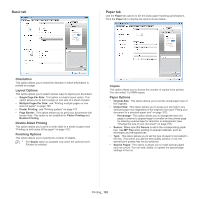
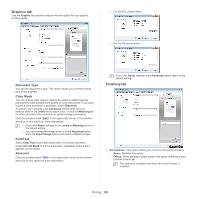
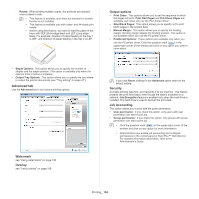
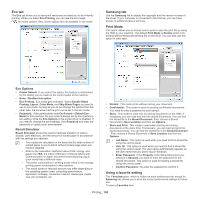
Graphics tab Use the Graphic tab options to adjust the print quality for your specific printing needs. • For the PCL printer driver: • For the PS printer driver: Document Type You can the document's type. This option allows you to set the actual type of the originals. Color Mode You can choose color options. Setting this option to Color typically produces the best possible print quality for color documents. If you want to print a color document in grayscale, select Grayscale. To adjust color manually, click Advanced. Simply slide the color balance slider in the Levels tab to adjust color, or click the Matching tab for driver provided color correction for general image processing. Click the question mark ( ) in the upper-right corner of the window and click on any option for more information. • If you click Reset, settings in the Levels or Matching return to the default setting. • You can change the image which is in the Advanced option. Click the Import Image button and select a different image. Font/Text Select Clear Text to print text darker than in a normal document. Check All Text Black to print in solid black, regardless of the color it appears on the screen. Advanced Click the question mark ( ) in the upper-right corner of the window and click on any option for more information. If you click Reset, settings in the Advanced option return to the default setting. Finishing tab • Sort Options: This option allows you to sort out the printouts easily. - None: Disables this option. - Offset: When printing multiple copies, this option shifts the output position of each set. This feature is available only when the Inner Finisher is installed. Printing_ 103
-
 1
1 -
2
-
3
-
4
-
5
-
6
-
7
-
8
-
9
-
10
-
11
-
12
-
13
-
14
-
15
-
16
-
17
-
18
-
19
-
20
-
21
-
22
-
23
-
24
-
25
-
26
-
27
-
28
-
29
-
30
-
31
-
32
-
33
-
34
-
35
-
36
-
37
-
38
-
39
-
40
-
41
-
42
-
43
-
44
-
45
-
46
-
47
-
48
-
49
-
50
-
51
-
52
-
53
-
54
-
55
-
56
-
57
-
58
-
59
-
60
-
61
-
62
-
63
-
64
-
65
-
66
-
67
-
68
-
69
-
70
-
71
-
72
-
73
-
74
-
75
-
76
-
77
-
78
-
79
-
80
-
81
-
82
-
83
-
84
-
85
-
86
-
87
-
88
-
89
-
90
-
91
-
92
-
93
-
94
-
95
-
96
-
97
-
 98
98 -
 99
99 -
 100
100 -
 101
101 -
 102
102 -
 103
103 -
 104
104 -
 105
105 -
 106
106 -
 107
107 -
 108
108 -
109
-
110
-
111
-
112
-
113
-
114
-
115
-
116
-
117
-
118
-
119
-
120
-
121
-
122
-
123
-
124
-
125
-
126
-
127
-
128
-
129
-
130
-
131
-
132
-
133
-
134
-
135
-
136
-
137
-
138
-
139
-
140
-
141
-
142
-
143
-
144
-
145
-
146
-
147
-
148
-
149
-
150
-
151
-
152
-
153
-
154
-
155
-
156
-
157
-
158
-
159
-
160
-
161
-
162
-
163
-
164
-
165
-
166
-
167
-
168
-
169
-
170
-
171
-
172
-
173
-
174
-
175
-
176
-
177
-
178
 |
 |
