Samsung MultiXpress SCX-8623 User Manual Ver.1.03 (English) - Page 68
Sending a fax, Setting the fax header, Sending a fax using speed dial numbers
 |
View all Samsung MultiXpress SCX-8623 manuals
Add to My Manuals
Save this manual to your list of manuals |
Page 68 highlights
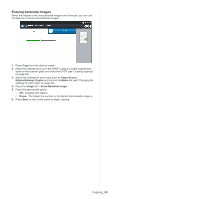
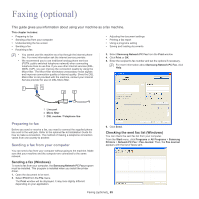
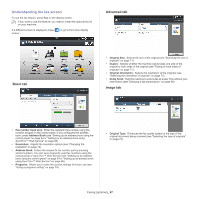
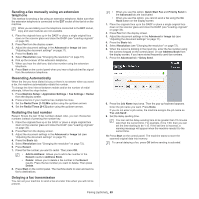
Sending a fax This part explains how to send a fax and the special methods of transmission. When you place the originals, you can use either the DADF or the scanner glass. If the originals are placed on both the DADF and the scanner glass, the machine will read the originals on the DADF first, because it has higher priority in scanning. Setting the fax header In some countries, you are required by law to indicate your fax number on any fax you send. 1. Press Machine Setup > Application Settings > Fax Settings > Machine ID & Fax No from the display screen. 2. Press a fax line if your machine has multiple fax lines. 3. Press the ID Name input area. The pop-up keyboard appears. Enter your name or the company name. Press OK. 4. Press the Fax Number input area. Enter your fax number using the numeric keypad on the control panel. 5. Press OK to save the information. Sending a fax 1. Place the originals face up in the DADF or place a single original face down on the scanner glass and close the DADF (see "Loading originals" on page 38). This machine automatically reduces the original document to fit the paper size of the recipient's fax. For example, the origianl document size is A3-sized paper and the paper loaded on recipient's fax is A4-sized paper, the original paper get reduced to be fit to A4-sized paper. 2. Press Fax from the display screen. 3. Adjust the document settings in the Advanced or Image tab (see "Adjusting the document settings" on page 71). 4. Press the Basic tab. 5. Select Resolution (see "Changing the resolution" on page 72). 6. When the cursor is blinking in the input line, enter the fax number using the numeric keypad on the control panel, or use Address Book from the display screen, if you have stored frequently used fax numbers. • You can send a fax to up to 10 destinations at once. • To insert a pause, press Pause at the appropriate place while entering the fax number. "-" appears on the display at the corresponding location. 7. Press Start on the control panel. The machine starts to scan and send a fax to the destinations. • You can send a fax directly from your computer (see "Sending a fax from your computer" on page 65). • When you want to cancel a fax job, press Stop on the control panel before the machine starts transmission, or press the Job Status button on the control panel, and select the job you want to delete, then press Delete (see "Job Status button" on page 36). • If an original is placed on the scanner glass, the machine shows the window asking if you want to place another page. Load another original and press Yes. When you finish, press No on this window. • While the machine is sending a fax, you cannot send an email at the same time. Sending a fax using speed dial numbers When you are prompted to enter a destination number while sending a fax, enter the speed dial number you set previously (see "Setting up an address book" on page 94). 1. Place the originals face up in the DADF or place a single original face down on the scanner glass and close the DADF (see "Loading originals" on page 38). 2. Press Fax from the display screen. 3. Adjust the document settings in the Advanced or Image tab (see "Adjusting the document settings" on page 71). 4. Press the Basic tab. 5. Select Resolution (see "Changing the resolution" on page 72). 6. When the cursor is blinking in the input line: • For a one-digit (0-9) speed dial number, press and hold the corresponding digit button using the numeric keypad on the control panel. • For a two- or three-digit speed dial number, press the first digit button(s) and then hold down the last digit button using the numeric keypad on the control panel. 7. Press Start on the control panel. The machine starts to scan and send a fax to the destination. Sending a fax manually using On Hook This method is sending a fax using On Hook in the Basic tab. When you use Delay Send, Quick Start Fax and Priority Send in the Advanced tab, you cannot send a fax using On Hook. 1. Place the originals face up in the DADF or place a single original face down on the scanner glass and close the DADF (see "Loading originals" on page 38). 2. Press Fax from the display screen. 3. Adjust the document settings in the Advanced or Image tab (see "Adjusting the document settings" on page 71). 4. Press the Basic tab. 5. Select Resolution (see "Changing the resolution" on page 72). 6. Press On Hook on the display screen. 7. When you hear the dial tone, enter a fax number using the numeric keypad on the control panel. 8. Press Start when you hear a high-pitched fax signal from the remote fax machine. Faxing (optional)_ 68
-
 1
1 -
2
-
3
-
4
-
5
-
6
-
7
-
8
-
9
-
10
-
11
-
12
-
13
-
14
-
15
-
16
-
17
-
18
-
19
-
20
-
21
-
22
-
23
-
24
-
25
-
26
-
27
-
28
-
29
-
30
-
31
-
32
-
33
-
34
-
35
-
36
-
37
-
38
-
39
-
40
-
41
-
42
-
43
-
44
-
45
-
46
-
47
-
48
-
49
-
50
-
51
-
52
-
53
-
54
-
55
-
56
-
57
-
58
-
59
-
60
-
61
-
62
-
 63
63 -
 64
64 -
 65
65 -
 66
66 -
 67
67 -
 68
68 -
 69
69 -
 70
70 -
 71
71 -
 72
72 -
 73
73 -
74
-
75
-
76
-
77
-
78
-
79
-
80
-
81
-
82
-
83
-
84
-
85
-
86
-
87
-
88
-
89
-
90
-
91
-
92
-
93
-
94
-
95
-
96
-
97
-
98
-
99
-
100
-
101
-
102
-
103
-
104
-
105
-
106
-
107
-
108
-
109
-
110
-
111
-
112
-
113
-
114
-
115
-
116
-
117
-
118
-
119
-
120
-
121
-
122
-
123
-
124
-
125
-
126
-
127
-
128
-
129
-
130
-
131
-
132
-
133
-
134
-
135
-
136
-
137
-
138
-
139
-
140
-
141
-
142
-
143
-
144
-
145
-
146
-
147
-
148
-
149
-
150
-
151
-
152
-
153
-
154
-
155
-
156
-
157
-
158
-
159
-
160
-
161
-
162
-
163
-
164
-
165
-
166
-
167
-
168
-
169
-
170
-
171
-
172
-
173
-
174
-
175
-
176
-
177
-
178
 |
 |
