Samsung NX58R9311SS/AA Installation Guide - Page 25
Step 9. Final installation checklist, FOR INSTALLER ONLY-Check and/or
 |
View all Samsung NX58R9311SS/AA manuals
Add to My Manuals
Save this manual to your list of manuals |
Page 25 highlights
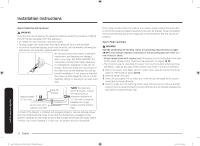
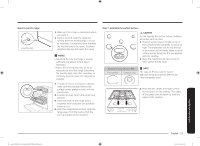
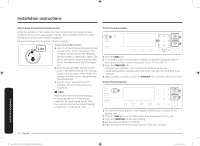
6. When one side of the food is browned, turn it over, close the oven door, and start cooking the other side. 7. When cooking is complete, press the OVEN OFF pad. Checking the flame quality: All combustion flames need to be visually checked to determine their flame quality. 1. Soft blue flames-Normal for natural gas 1 operation. 2. Yellow tips on outer cones-Normal for LP gas operation. 3. Yellow flames-Abnormal for any gas 2 operation; call for service. NOTE 3 If burner flame looks like 3, the range should not be used until it is serviced. Call for service. Normal burner flames shall look like 1 or 2, depending on the gas type you use. Step 9. Final installation checklist You have just completed installing your range. Make sure all controls are in the off position and the flow of ventilation air to the range is unobstructed. The following is a checklist to confirm your range is safely installed and ready for operation. Gas Range Plug Locking screw - Gas line has been properly connected to the range. The gas has been turned on. All connections have been checked for leaks. - Range is plugged into the properly grounded electrical receptacle. - Approved anti-tip bracket is properly installed and engaged with the range. - Range is leveled and is firmly sitting on a solid, level floor. - Gas surface burners have been properly assembled. - All burners have been tested for proper operation. - FOR INSTALLER ONLY-Check and/or adjust the broil and oven burner flames as described on pages 23-24 in this manual. Installation instructions Install_NX58R9311SS_AA_DG68-00906B-00_EN+MES+CFR.indb 25 English 25 2019-06-03 2:18:21
-
 1
1 -
2
-
3
-
4
-
5
-
6
-
7
-
8
-
9
-
10
-
11
-
12
-
13
-
14
-
15
-
16
-
17
-
18
-
19
-
 20
20 -
 21
21 -
 22
22 -
 23
23 -
 24
24 -
 25
25 -
 26
26 -
 27
27 -
 28
28 -
 29
29 -
 30
30 -
31
-
32
-
33
-
34
-
35
-
36
-
37
-
38
-
39
-
40
-
41
-
42
-
43
-
44
-
45
-
46
-
47
-
48
-
49
-
50
-
51
-
52
-
53
-
54
-
55
-
56
-
57
-
58
-
59
-
60
-
61
-
62
-
63
-
64
-
65
-
66
-
67
-
68
-
69
-
70
-
71
-
72
-
73
-
74
-
75
-
76
-
77
-
78
-
79
-
80
-
81
-
82
-
83
-
84
 |
 |
