Samsung RF25HMEDBBC User Manual Ver.0.0 (English, French, Spanish) - Page 11
Warning, Caution - parts
 |
View all Samsung RF25HMEDBBC manuals
Add to My Manuals
Save this manual to your list of manuals |
Page 11 highlights
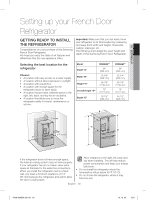
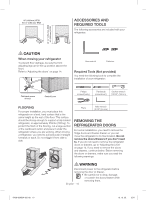
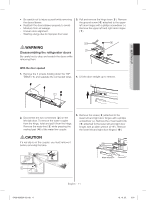
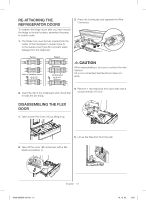
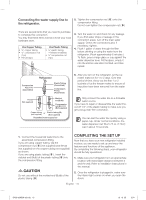
01 SETTING UP • Be careful not to injure yourself while removing the doors/drawer. • Reattach the doors/drawer properly to avoid: - Moisture from air leakage. - Uneven door alignment. - Wasting energy due to improper door seal. 3. Pull and remove the hinge lever ( 5 ). Remove the ground screw ( 6 ) attached to the upper left door hinges with a philips screwdriver (+). Remove the upper left and right door hinges ( 7 ). 5 6 WARNING 7 Disassembling the refrigerator doors Be careful not to drop and scratch the doors while removing them. With the door opened 1. Remove the 3 screws holding down the TOP TABLE ( 1 ) and separate the connected wires. 4. Lift the door straight up to remove. 1 2. Disconnect the two connectors ( 2 ) on the left side door. To remove the water coupler from the hinge, twist and pull it from the hinge. Remove the water line ( 3 ) while pressing the marked part ( 4 ) of the water line coupler. 5. Remove the screw ( 8 ) attached to the lower left and right door hinges with a philips screwdriver (+). Remove the 2 hex head bolts ( 9 ) attached to the lower left and right door hinges with an allen wrench (3/16"). Remove the lower left and right door hinges ( 10 ). CAUTION If a red clip is on the coupler, you must remove it before removing the tube. 2 Red Clip (1/4") 10 8 9 Allen wrench 3 4 English - 11 DA68-02952A-00.indb 11 13. 10. 25. 2:54
-
 1
1 -
2
-
3
-
4
-
5
-
 6
6 -
 7
7 -
 8
8 -
 9
9 -
 10
10 -
 11
11 -
 12
12 -
 13
13 -
 14
14 -
 15
15 -
 16
16 -
17
-
18
-
19
-
20
-
21
-
22
-
23
-
24
-
25
-
26
-
27
-
28
-
29
-
30
-
31
-
32
-
33
-
34
-
35
-
36
-
37
-
38
-
39
-
40
-
41
-
42
-
43
-
44
-
45
-
46
-
47
-
48
-
49
-
50
-
51
-
52
-
53
-
54
-
55
-
56
-
57
-
58
-
59
-
60
-
61
-
62
-
63
-
64
-
65
-
66
-
67
-
68
-
69
-
70
-
71
-
72
-
73
-
74
-
75
-
76
-
77
-
78
-
79
-
80
-
81
-
82
-
83
-
84
-
85
-
86
-
87
-
88
-
89
-
90
-
91
-
92
-
93
-
94
-
95
-
96
-
97
-
98
-
99
-
100
-
101
-
102
-
103
-
104
-
105
-
106
-
107
-
108
-
109
-
110
-
111
-
112
-
113
-
114
-
115
-
116
 |
 |
