Samsung SCX 4828FN User Manual (ENGLISH) - Page 27
Setting the date and time, Changing the clock mode, Setting sounds - fax
 |
UPC - 635753612172
View all Samsung SCX 4828FN manuals
Add to My Manuals
Save this manual to your list of manuals |
Page 27 highlights
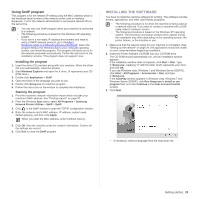
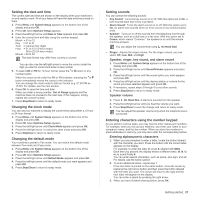
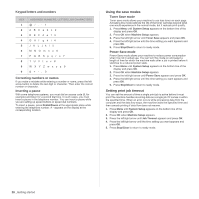
Setting the date and time The current date and time are shown on the display when your machine is on and ready to work. All of your faxes will have the date and time printed on them. 1. Press Menu until System Setup appears on the bottom line of the display and press OK. 2. Press OK when Machine Setup appears. 3. Press the left/right arrow until Date & Time appears and press OK. 4. Enter the correct time and date using the number keypad. Month = 01 to 12 Day = 01 to 31 Year = requires four digits Hour = 01 to 12 (12-hour mode) 00 to 23 (24-hour mode) Minute = 00 to 59 The date format may differ from country to country You can also use the left/right arrow to move the cursor under the digit you want to correct and enter a new number. 5. To select AM or PM for 12-hour format, press the *or # button or any number button. When the cursor is not under the AM or PM indicator, pressing the *or # button immediately moves the cursor to the indicator. You can change the clock mode to 24-hour format (e.g. 01:00 PM as 13:00). For details, see the next section. 6. Press OK to save the time and date. When you enter a wrong number, Out of Range appears and the machine does not proceed to the next step. If this happens, simply reenter the correct number. 7. Press Stop/Clear to return to ready mode. Changing the clock mode You can set your machine to display the current time using either a 12-hour or 24-hour format. 1. Press Menu until System Setup appears on the bottom line of the display and press OK. 2. Press OK when Machine Setup appears. 3. Press the left/right arrow until Clock Mode appears and press OK. 4. Press the left/right arrow to select the other mode and press OK. 5. Press Stop/Clear to return to ready mode. Changing the default mode Your machine is preset to Fax mode. You can switch this default mode between Fax mode and Copy mode. 1. Press Menu until System Setup appears on the bottom line of the display and press OK. 2. Press OK when Machine Setup appears. 3. Press the left/right arrow until Default Mode appears and press OK. 4. Press the left/right arrow until the default mode you want appears and press OK. 5. Press Stop/Clear to return to ready mode. Setting sounds You can control the following sounds: • Key Sound: Turns the key sound on or off. With this option set to On, a tone sounds each time a key is pressed. • Alarm Sound: Turns the alarm sound on or off. With this option set to On, an alarm tone sounds when an error occurs or fax communication ends. • Speaker: Turns on or off the sounds from the telephone line through the speaker, such as a dial tone or a fax tone. With this option set to Comm. which means "Common," the speaker is on until the remote machine answers. You can adjust the volume level using On Hook Dial. • Ringer: Adjusts the ringer volume. For the ringer volume, you can select Off, Low, Mid, and High. Speaker, ringer, key sound, and alarm sound 1. Press Menu until System Setup appears on the bottom line of the display and press OK. 2. Press the left/right arrow until Sound/Volume appears and press OK. 3. Press the left/right arrow until the sound option you want appears and press OK. 4. Press the left/right arrow until the desired status or volume for the sound you have selected appears and press OK. 5. If necessary, repeat steps 3 through 5 to set other sounds. 6. Press Stop/Clear to return to ready mode. Speaker volume 1. Press On Hook Dial. A dial tone sounds from the speaker. 2. Press the left/right arrow until you hear the volume you want. 3. Press Stop/Clear to save the change and return to ready mode. You can adjust the speaker volume only when the telephone line is connected. Entering characters using the number keypad As you perform various tasks, you may need to enter names and numbers. For example, when you set up your machine, you enter your name or your company's name, and the fax number. When you store fax numbers or email addresses in memory, you may also enter the corresponding names. Entering alphanumeric characters 1. When you are prompted to enter a letter, locate the button labeled with the character you want. Press the button until the correct letter appears on the display. For example, to enter the letter O, press 6, labeled with MNO. Each time you press 6, the display shows a different letter, M, N, O, m, n, o and finally 6. You can enter special characters, such as space, plus sign, and etc. For details, see the below section. 2. To enter additional letters, repeat step 1. If the next letter is printed on the same button, move the cursor by pressing the right arrow button and then press the button labeled with the letter you want. The cursor will move to the right and the next letter will appear on the display. You can enter a space by pressing the right arrow. 3. When you have finished entering letters, press OK. Getting started_ 27
-
 1
1 -
2
-
3
-
4
-
5
-
6
-
7
-
8
-
9
-
10
-
11
-
12
-
13
-
14
-
15
-
16
-
17
-
18
-
19
-
20
-
21
-
 22
22 -
 23
23 -
 24
24 -
 25
25 -
 26
26 -
 27
27 -
 28
28 -
 29
29 -
 30
30 -
 31
31 -
 32
32 -
33
-
34
-
35
-
36
-
37
-
38
-
39
-
40
-
41
-
42
-
43
-
44
-
45
-
46
-
47
-
48
-
49
-
50
-
51
-
52
-
53
-
54
-
55
-
56
-
57
-
58
-
59
-
60
-
61
-
62
-
63
-
64
-
65
-
66
-
67
-
68
-
69
-
70
-
71
-
72
-
73
-
74
-
75
-
76
-
77
-
78
-
79
-
80
-
81
-
82
-
83
-
84
-
85
-
86
-
87
-
88
-
89
-
90
-
91
-
92
-
93
-
94
-
95
-
96
-
97
-
98
-
99
-
100
-
101
-
102
-
103
-
104
-
105
-
106
-
107
-
108
-
109
-
110
-
111
-
112
-
113
-
114
-
115
-
116
-
117
-
118
-
119
-
120
-
121
-
122
-
123
-
124
-
125
-
126
-
127
-
128
-
129
-
130
-
131
-
132
-
133
-
134
-
135
-
136
-
137
-
138
-
139
-
140
-
141
-
142
-
143
 |
 |