Samsung SHR-5082 User Manual - Page 22
Freezing And Zooming, Event Monitoring
 |
View all Samsung SHR-5082 manuals
Add to My Manuals
Save this manual to your list of manuals |
Page 22 highlights
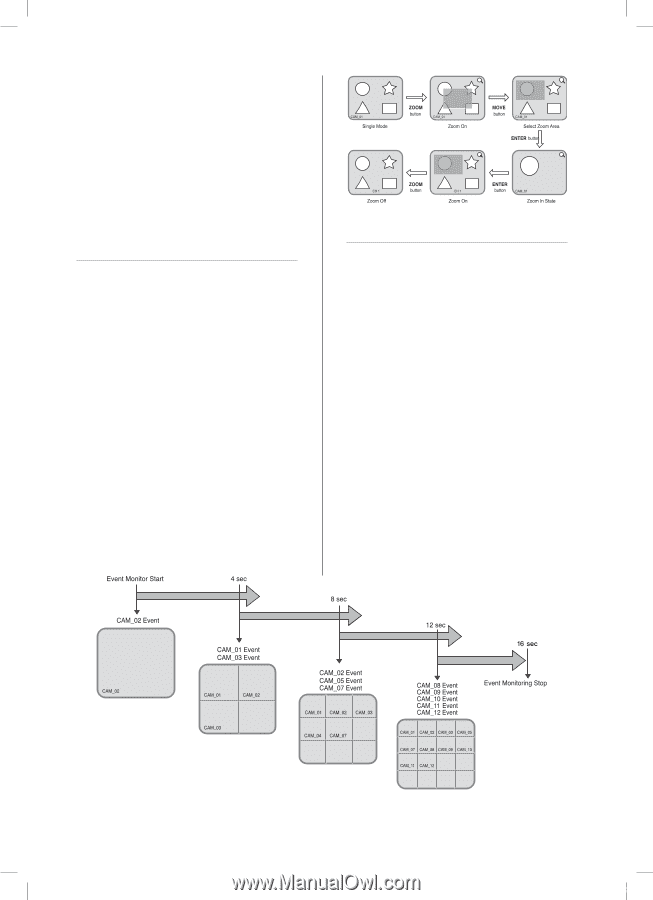
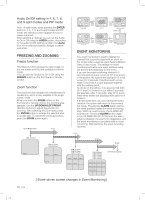
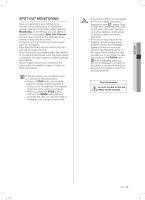
Audio On/Off setting in 4, 6, 7, 8, and 9-split modes and PIP mode As in 16-split mode, when pressing the ENTER button in 4, 6, 7, 8, and 9-split modes and PIP mode, the selection cursor appears for you to select a channel. After selecting a channel, you can set the Audio to On or Off using the AUDIO button. According to the audio On/Off setting condition, the Audio icon of the selected channel changes to yellow and white. FREEZING AND ZOOMING Freeze function The freeze function pauses the video image on the live screen and it is only available in the live mode. You can set this function to On or Off using the FREEZE button on the front panel or remote control. Zoom function The zoom function enlarges the selected area to double size, and it is only available in the single screen mode. When you press the ZOOM button on the front panel or remote control, the zooming area appears. Use the UP/DOWN/LEFT/RIGHT direction buttons to adjust the position for zooming. After selecting the Zoom area, press the ENTER button to enlarge the selected area in double size. To cancel the zooming function, press the ZOOM button again. EVENT MONITORING The event monitoring is used to display the channel that is synchronized with an event on the screen when a special event (Sensor/Motion/ Video Loss) occurs. The settings for event monitoring activation and event duration setup are done in the Monitoring on the menu. If you set the event monitoring interval to 5 seconds and an event occurs at CH 2 as shown in the picture, the system will display CH 2 in full screen for 5 seconds. If another event occurs within 5 seconds, it is also displayed together with the existing event. As shown in the picture, if we assume that both CH 1 and CH 3 events occur within 5 seconds (for example, after 4 seconds), after CH 2 event, these three events are displayed with split into 4 screens. If a new event does not occur during the event duration, the system will return to the previous live mode. Pressing the ALARM button during the event duration makes the event monitoring stop. When an event occurs, the ALARM LED is turned on. Press the ALARM button again to turn ALARM LED Off. At this time, the alarm setup is initialized, the event icon disappears, and the event monitoring is cancelled while in event monitoring. After alarming, the event recording resumes. 18_ live SHR-5162_Eng.indb 18 [ Event-driven screen changes in Event Monitoring ] 2007-06-18 11:48:05
-
 1
1 -
2
-
3
-
4
-
5
-
6
-
7
-
8
-
9
-
10
-
11
-
12
-
13
-
14
-
15
-
16
-
 17
17 -
 18
18 -
 19
19 -
 20
20 -
 21
21 -
 22
22 -
 23
23 -
 24
24 -
 25
25 -
 26
26 -
 27
27 -
28
-
29
-
30
-
31
-
32
-
33
-
34
-
35
-
36
-
37
-
38
-
39
-
40
-
41
-
42
-
43
-
44
-
45
-
46
-
47
-
48
-
49
-
50
-
51
-
52
-
53
-
54
-
55
-
56
-
57
-
58
-
59
-
60
-
61
-
62
-
63
-
64
-
65
-
66
-
67
-
68
-
69
-
70
-
71
-
72
-
73
-
74
-
75
-
76
-
77
-
78
-
79
-
80
-
81
-
82
-
83
-
84
-
85
-
86
-
87
-
88
-
89
-
90
-
91
-
92
-
93
 |
 |