Samsung SM-G730V User Manual Verizon Wireless Sm-g730v Galaxy S 3 Mini Jb Engl - Page 85
Creating Additional Email Accounts, Done with accounts, Email, Settings, Add account
 |
View all Samsung SM-G730V manuals
Add to My Manuals
Save this manual to your list of manuals |
Page 85 highlights
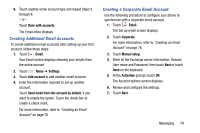
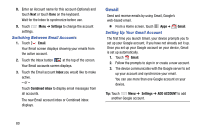
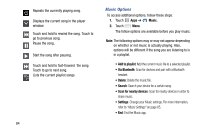
9. Touch another email account type and repeat Steps 3 through 8. - or - Touch Done with accounts. The Email inbox displays. Creating Additional Email Accounts To create additional email accounts after setting up your first account, follow these steps: 1. Touch Email. Your Email screen displays showing your emails from the active account. 2. Touch Menu ➔ Settings. 3. Touch Add account to add another email account. 4. Enter the information required to set up another account. Touch Send email from this account by default, if you want to enable the option. Touch the check box to create a check mark. For more information, refer to "Creating an Email Account" on page 78. Creating a Corporate Email Account Use the following procedure to configure your phone to synchronize with a corporate email account. 1. Touch Email. The Set up email screen displays. 2. Touch Corporate. For more information, refer to "Creating an Email Account" on page 78. 3. Touch Manual setup. 4. Enter all the Exchange server information, Domain, User name and Password, then touch Next or touch Done on the keyboard. 5. At the Activation prompt, touch OK. The Account options screen displays. 6. Review and configure the settings. 7. Touch Next. Messaging 79
-
 1
1 -
2
-
3
-
4
-
5
-
6
-
7
-
8
-
9
-
10
-
11
-
12
-
13
-
14
-
15
-
16
-
17
-
18
-
19
-
20
-
21
-
22
-
23
-
24
-
25
-
26
-
27
-
28
-
29
-
30
-
31
-
32
-
33
-
34
-
35
-
36
-
37
-
38
-
39
-
40
-
41
-
42
-
43
-
44
-
45
-
46
-
47
-
48
-
49
-
50
-
51
-
52
-
53
-
54
-
55
-
56
-
57
-
58
-
59
-
60
-
61
-
62
-
63
-
64
-
65
-
66
-
67
-
68
-
69
-
70
-
71
-
72
-
73
-
74
-
75
-
76
-
77
-
78
-
79
-
 80
80 -
 81
81 -
 82
82 -
 83
83 -
 84
84 -
 85
85 -
 86
86 -
 87
87 -
 88
88 -
 89
89 -
 90
90 -
91
-
92
-
93
-
94
-
95
-
96
-
97
-
98
-
99
-
100
-
101
-
102
-
103
-
104
-
105
-
106
-
107
-
108
-
109
-
110
-
111
-
112
-
113
-
114
-
115
-
116
-
117
-
118
-
119
-
120
-
121
-
122
-
123
-
124
-
125
-
126
-
127
-
128
-
129
-
130
-
131
-
132
-
133
-
134
-
135
-
136
-
137
-
138
-
139
-
140
-
141
-
142
-
143
-
144
-
145
-
146
-
147
-
148
-
149
-
150
-
151
-
152
-
153
-
154
-
155
-
156
-
157
-
158
-
159
-
160
-
161
-
162
-
163
-
164
-
165
-
166
-
167
-
168
-
169
-
170
-
171
-
172
-
173
-
174
-
175
-
176
-
177
-
178
-
179
-
180
-
181
-
182
-
183
-
184
-
185
-
186
-
187
-
188
-
189
-
190
-
191
-
192
-
193
-
194
-
195
-
196
-
197
-
198
-
199
-
200
-
201
-
202
-
203
-
204
-
205
-
206
-
207
-
208
-
209
-
210
-
211
-
212
-
213
-
214
-
215
-
216
-
217
-
218
-
219
-
220
-
221
-
222
-
223
 |
 |
