Samsung SPH-I330SS User Manual (user Manual) (ver.f5) (English) - Page 72
Voice Dial, Play or Erase Recorded Voice Names, Tips on Recording Names, To setup Voice Dialing
 |
View all Samsung SPH-I330SS manuals
Add to My Manuals
Save this manual to your list of manuals |
Page 72 highlights
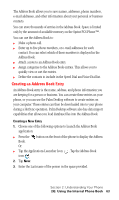
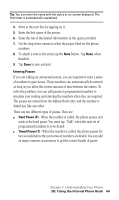
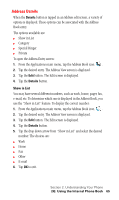
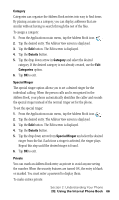
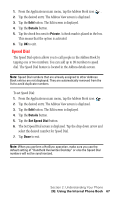
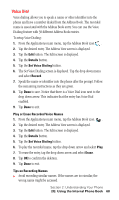
Voice Dial Voice dialing allows you to speak a name or other identifier into the phone and have a number dialed from the Address Book. The recorded name is associated with the Address Book entry. You can use the Voice Dialing feature with 30 different Address Book entries. To setup Voice Dialing: 1. From the Applications main menu, tap the Address Book icon . 2. Tap the desired entry. The Address View screen is displayed. 3. Tap the Edit button. The Edit screen is displayed. 4. Tap the Details button. 5. Tap the Set Voice Dialing button. 6. The Set Voice Dialing screen is displayed. Tap the drop down menu and select Record. 7. Speak the name or identifier into the phone after the prompt. Follow the remaining instructions as they are given. 8. Tap Done to save. Notice that there is a Voice Dial icon next to the drop down arrow. This indicates that the entry has Voice Dial enabled. 9. Tap Done to exit. Play or Erase Recorded Voice Names 1. From the Applications main menu, tap the Address Book icon. . 2. Tap the desired entry. The Address View screen is displayed. 3. Tap the Edit button. The Edit screen is displayed. 4. Tap the Details button. 5. Tap the Set Voice Dialing button. 6. To play the recorded name, tap the drop down arrow and select Play. 7. To erase the entry, tap the drop down arrow and select Erase. 8. Tap OK to confirm the deletion. 9. Tap Done to exit. Tips on Recording Names ᮣ Avoid recording similar names. If the names are too similar, the wrong name might be accessed. Section 2: Understanding Your Phone 2G: Using the Internal Phone Book 68
-
 1
1 -
2
-
3
-
4
-
5
-
6
-
7
-
8
-
9
-
10
-
11
-
12
-
13
-
14
-
15
-
16
-
17
-
18
-
19
-
20
-
21
-
22
-
23
-
24
-
25
-
26
-
27
-
28
-
29
-
30
-
31
-
32
-
33
-
34
-
35
-
36
-
37
-
38
-
39
-
40
-
41
-
42
-
43
-
44
-
45
-
46
-
47
-
48
-
49
-
50
-
51
-
52
-
53
-
54
-
55
-
56
-
57
-
58
-
59
-
60
-
61
-
62
-
63
-
64
-
65
-
66
-
 67
67 -
 68
68 -
 69
69 -
 70
70 -
 71
71 -
 72
72 -
 73
73 -
 74
74 -
 75
75 -
 76
76 -
 77
77 -
78
-
79
-
80
-
81
-
82
-
83
-
84
-
85
-
86
-
87
-
88
-
89
-
90
-
91
-
92
-
93
-
94
-
95
-
96
-
97
-
98
-
99
-
100
-
101
-
102
-
103
-
104
-
105
-
106
-
107
-
108
-
109
-
110
-
111
-
112
-
113
-
114
-
115
-
116
-
117
-
118
-
119
-
120
-
121
-
122
-
123
-
124
-
125
-
126
-
127
-
128
-
129
-
130
-
131
-
132
-
133
-
134
-
135
-
136
-
137
-
138
-
139
-
140
-
141
-
142
-
143
-
144
-
145
-
146
-
147
-
148
-
149
-
150
-
151
-
152
-
153
-
154
-
155
-
156
-
157
-
158
-
159
-
160
-
161
-
162
-
163
-
164
-
165
-
166
-
167
-
168
-
169
-
170
-
171
-
172
-
173
-
174
-
175
-
176
-
177
-
178
-
179
-
180
-
181
-
182
-
183
-
184
-
185
-
186
-
187
-
188
-
189
-
190
-
191
-
192
-
193
-
194
-
195
-
196
-
197
-
198
-
199
-
200
-
201
-
202
-
203
-
204
-
205
-
206
 |
 |