Samsung SSC-1000 User Guide - Page 10
Manipulating the camera - manual
 |
View all Samsung SSC-1000 manuals
Add to My Manuals
Save this manual to your list of manuals |
Page 10 highlights
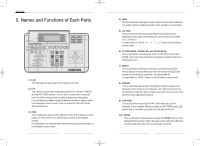
SSC-1000 (gb) 2009.1.8 1:38 PM Page 16 User's Guide * DATA BACK-UP In case changing the camera by downloading the set-up data of the Samsung Dome Camera, this is a M ON = [ 0 0 ] CAM=[ 0 0 0 ] →CAM RESET DOWN LOAD UP LOAD function for applying the set-up value set up in the changed camera just the way it is. In order to perform this mode, move CURSOR(→) to the DATA BACK-UP in the CAMERA SET MENU, and press the ENTER button. If you want to go back to the main menu, press the MENU button. ∗ In this mode, the menu will appear only if the protocol is set to "SAMSUNG", where you can backup data. *-1 In order to initialize the camera connected to the controller, move CURSOR(→) to CAM RESET, and press the ENTER button. *-2 When downloading the set-up data of the camera, move CURSOR(→) to DOWNLOAD, and press the ENTER button. *-3 When you wan to set the set-up data downloaded to the camera, move CURSOR(→) to UPLOAD, and press the ENTER button. ( SYSTEM INFO You can check SSC-1000 for the communication settings and the firmware version. Press the MENU button to return to the previous menu. M ON = [ 0 0 ] CAM=[ 0 0 0 ] ∗ CAM RESET ∗ MON = [00] CAM = [000] DOWN LOADING . . . 120 SEC LEFT. MON = [00] CAM = [000] UP LOADING . . . 120 SEC LEFT. SYSTEM INFO BAUDRATE : 9600 PROTOCOL : SAMSUNG F/W V2.00 - 080812 ) MULTIPLEX CONTROL When you press "MUX CONTROL" button, you can control Multiplex. M ON = [ 0 01] CAM=[ 0 0 0 ] MULTIPLEX CONTROL ∗ If communication error occurs, 'ERR' message appears on the second right line of the LCD for a moment, and then disappears. 16 2) Manipulating the camera ! For manipulating the camera, since only the concerned cam no. indicated in LCD is possible, first select the camera you want to manipulate. For camera selection, when you press CAM+NO+ENTER the camera no. gets indicated in LCD. @ In the third line of LCD, the camera's action state gets indicated. Initially, it appears as "MANUAL". And, in this state, by using the JOY STICK and LENS CONTROL buttons, you can manipulate the light turning mark and the lens. According to the manipulation angle of the Joy Stick, the rotation speed of the light turning mark gets varied. # AUTO PAN action AUTO PAN enables you to move the camera between two preset points you set in the menu If you want to perform Auto Pan, press the AUTO PAN button in Manual mode and enter a desired AUTOPAN number, then press the ENTER button. Then, the LED indicator on the AUTO PAN button flashes with a message of "AUTO PAN [ ]". To deactivate AUTO PAN, press the AUTO PAN button again. $ SCAN action You can scan for multiple preset positions in sequence as set in Scan mode. In Manual mode, enter a desired SCAN number and press the ENTER button to start the scan function. Then, the LED indicator on the SCAN button flashes with a message of "SCAN [ ]". To release Scan mode, press the SCAN button again. % PATTERN action This is a function for watching 30 seconds of the camera's moves set up by the user according to the camera's pattern mode set-up. Press the PATTERN button in the manual state, put in the pattern no. you want, and when you press the ENTER button pattern action gets performed. At this time, the LED of the PATTERN button gets turned on, and "Pattern [ ]" gets indicated in the LCD. If you want to cancel the pattern action, press the PATTERN button once again. ^ PRESET action This is a function for selecting and watching the preset position set up in the camera. If you want to select the PRESET Position you want, press the PRESET button, put in the appropriate number in the position you want, and press the ENTER button. At this time, the LED of the PRESET button gets turned on, "Pattern [ ]" gets indicated in the LCD. Once the operation is finished, current move is changed to MANUAL MODE. 17
-
 1
1 -
2
-
3
-
4
-
 5
5 -
 6
6 -
 7
7 -
 8
8 -
 9
9 -
 10
10 -
 11
11 -
 12
12 -
 13
13
 |
 |
