Sanyo DS32224 Owners Manual
Sanyo DS32224 Manual
 |
View all Sanyo DS32224 manuals
Add to My Manuals
Save this manual to your list of manuals |
Sanyo DS32224 manual content summary:
- Sanyo DS32224 | Owners Manual - Page 1
/Video Input Jacks . . 7 Connecting a DVD 7 Using the Audio Output Jacks 8 Connecting to a Stereo Amplifier 8 Using the Multimedia Remote Control . . . 8 ~ 10 CONTENTS Programming the Remote 10 VCR / Cable Box / DVD Player Codes . . . . . 11 Keys Functions Chart 12 TV Adjustment and Setup How - Sanyo DS32224 | Owners Manual - Page 2
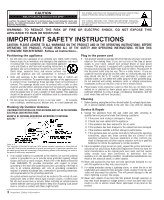
USER-SERVICEABLE PARTS INSIDE. REFER SERVICING TO QUALIFIED SERVICE PERSONNEL. THIS SYMBOL INDICATES THAT THERE ARE IMPORTANT OPERATING AND MAINTENANCE INSTRUCTIONS Code, ANSI/NFPA 70, provides information with respect to proper grounding of the mast and supporting shock. 6. Power-supply cords should - Sanyo DS32224 | Owners Manual - Page 3
Remote Control VCR/ TV/AUX Large Glow-in-the-Dark basic operating keys 0~9 Numbered Channel Selection Channel Scanning Volume Mute Power Recall Display Sleep Caption Reset Menu V-Guide Input VCR/DVD keys N Automatic Fine Tuning VHF and Cable Channels Specifications PICTURE - Sanyo DS32224 | Owners Manual - Page 4
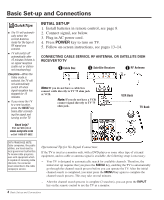
or Call 1-800-877-5032 INITIAL SET-UP 1. Install batteries in remote control, see page 8. 2. Connect signal, see below. 3. Plug in AC power cord. 4. Press POWER key to turn on TV. 5. Follow on-screen instructions, see pages 13~14. CONNECTING CABLE SERVICE, RF ANTENNA, OR SATELLITE DISH RECEIVER TO - Sanyo DS32224 | Owners Manual - Page 5
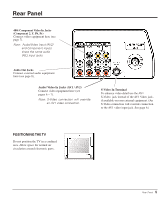
here (see page 7). Note: Audio/Video Input (AV2) and Component inputs share the same audio (R/L) input jacks. Audio Out Jacks Connect external audio equipment override connection to the AV1 video input jack. See page 6.) POSITIONING THE TV Do not position the TV in a confined area. Allow space - Sanyo DS32224 | Owners Manual - Page 6
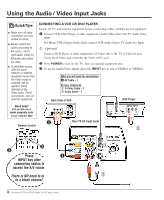
Switch off TV and external equipment before connecting cables. (Cables are not supplied.) ‚ Connect VCR, DVD Player, or other equipment's Audio Video Out to the TV Audio Video Input TV AV Input Jacks Remote Control x „ ƒ Press ‚ INPUT key after connecting cables to access the A/V inputs. - Sanyo DS32224 | Owners Manual - Page 7
turn on external equipment. Need help? Visit our Web site at www.sanyoctv.com or Call 1-800-877-5032 ƒ TV BACK ‚ Remote Control ‚ ƒ … „ Press INPUT key after connecting cables to access the A/V inputs. There is NO need to tune to a blank channel. Connect a DVD Player to Component AV In 7 - Sanyo DS32224 | Owners Manual - Page 8
Switch off TV and external equipment before connecting cables. (Cables are not supplied.) ‚ Connect the TV Audio Out (R/L) to the Stereo Amplifier In (R/L). ƒ Press POWER to turn on the TV Remote Control Operates your TV, VCR, and DVD Player, or Cable converter box. To program the remote control, - Sanyo DS32224 | Owners Manual - Page 9
to program the remote control and to select the operating mode (VCR, TV, or AUX). To Operate Your... VCR-Press the VCR key; Television-Press the TV key; Cable Box or DVD Player-Press the AUX key. Note: Make sure you hold down the mode key while entering a code number, see page 10. Input Key-Press - Sanyo DS32224 | Owners Manual - Page 10
keys. Press Recall to switch between the channels. 14 Display Key-Press once to display the channel 12 number. Press twice to display the channel number continuously. Press again to remove the display. 13 PROGRAMMING THE REMOTE CONTROL 14 • Power Key-Press to turn TV on or off. 11 Reset - Sanyo DS32224 | Owners Manual - Page 11
200, 201, 202, 203 206, 208, 216, 217 Samsung 248, 208, 233, 211 217, 222 BRAND NAME CODES Samtron 208, 248 Sansui 243, 226, 228, 235 209, 219, 220, 225 Sanky 239, 229, 224 Sanyo 200, 201, 202, 203 Scott 234, 247, 223, 227, 211 Sears 232, 223, 228, 230, 221 200 - Sanyo DS32224 | Owners Manual - Page 12
(VCR/TV/AUX) when programming the remote control and to choose an operating mode. Notes: - Many of the keys on this remote control are multifunctional. Please refer to the chart for a generic description of the keys and their functions. Refer to your original operating manuals for specific feature - Sanyo DS32224 | Owners Manual - Page 13
TV Adjustment and Setup The on-screen menu provides the viewer with easy access to adjustments and settings. Just use the keys on the remote control and follow the on-screen instructions. QuickTips HOW TO OPERATE THE ON-SCREEN MENU 1. Press the MENU key. 2. Use the L /M keys to highlight the - Sanyo DS32224 | Owners Manual - Page 14
on-screen menu to manually add channels or start to the component input jacks. The TV screen. Because different types of captions can be transmitted with the TV signal, separate captioning modes are provided. The captioning modes recognized by this model on the remote control to block the TV sound; - Sanyo DS32224 | Owners Manual - Page 15
, 3) Cable companies must transmit the rating code signal, and 4) The TV must be properly setup to decode the signal. SETTING MPAA MOVIE RATING 1. Press the V-GUIDE key on the remote control to display menu. 2. Press the + key to switch V-Guide ON. 3. Press the + key again. Then use the L / M keys - Sanyo DS32224 | Owners Manual - Page 16
Unplug the power cord before cleaning the television. 2. Clean the screen and cabinet with a soft dry cloth. Note: Never spray liquids on the screen because it can run down and drip onto the chassis. This may cause component failure not covered under Warranty. 16 V-Guide (Parental Control) / Care - Sanyo DS32224 | Owners Manual - Page 17
menu language choice using the on-screen menu or press RESET key. G Replace batteries. G Aim remote control at front of TV. G Re-enter brand code (see pages 10 ~ 12). G This is a normal condition during warm-up and cool down of the plastic cabinet parts. Helpful Hints (Problems and Solutions) 17 - Sanyo DS32224 | Owners Manual - Page 18
02770 RFC: CMA9109119L0 DESCRIPTION: Television BRAND: SANYO MODEL: DS32224 GUARANTEE THE APPARATUS THAT YOU HAVE SUPPLIER UNIT OR THIS SALES INVOICE, WITH THE APPARATUS IN ANY OF THE SERVICE CENTERS INDICATED ON THIS THE INSTRUCTIONS IN THIS MANUAL. * WHEN PRODUCT HAS BEEN CHANGED OR REPAIRED - Sanyo DS32224 | Owners Manual - Page 19
LIMITED WARRANTY IS VALID ONLY ON SANYO TELEVISIONS PURCHASED AND USED IN THE UNITED remote control. The defective TV will be exchanged for the same model, or a replacement model of equal value, if necessary. Replacement model will be contingent on availability and at the sole discretion of Sanyo - Sanyo DS32224 | Owners Manual - Page 20
de Cable / Códigos de Reproductor de DVD 30 Teclas de Funciones del Control Remoto 31 Ajustes del TV 32 ~ 33 Como Operar el Menú en Pantalla 32 Ajuste el modo de Audio 32 Ajuste de Imagen/Sonido 32 Agregando o Borrando Canales 33 Relacion Imagen 33 Informacíon de Guía-V 34 Operaci - Sanyo DS32224 | Owners Manual - Page 21
Electrical Code, controles puede resultar en avería al aparato y posiblemente requiera de trabajo extensivo por un técnico calificado para restaurar el aparato a su operación normal. 9. Cuando se termine cualquier servicio o reparación, requiera del técnico de servicio confirmación de que solo Partes - Sanyo DS32224 | Owners Manual - Page 22
3-Líneas de tipo Peine N Relacion Imagen N Controles digitales de Imagen desplegados en Pantalla N MTS Power Display Caption Recall Sleep Reset UHF Canales 14-69 Menu V-Guide Cable TV (CATV) 1, 14-125 Input VCR/DVD teclas Especificaciones TAMAÑO DEL TUBO DE IMAGEN (Medido Diagonalmente 32 - Sanyo DS32224 | Owners Manual - Page 23
control remoto, ver página 27. 2. Conecte la señal, ver abajo. 3. Conecte el cable de AC. 4. Presione la tecla de POWER para activar el TV. 5. Siga en instrucciones de pantalla, ver páginas 32 se puede presionar la tecla de INPUT en el control remoto para usar la TV como monitor. canales de cable, - Sanyo DS32224 | Owners Manual - Page 24
el equipo de video aquí (vea páginas 25 ~ 26). Nota: La conexión de S-Vídeo se sobrepondrá a la conexión de Video (AV1). COLOCANDO LA TV No coloque la TV en una área confinada. Deje espacio suficiente para tener una buena circulación de aire en los componentes electrónicos. 24 Panel Posterior - Sanyo DS32224 | Owners Manual - Page 25
POWER para encender la TV. Además Encienda el equipo externo. „ Para accesar las entradas de Audio/Video, presione INPUT para seleccionar de VIDEO1 o VIDEO2. Parte Posterior de VCR x Parte internet www.sanyoctv.com o Llame 1-800-877-5032 Control Remoto ‚ Lo que necesitas para las conexiones: ‚ - Sanyo DS32224 | Owners Manual - Page 26
del TV (Y-Pb-Pr). ƒ Conecte la salida del Audio del DVD a las entradas L/R de componente de Audio del TV. „ Presione POWER para encender la TV. Adem Audio - 1 Parte Posterior de DVD Control Remoto … „ Entradas de componente ‚ ƒ de video del TV (Y-Pb-Pr) Presione la tecla de INPUT después de - Sanyo DS32224 | Owners Manual - Page 27
la entrada del Amplificador Estéreo (R/L). ƒ Presione POWER para encender la TV. Además Encienda el equipo externo. Notas : No conecte bocinas externas directamente a la TV. Lo que necesitas para las conexiones: ‚ Cable de Audio - 1 ‚ Parte Posterior de TV Consejos Rápidos I Coloque su televisor al - Sanyo DS32224 | Owners Manual - Page 28
INPUT-Presione para seleccionar la fuente del programa que va a control remoto. ser desplegado en la pantalla: Señal TV 12 I Sí el control del 1~9. Ejemplo:Canal "05." sistema de menú en pantalla (vea páginas 32 ~ 33). I Ajustando el nivel de volumen: La flecha de parpadeante hacia el - Sanyo DS32224 | Owners Manual - Page 29
Pausa (Pause) de su VCR. ”V-Guide-Vea páginas 34 ~ 35. • Tecla de POWER-Presione esta tecla para encender o apagar la TV. 11 Tecla de Reajuste (RESET)-Presione desplegado aparezca nuevamente. Presione nuevamente para eliminarlo. PROGRAMANDO EL CONTROL REMOTO ‚ Encuentre el código de la marca de la - Sanyo DS32224 | Owners Manual - Page 30
, 206, 209, 209, 219, 220, 225 Aiko 240, 205 213, 219 215, 217, 248 Sanky 239, 229, 224 Aiwa 228, 217 Gradiente 228 Olympus 232 Sanyo 200, 201, 202, 203 Akai 209, 215 Garrard 228 Optimus 239, 245, 248, 223, 224, Scott 234, 247, 223, 227, 211 America Action . . . 205, 240 - Sanyo DS32224 | Owners Manual - Page 31
SLEEP V-GUIDE TECLAS DE MODO Opera solamente en la TV No Funciona Opera solamente en la TV No Funciona Opera solamente en la TV No Funciona No Funciona No Funciona No Funciona Accesa Opciones de Audio No Funciona No Funciona Presione estas tecla (VCR/TV/AUX) cuando programe el control remote - Sanyo DS32224 | Owners Manual - Page 32
a los ajustes. Solamente use las teclas del control remoto y siga las instrucciones. COMO OPERAR EL MEN Manual Botones LM Botones - + Color Tinte Contraste Brillo Nitidez Resaltar Color Normal ±Caliente Fresco To n o L---- I SSSSSH Surround NO ±S I Use MENU para salirse 32 Ajustes del TV - Sanyo DS32224 | Owners Manual - Page 33
de la pantalla para visualizar una imagen alargada con una mínima porción comprimida en la parte superior e inferior. 1. Presione la tecla de MENU. 2. Use las teclas de L/ Cuando ajuste el modo de Antena, escoja el modo Cable, si su TV esta conectada a un sistema de cable, de otra manera escoja VHF/ - Sanyo DS32224 | Owners Manual - Page 34
estas condiciones, estas iniciales forman parte del ícono que es desplegado en la pantalla de la TV. Un icono de clasificación 4) La TV debe de esta ajustada para decodificar la señal. AJUSTE DE LA CLASIFICACIÓN DE PELÍCULAS 1. Presione la tecla de V-GUIDE en el control remoto para desplegar - Sanyo DS32224 | Owners Manual - Page 35
Use LM, - + para seleccion Use V-GUIDE para salirse Nota : Las cadenas transmisoras y las estaciones locales, pueden no incluir las porciones de contenido de clasificación de los Ordenamientos del control de TV Paternal. Consejos Rápidos I La TV automáticamente Bloqueará (B) las clasificaciones - Sanyo DS32224 | Owners Manual - Page 36
viendo). Estos subtítulos son generalmente una o dos lineas y aparecen el la parte inferior de la pantalla o cerca de la persona que esta hablando. Caption2 : de MUTE. Presiona la tecla de MUTE en el control remoto para desactivar el sonido de la TV, los subtítulos se desplegarán automáticamente, - Sanyo DS32224 | Owners Manual - Page 37
INPUT • V-Guide esta TV. El Control Remoto no el VCR, DVD, o CABLE. • Presione las teclas de VCR o AUX. • Cheque equipo externo. • Re-instale el Código de Marca (vea páginas 29~31). El gabinete puede hacer sonidos. • Está condición es normal durante el calentamiento y enfriamiento de las partes - Sanyo DS32224 | Owners Manual - Page 38
Cuidados y Limpieza La superficie del gabinete puede ser dañada si no recibe un apropiado mantenimiento. Varios productos usados en el hogar como aerosoles, agentes de limpieza, solventes y ceras pueden causar daños en el terminado de la superficie del gabinete. 1. Desconecte el cordón de Potencia - Sanyo DS32224 | Owners Manual - Page 39
, MÉXICO, C.P. 02770 RFC: CMA9109119L0 DESCRIPCION: Televisor MARCA: SANYO MODELO: DS32224 GARANTIA EL APARATO QUE USTED HA ADQUIRIDO CUENTA CON UNA GARANTIA DE RESPECTIVO. CENTRO DE SERVICIO Y LUGAR DONDE OBTENER PARTES, COMPONENTES, CONSUMIBLES Y ACCESORIOS: SUCURSAL VALLEJO Poniente 126 - Sanyo DS32224 | Owners Manual - Page 40
y los accesorios incluidos, como es el control remoto. La TV defectuosa será cambiada por una del mismo modelo, o el reemplazo de un modelo igual valor, sí es necesario. El modelo de reemplazo dependerá de la disponibilidad y de la voluntad de Sanyo Manufacturing Corporation. LA ANTERIOR GARANTÍA ES - Sanyo DS32224 | Owners Manual - Page 41
Sanyo. Vous avez fait un choix excellent du point de vue du fonctionnement du style, de la fiabilité et du rapport qualité/prix. Ce télécouleur est fourni avec des instructions codes de magnétoscope/convertisseur de télé par cable / Tableu des codes sur le Guide V 55 Entretien et nettoyage 56 - Sanyo DS32224 | Owners Manual - Page 42
, de s'endommager et d'entraîner de graves blessures. N'utilisez qu'un chariot, support ou table recommandé par le fabricant ou vendu avec l'appareil. Lors de son installation, suivez les instructions du fabricant et utilisez les accessoires d'installation recommandés. Prenez garde lorsque vous - Sanyo DS32224 | Owners Manual - Page 43
à 13 Canaux UHF 14 à 69 Sous-titres Menu Entreé Réinitialisation Guide V Télé par câble 1, 14 à 125 N Syntonisation précise de télé par câble Fiche technique DIMENSION DU TUBE IMAGE (en diagonale cran 32 pouces RÉSOLUTION D'IMAGE 330 lignes Video 700 lignes ENTRÉE ANTENNE 75 ohms,UHF - Sanyo DS32224 | Owners Manual - Page 44
le cordon d'alimentation en C.A. 4. Appuyez sur la touche POWER pour allumer le téléviseur. 5. Suivre les instructions de sur écran, voir pages 53~54. BRANCHEMENT DE (2 tours de recherche), vous pouvez appuyer sur la touche INPUT sur la télécommande afin d'utiliser le téléviseur comme un moniteur. 44 - Sanyo DS32224 | Owners Manual - Page 45
Panneau arrière Borne d'entrée vidéo S (Super-Video) Pour accentuer les détails de l'image, utilisez la prises S-Video AV1 à la place de la prise Video, si votre appareil vidéo extérieur en est équipé. (La connexion vidéo S neutralise les connexions à la prise vidéo arrière. Voir page 46.) Prises de - Sanyo DS32224 | Owners Manual - Page 46
appareil dans la prise d'entrée vidéo S du télécouleur. ƒ Appuyez sur POWER pour mettre le téléviseur en marche. Mettez aussi l'équipement extérieur en marche. Pour accéder aux entrées audio/vidéo, appuyez sur la touche de INPUT pour choisir la VIDEO1 ou VIDEO2. Arrière du magnétoscope x Lecteur - Sanyo DS32224 | Owners Manual - Page 47
prises d'entrée audio (G/D) de composant du télécouleur. „Appuyez sur POWER pour mettre le téléviseur en marche. Mettez aussi l'équipement extérieur en … Pour accéder aux entrées audio/vidéo, appuyez sur la touche INPUT pour choisir la source de COMPOSANT2. Remarque: La sortie du composant lecteur - Sanyo DS32224 | Owners Manual - Page 48
(D/G) du téléviseur dans la prise d'ampli stéréo (D/G). ƒ Appuyez sur la touche POWER de la télécommande pour mettre le télécouleur en marche. Mettez aussi l'appareil exté dommages. (La durée de service normal des piles est d'environ 6 mois.) 48 Utilisation des prises d'e sortie audio / - Sanyo DS32224 | Owners Manual - Page 49
toscope-Appuyez sur VCR; Téléviseur-Appuyez sur TV; Boîte de raccordement de télé par (REC), Arrêt ( ), et Pause. ”Touche de Guide V-Voir page 55. Conseils I Vérifiez si les piles 50 ~ 52. Remarque : Les codes de magnétoscope et de lecteur de vidéodisque Sanyo sont préprogrammés. I Pour choisir un - Sanyo DS32224 | Owners Manual - Page 50
ambiophonique • Mémoire des canaux • Audio à stéréo • Sous-titres à NON • Guide V à NON • Rapport hauteur/largeur image à 4:3 (image normale) • Langue menu code et reprenez à l'étape 2. Après avoir composé le numéro de code, vérifiez le fonctionnement de l'appareil en appuyant sur les touches POWER - Sanyo DS32224 | Owners Manual - Page 51
526 Oritron 522 Panasonic 501, 518 Philips 508, 502 MARQUE . . . . No DE CODE Pioneer 511, 505, 518 Proscan 504 RCA 504 Samsung 512 Sanyo 500, 526 Sharp 531, 517 Sherwood 519 MARQUE . . . . No DE CODE Sony 506 Sylvania 524 Symphonic . . . . . 524 Technics 501 Theta Digital . . . . 511 - Sanyo DS32224 | Owners Manual - Page 52
sur le disque Pas de fonction Marche/Arrêt du son téléviseur DISPLAY RESET CAPTION SLEEP V-GUIDE TOUCHES DE MODE Afficher/eliminer l'affichage Pas de fonction Pas de fonction Fonction zoom Fait fonctionner la TV seulement Pas de fonction Pas de fonction Pas de fonction Fait fonctionner la - Sanyo DS32224 | Owners Manual - Page 53
à l'écran facilite l'accès aux réglages et à leurs commandes. Il suffit d'utiliser les touches de la télécommande et de suivre les instructions. UTILISATION DU MENU À L'ÉCRAN 1. Appuyez sur la touche MENU. 2. Mettez en évidence la fonction désirée à l'aide des touches L / M. 3. Choisissez l'option - Sanyo DS32224 | Owners Manual - Page 54
canaux que si d'autres canaux deviennent disponibles, par exemple si vous déménagez dans une autre ville ou si vous faites installer un service de télé par câble. 1. Choisissez Debut dans les options Recherche. Recherche NON Memoire balayage Relation d'imagen Langue Menu ±Debut Prss MENU pour - Sanyo DS32224 | Owners Manual - Page 55
notre site web à www.sanyoctv.com ou appelez le 1-800-877-5032 Renseignements sur le guide V REMARQUE : CETTE FONCTION PERMET DE RESPECTER LA RÉGLEMENTATION SUR LA PUCE V DE LA ÈME D'EMISSION DE GUIDE V CANADIEN, DONC, LES INSTRUCTIONS NE SONT PAS POURVU À CETTE CARACTÉRISTIQUE. Sous-titrage (CC) 55 - Sanyo DS32224 | Owners Manual - Page 56
faut qui ressemble le plus à celui que vous rencontrez puis suivez les instructions correspondantes. Visitez notre site web à www.sanyoctv.com ou appelez notre les sur tensions. Essayez les solutions suivantes : G Appuyez sur la touche POWER. G L'arrêt retardé a peut-être été réglé. G Débranchez - Sanyo DS32224 | Owners Manual - Page 57
les solutions suivantes : G Appuyez sur la touche INPUT. G Mettez l'équipement extérieur en marche. G le télécouleur est branché. G Appuyez sur la touche TV. G Remplacez les piles. G Dirigez la télécommande récepteur de satellite. G Entrez de nouveau le code de marque (voir pages 50 ~ 52). Le - Sanyo DS32224 | Owners Manual - Page 58
Garantie pour le Canada et les États-Unis GARANTIE LIMITÉE D'UN AN LA PRÉSENTE GARANTIE LIMITÉE N'EST ACCORDÉE QU'AUX TÉLÉCOULEURS SANYO ACHETÉS ET UTILISÉS AU CANADA, AUX ÉTATS-UNIS ET À PORTO RICO, MAIS À L'EXCEPTION DES AUTRES TERRITOIRES ET PROTECTORATS DES ÉTATS-UNIS. CETTE GARANTIE LIMITÉE
-
 1
1 -
 2
2 -
 3
3 -
 4
4 -
 5
5 -
 6
6 -
 7
7 -
8
-
9
-
10
-
11
-
12
-
13
-
14
-
15
-
16
-
17
-
18
-
19
-
20
-
21
-
22
-
23
-
24
-
25
-
26
-
27
-
28
-
29
-
30
-
31
-
32
-
33
-
34
-
35
-
36
-
37
-
38
-
39
-
40
-
41
-
42
-
43
-
44
-
45
-
46
-
47
-
48
-
49
-
50
-
51
-
52
-
53
-
54
-
55
-
56
-
57
-
58
 |
 |
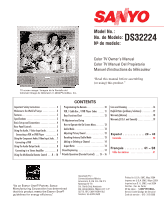
Model No.:
No. de Modelo:
N
o
de modele:
Color TV Owner’s Manual
Color TV Manual Del Propietario
Manuel d’instructions du télécouleur
“Read this manual before assembling
(or using) this product.”
Important Safety Instructions . . . . . . . . . . . . . .2
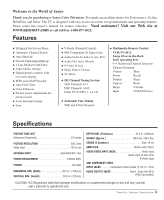
Welcome to the World of Sanyo . . . . . . . . . . . .3
Features . . . . . . . . . . . . . . . . . . . . . . . . . . . . . . 3
Specifications . . . . . . . . . . . . . . . . . . . . . . . . . .3
Basic Set-up and Connections . . . . . . . . . . . . . .4
Rear Panel Controls . . . . . . . . . . . . . . . . . . . . .5
Using the Audio / Video Input Jacks . . . . . . . . . 6
Connecting a VCR or DVD Player
. . . . . . . . .
6
Using the Component Audio / Video Input Jacks . . 7
Connecting a DVD
. . . . . . . . . . . . . . . . . . . . . 7
Using the Audio Output Jacks . . . . . . . . . . . . . . 8
Connecting to a Stereo Amplifier
. . . . . . . . . . 8
Using the Multimedia Remote Control . . .8
~
10
Programming the Remote . . . . . . . . . . . . . . . 10
VCR / Cable Box
/ DVD Player Codes
. . . . . 11
Keys Functions Chart
. . . . . . . . . . . . . . . . . . 12
TV Adjustment and Setup
How to Operate the On-Screen Menu . . . . . . . 13
Audio Mode
. . . . . . . . . . . . . . . . . . . . . . . . . 13
Adjusting Picture/Sound . . . . . . . . . . . . . . . . 13
Resetting Antenna/Cable Mode
. . . . . . . . . . 13
Adding or Deleting a Channel . . . . . . . . . . .
14
Aspect Ratio
. . . . . . . . . . . . . . . . . . . . . . . . 14
Closed-Captioning
. . . . . . . . . . . . . . . . . . . . . . 14
V-Guide Operation (Parental Control)
. . . 15
~
16
Care and Cleaning . . . . . . . . . . . . . . . . . . . . . . 16
Helpful Hints (problems/solutions) . . . . . . . . .17
Warranty (Mexico) . . . . . . . . . . . . . . . . . . . . . . 18
Warranty (U.S.A. and Canada) . . . . . . . . . . . . . 19
Child Safety Matters
. . . . . . . . . . . . . . Back cover
Español
. . . . . . . . . . . . . .
20 ~ 40
Contenido . . . . . . . . . . . . . . . . . . . . . . . . . . . 20
Français
. . . . . . . . . . . .
41 ~ 58
Table des matières
. . . . . . . . . . . . . . . . . . . 41
CONTENTS
TV screen image / Imagen de la Pantalla del
televisor/ Image de télévision © 2004 PhotoDisc, Inc.
DS32224
Printed in U.S.A. SMC, May 2004
Impreso en U.S.A. SMC, Mayo 2004
Imprimé aux É.-U. SMC, mai 2004
Part No. / No. de Parte/
N
o
de pièce :
1JC6P1P0160A–
Service Code/Código de Servicio/
Code de service :
610
312 0959
Importado Por :
Comercializadora México
Americana, S. DE
R.L. DE C.V.
Nextengo Nº 78
Col. Santa Cruz Acayucan
Del. Azcapotzalco, México D.F. C.P.
02770, RFC CMA 9109119L0
Telefono: 55-5328-3500
“As an E
NERGY
S
TAR
®
Partner, Sanyo
Manufacturing Corporation has determined
that this product meets the E
NERGY
S
TAR
®
guidelines for energy efficiency.”