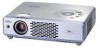
Sanyo PLC-XU47 Owners Manual
Sanyo PLC-XU47 - XGA LCD Projector Manual
 |
View all Sanyo PLC-XU47 manuals
Add to My Manuals
Save this manual to your list of manuals |
Sanyo PLC-XU47 manual content summary:
- Sanyo PLC-XU47 | Owners Manual - Page 1
Multimedia Projector MODEL PLC-XU41 PLC-XU47 Owner's Manual - Sanyo PLC-XU47 | Owners Manual - Page 2
The Power management function reduces power consumption and maintain the lamp life. (See page 41.) ◆ Switcheable Interface Terminal The projector provides a switcheable interface terminal. You can use the terminal as computer input or monitor output conveniently. (See page 41.) ◆ User's Logo - Sanyo PLC-XU47 | Owners Manual - Page 3
the Projection Lens 47 Cleaning the Projector Cabinet 47 Lamp Replacement 48 Lamp Replace Counter 49 Appendix 50 Troubleshooting 50 Indicators and Projector Condition 52 Menu Tree 53 Compatible Computer Specifications 55 Technical Specifications 56 Configurations of Terminals 58 - Sanyo PLC-XU47 | Owners Manual - Page 4
problem still persists, contact the dealer where you purchased the projector or the service center. CAUTION RISK OF ELECTRIC SHOCK DO NOT OPEN CAUTION : TO REDUCE THE RISK OF ELECTRIC SHOCK, DO NOT REMOVE COVER (OR BACK). NO USER-SERVICEABLE PARTS INSIDE EXCEPT LAMP REPLACEMENT. REFER SERVICING - Sanyo PLC-XU47 | Owners Manual - Page 5
conditions: a. When the power cord or plug is damaged or frayed. b. If liquid has been spilled into the projector. c. If the projector has been exposed to rain or water. d. If the projector does not operate normally by following the operating instructions. Adjust only those controls that are covered - Sanyo PLC-XU47 | Owners Manual - Page 6
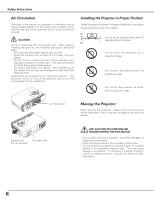
fans are provided to cool down the projector. This projector monitors internal temperature and control the running speed of the cooling fans. Installing the Projector in Proper Position Install the projector properly. Improper Installation may reduce the lamp life and cause a fire hazard. 20˚ Do - Sanyo PLC-XU47 | Owners Manual - Page 7
Numbers Trade Name Responsible party Address Telephone No. : PLC-XU41 / PLC-XU47 : Sanyo : SANYO FISHER COMPANY : 21605 Plummer Street, Chatsworth, California 91311 : (818)998-7322 AC Power Cord Requirement The AC Power Cord supplied with this projector meets the requirement for use in the country - Sanyo PLC-XU47 | Owners Manual - Page 8
Part Names and Functions Front q we rt Back !6 y ui o !0 Bottom !2 !3 !1 !4 q Power Cord Connector w Infrared Remote Receiver e Projection Lens r Lens Cover (See page 46 for attaching.) t Air Intake Vent y Top Controls and Indicators u Focus Ring i Zoom Ring o Air Intake Vent !0 Terminals - Sanyo PLC-XU47 | Owners Manual - Page 9
w SERVICE PORT This jack is used to service this projector. e AUDIO IN Connect the audio output to use the PAGE ed buttons on the remote control to scroll back and forth pages on the screen controls this unit may occasionally malfunction and need to be reset. This can be done by pressing the RESET - Sanyo PLC-XU47 | Owners Manual - Page 10
and Functions Top Control qw er t y ON - OFF INPUT POWER WARNING VOLUME - VOLUME + KEYSTONE MENU SELECT LAMP REPLACE o i u q KEYSTONE button Corrects keystone distortion. (p22, 39) w INPUT button Selects input source. (p24, 32 ) e POWER ON-OFF button Turns the projector on or off - Sanyo PLC-XU47 | Owners Manual - Page 11
Part Names and Functions Remote Control ew q COMPUTER VIDEO ON-OFF !5 r !4 MENU VOLUME- SELECT VOLUME+ t !3 !2 y D.ZOOM PAGE KEYSTONE NO SHOW !1 u AUTO PC P-TIMER IMAGE FREEZE MUTE i o !0 Part Names and Functions q POWER ON-OFF button Turns the projector on or off. (p18, 19) w - Sanyo PLC-XU47 | Owners Manual - Page 12
the remote control to moisture, or heat. - Do not drop the remote control. - If a battery has leaked on remote control, carefully wipe case clean and install new batteries. - Risk of explosion if battery is replaced by an incorrect type. - Dispose of used batteries according to the instructions. 12 - Sanyo PLC-XU47 | Owners Manual - Page 13
lock the adjustable feet and rotate the adjustable feet to adjust the position and tilt. 3 To retract the adjustable feet, lift the front of the projector and pull and undo the feet lock latches. Keystone distortion of the projected image can be adjusted by menu operation. (p22, 39) Adjustable Feet - Sanyo PLC-XU47 | Owners Manual - Page 14
shock, do not plug into any other type of power system. Consult your authorized dealer or service station if you are not sure of the type of power being supplied. Connect the projector with all peripheral equipment before turning the projector on. (See page 15-17 for connection.) CAUTION For - Sanyo PLC-XU47 | Owners Manual - Page 15
41.) ✔Note: • If you wish to use Page ed buttons on the remote control, connect USB port of your computer to the USB socket of the projector. (p9 and 42) • When connecting AUDIO OUT to external audio equipment, the projector's built-in speaker is disconnected. Note: When connecting the cable, the - Sanyo PLC-XU47 | Owners Manual - Page 16
the COMPUTER IN 2/ MONITOR OUT terminal as input. • When connecting AUDIO OUT to external audio equipment, the projector's built-in speaker is disconnected. Note: When connecting the cable, the power cords of both the projector and the external equipment should be disconnected from AC outlet. 16 - Sanyo PLC-XU47 | Owners Manual - Page 17
/ AUDIO IN AUDIO OUT ((VVAARRIAIBALBE)LE) COMPUTER/ COMPONENT AUDIO IN AUDIO OUT (stereo) Audio cable ✽ (stereo) ✔Note: When connecting AUDIO OUT to external audio equipment, the projector's built-in speaker is disconnected. Note: When connecting the cable, the power cords of both the projector - Sanyo PLC-XU47 | Owners Manual - Page 18
, VCR, etc.) before turning on the projector. 2 Connect the projector's AC power cord into an AC outlet. The POWER indicator blinks red in a moment and lights red. 3 Press the POWER ON-OFF button on the top control or on the remote control. The POWER indicator turns green lighting and the cooling - Sanyo PLC-XU47 | Owners Manual - Page 19
continuously without rest. Continuous use may result in shortening the lamp life. Turn off the projector and give it a rest about an hour in every 24 hours. • This projector monitors internal temperature and automatically controls the running speed of the cooling fans. • If the WARNING indicator - Sanyo PLC-XU47 | Owners Manual - Page 20
Operation How to Operate the On-Screen Menu The projector can be adjusted or set via the On- Remote Control MENU VOLUME- SELECT VOLUME+ D.ZOOM PAGE KEYSTONE NO SHOW AUTO PC P-TIMER IMAGE FREEZE MUTE Top Control ON - OFF INPUT POWER WARNING VOLUME - VOLUME + KEYSTONE MENU SELECT LAMP REPLACE - Sanyo PLC-XU47 | Owners Manual - Page 21
Basic Operation Menu Bar For computer source Guide Window Shows the selected Menu of the / Wide / Digital zoom +/-] (p31) Setting Menu Used to change settings of the projector or reset lamp replace counter. (p39-44) Basic Operation Input Menu Used to select input source either Computer or Video - Sanyo PLC-XU47 | Owners Manual - Page 22
at the maximum correction. • The direction of the arrow being corrected turns red. • If you press the KEYSTONE button on the top control or on the remote control once more while the keystone dialog box is being displayed, the keystone adjustment will be canceled. Reduce the upper width with Point - Sanyo PLC-XU47 | Owners Manual - Page 23
Basic Operation No Show Function Press the NO SHOW button on the remote control to black out the image. To restore to normal, press the NO SHOW button again or press any other button. When a projected image is captured and set as "User" in the Logo item in the Setting Menu (p40), the screen - Sanyo PLC-XU47 | Owners Manual - Page 24
Source Selection Direct Operation Choose either Computer 1 or Computer 2 by pressing the INPUT button on the top control or press the COMPUTER button on the remote control. Before using these buttons, correct input source should be selected through menu operation as described below. INPUT button - Sanyo PLC-XU47 | Owners Manual - Page 25
Menu The Auto PC Adjustment function operates to adjust the projector. ----- There is no signal input from computer. Check the connection of your computer and the projector. ( " Troubleshooting" p50 ) Mode 1 User preset system manually adjusted in PC Adjust menu. Adjustment data can be stored - Sanyo PLC-XU47 | Owners Manual - Page 26
on the remote control unit. To store adjustment parameters Adjustment parameters from Auto PC Adjustment can be memorized in this projector. Once Adjustment function. When the image is not provided properly with this operation, manual adjustments are required. (p27, 28) • The Auto PC Adjust cannot - Sanyo PLC-XU47 | Owners Manual - Page 27
enables you to precisely adjust several parameters to match those signal formats. The projector has 5 independent memory areas to memorize those parameters manually adjusted. It allows you to recall the setting for a specific computer. 1 Press the MENU button and the On-Screen Menu will appear - Sanyo PLC-XU47 | Owners Manual - Page 28
button. Display area V Adjusts the vertical area displayed by this projector. Press the Point 7 8 button to decrease/increase value and then It is displayed at 5 : 4 aspect ratio with this function off. Reset Resets all adjustment to their previous levels. Store To store adjustment data, move the - Sanyo PLC-XU47 | Owners Manual - Page 29
4 by pressing the IMAGE button on the remote control. Standard Normal picture level preset on this projector. Real Picture level with improved halftone for on a blackboard (Green). See above for further description. Image 1~4 User preset image in the Image Adjust Menu (p30). Image Select Menu Image - Sanyo PLC-XU47 | Owners Manual - Page 30
(From 0 to 15.) Gamma Press the Point 7 8 button to obtain better balance of contrast. (From 0 to 15.) Reset Resets all adjustment to their previous levels. Store To store the image data adjusted manually, move the red frame pointer to the Store icon and press the SELECT button. The Image Level Menu - Sanyo PLC-XU47 | Owners Manual - Page 31
projected image can be also expanded by pressing the D.ZOOM ▲ button on the remote control. ✔Note: • This Screen Menu cannot be operated when "720p(HDTV)", " resolution is higher than 1280 X 1024, reset the resolution to the lower before connecting to the projector. • The image data in other than - Sanyo PLC-XU47 | Owners Manual - Page 32
pressing the INPUT button on the top control or the VIDEO button on the remote control. Before using these buttons, correct input source selecting Auto, the projector automatically detects incoming video signal, and adjusts itself to optimize its performance. The projector selects connection in the - Sanyo PLC-XU47 | Owners Manual - Page 33
Selection (Component, RGB Scart 21-Pin) Direct Operation Choose Computer 1 by pressing the INPUT button on the top control or press the COMPUTER button on the remote control. Before using these buttons, correct input source should be selected through menu operation as described below. INPUT button - Sanyo PLC-XU47 | Owners Manual - Page 34
to optimize its performance. When Video System is PAL-M or PAL-N, select system manually. PAL / SECAM / NTSC / NTSC4.43 / PAL-M / PAL-N If the projector cannot reproduce proper video image, it is necessary to select a specific broadcast signal format among PAL, SECAM, NTSC, NTSC 4.43, PAL-M, and PAL - Sanyo PLC-XU47 | Owners Manual - Page 35
by pressing the IMAGE button on the remote control. Standard Normal picture level preset on this projector. Cinema Picture level adjusted for the picture projected on a Blackboard (Green). See above for further description. Image1~4 User preset image in the Image Adjust Menu (p36, 37). Image Select - Sanyo PLC-XU47 | Owners Manual - Page 36
Video Input Image Level Adjustment 1 Press the MENU button and the On-Screen Menu will appear. Press the Point 7 8 button to move the red frame pointer to the Image Adjust Menu icon. 2 Press the Point d button to move the red frame pointer to the item that you want to adjust and then press the - Sanyo PLC-XU47 | Owners Manual - Page 37
" for a still picture. Film This function is effective on 3:2 pulldown video source. With this function On, the projector reproduces pictures faithful to the original film quality. Reset Resets all adjustment to their previous figure. Store To store the adjustment data, move the red frame pointer to - Sanyo PLC-XU47 | Owners Manual - Page 38
Video Input Screen Size Adjustment This projector has a picture screen resize function, which enables you to display the desirable image size. 1 Press the MENU button and the On-Screen Menu will appear. - Sanyo PLC-XU47 | Owners Manual - Page 39
button. Store . . . . stores the keystone adjustment even if the AC power cord is disconnected. Reset . . . . .resets the keystone adjustment when the AC power cord is disconnected. Blue back When this function is "On," the projector produces a blue image while input signal is not detected. Display - Sanyo PLC-XU47 | Owners Manual - Page 40
PIN code setting, refer to relevant instructions of the PIN Code Lock function on page to be displayed on the starting-up display as follows: User . . . . . .the image you captured function, the adjustment data is automatically reset and the projector captures an image without keystone adjustment - Sanyo PLC-XU47 | Owners Manual - Page 41
reconnected or any button on the top control or remote control unit is pressed. Shutdown . . .When the lamp has been fully cooled down, the power will be turned off. Off The Power Management function is canceled. On start When this function is "On," the projector is automatically turned on just by - Sanyo PLC-XU47 | Owners Manual - Page 42
signal ···· lower brightness reduces the lamp power consumption and extends the lamp life ✔Note: Lamp mode is not switched into Eco mode ( is turned on. ) within 2 minutes after the projector Remote control This projector provides two different remote control codes; the factory-set, initial - Sanyo PLC-XU47 | Owners Manual - Page 43
. On1 requires to enter the PIN code every time turning on the projector. On2...........requires to enter the PIN code to operate the projector once the power cord is disconnected; as long as the AC power cord is connected, the projector can be operated without the PIN code. To change the PIN Code - Sanyo PLC-XU47 | Owners Manual - Page 44
this mode, cooling time after turning off the projector will be extended longer than in the normal mode. Lamp counter reset This function is used to reset the lamp replace counter. When replacing the projection lamp, reset the lamp replace counter by using this function. See page 49 for operation - Sanyo PLC-XU47 | Owners Manual - Page 45
red, disconnect the AC power cord and contact the service station for check and repair. CAUTION DO NOT LEAVE THE PROJECTOR WITH THE AC POWER CORD CONNECTED UNDER THE ABNORMAL CONDITION. IT MAY RESULT IN FIRE OR ELECTRIC SHOCK. TOP CONTROL WARNING LECT LAMP REPLACE VOLUME + WARNING lights red - Sanyo PLC-XU47 | Owners Manual - Page 46
symptoms above are noticed, contact your authorized dealer or service station for proper cleaning. Air Filter Pull up and remove. Attaching the Lens Cover When moving this projector or while not using it over an extended period of time, replace the lens cover. 1 Pass the string through a hole of - Sanyo PLC-XU47 | Owners Manual - Page 47
chemicals might scratch the surface. 3 When the projector is not in use, replace the lens cover. Cleaning the Projector Cabinet Follow these steps to clean the projector cabinet. 1 Disconnect the AC power cord before cleaning. 2 Softly wipe the projector body with a soft, dry cleaning cloth. When - Sanyo PLC-XU47 | Owners Manual - Page 48
Screw Handle ORDER REPLACEMENT LAMP Replacement lamp can be ordered through your dealer. When ordering a projection lamp, give the following information to the dealer. ● Model No. of your projector : ● Replacement Lamp Type No. : PLC-XU41 / PLC-XU47 POA-LMP79 (for PLC-XU41) (Service Parts No. 610 - Sanyo PLC-XU47 | Owners Manual - Page 49
The message "Lamp replace counter Reset?" is displayed. LAMP HANDLING PRECAUTIONS This projector uses a high-pressure lamp which must be handled carefully and properly. Improper handling may result in accidents, injury, or create a fire hazard. ● Lamp life may differ from lamp to lamp and according - Sanyo PLC-XU47 | Owners Manual - Page 50
outlet and the power is turned on. - If the projector does not project an image being operated with a computer, restart the computer. Problem: No power Image is for monitor output when connecting to a projector. See your computer's instruction manual for the setting. - It takes about 20 seconds - Sanyo PLC-XU47 | Owners Manual - Page 51
See page 15.) WARNING : High voltages are used to operate this projector. Do not attempt to open the cabinet. If problems still persist after following all operating instructions, contact the dealer where you purchased the projector or the service center. Give the model number and explain about the - Sanyo PLC-XU47 | Owners Manual - Page 52
• • blinks red. • • • off ✽ When the life of the projection lamp draws to an end, the LAMP REPLACE indicator lights yellow. When this indicator lights yellow, replace the projection lamp with a new one promptly. Reset the Lamp replace counter after replacement of the lamp. See page 48 and 49. 52 - Sanyo PLC-XU47 | Owners Manual - Page 53
signal. PC Adjust Auto PC Adj. Fine sync. Total dots Horizontal Vertical Current mode Clamp Display area Display area - H Display area - V Full screen Reset Mode free Store Quit Appendix RGB Component RGB( Scart ) RGB Auto Video S-Video 0 - 63 On / Off Go to System (1) Go to System (2) N/A Go - Sanyo PLC-XU47 | Owners Manual - Page 54
Language Keystone Blue back Display Logo PIN code lock Logo Capture Ceiling Rear Terminal Power management On start Lamp mode Remote control USB Key lock PIN code lock Fan Lamp counter reset Factory default Quit English German French Italian Spanish Portuguese Dutch Swedish Russian Chinese Korean - Sanyo PLC-XU47 | Owners Manual - Page 55
Appendix Appendix Compatible Computer Specifications Basically this projector can accept the signal from all computers with the V, H-Frequency below mentioned and less than 130 MHz of Dot Clock. ON-SCREEN DISPLAY RESOLUTION VGA 1 - Sanyo PLC-XU47 | Owners Manual - Page 56
Appendix Technical Specifications Mechanical Information Projector Type Dimensions (W x H x D) Net Weight Feet Adjustment Multi-media Projector 11.73" x 2.8" x 8.39" (298mm x 71mm x 213mm) (Not including adjustable feet) 6.0 lbs (2.7kgs) 0˚ to 11.8˚ Panel Resolution LCD Panel System Panel - Sanyo PLC-XU47 | Owners Manual - Page 57
Accessories Owner's Manual AC Power Cord Remote Control and Batteries VGA Cable Lens Cover with String and Screw PIN Code Label Appendix ● The specifications are subject to change without notice. ● LCD panels are manufactured to the highest possible standards. Even though 99.99% of the pixels are - Sanyo PLC-XU47 | Owners Manual - Page 58
----- 10 Ground (Vert.sync.) 11 Ground / ----- 12 ----- 13 Horiz. sync. Input/Output (Composite H/V sync.) 14 Vert. sync. Input / Output 15 ----- SERVICE PORT CONNECTOR Terminal : Mini DIN 8-PIN Pin Configuration 876 5 43 21 Serial 1 RXD 2 ----3 ----4 GND 5 RTS / CTS 6 TXD 7 GND 8 GND USB - Sanyo PLC-XU47 | Owners Manual - Page 59
Number Memo Write down the PIN code number in the column below and keep it with this manual securely. If you forgot or lost the number and unable to operate the projector, contact the service station. PIN Code Lock No. Factory default set No: 1 2 3 4* Logo PIN Code Lock No. Factory default set - Sanyo PLC-XU47 | Owners Manual - Page 60
Printed in Japan Part No. 610 315 6095 (1AA6P1P4571-- MY7A) SANYO Electric Co., Ltd.
-
 1
1 -
 2
2 -
 3
3 -
 4
4 -
 5
5 -
 6
6 -
 7
7 -
8
-
9
-
10
-
11
-
12
-
13
-
14
-
15
-
16
-
17
-
18
-
19
-
20
-
21
-
22
-
23
-
24
-
25
-
26
-
27
-
28
-
29
-
30
-
31
-
32
-
33
-
34
-
35
-
36
-
37
-
38
-
39
-
40
-
41
-
42
-
43
-
44
-
45
-
46
-
47
-
48
-
49
-
50
-
51
-
52
-
53
-
54
-
55
-
56
-
57
-
58
-
59
-
60
 |
 |

Multimedia Projector
MODEL
PLC-XU41
PLC-XU47
Owner’s Manual