Sanyo VCC-HD4600 VCC-HD4600 Manual - Page 121
To detect tampered images, set [ALTERATION DETECTION] to ON.
 |
UPC - 086483075704
View all Sanyo VCC-HD4600 manuals
Add to My Manuals
Save this manual to your list of manuals |
Page 121 highlights
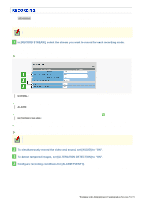
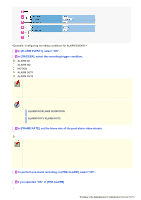
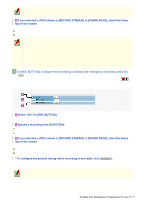
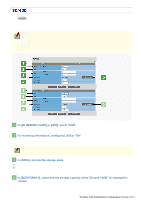
Click RECORDING button in the configuration menu to display the RECORDING screen. Configure the recording conditions on this screen if you intend to record video on a SD memory card installed in the camera or an external hard disk drives. Required operation privilege: admin, operator1 1 In [RECORD STREAM], select the stream you want to record for each recording mode. Based on the [RECORDING] settings on the VIDEO & AUDIO SETTINGS screen, the selectable stream is displayed for each recording mode. The pull-down menu displays the image conditions of the selected stream. OFF (no recording), STREAM1, STREAM2, STREAM3, STREAM4 NORMAL: Normal live video is recorded. Configure the recording time on the SCHEDULE SETTINGS screen. ALARM: Alarm video is recorded. Configure the recording conditions in [ALARM EVENT1] to [ALARM EVENT4] (step 4 ). NETWORK FAILURE: If a network failure occurs during network recording, backup recording is performed until the failure is resolved. In [NETWORK FAILURE TIME], select the time from the occurrence of a network failure until the camera recognizes it as a recording trigger. 15SEC, 20SEC, 30SEC, 40SEC, 50SEC, 1MIN, 2MIN, 3MIN, 4MIN, 5MIN The setting values are interlocked among RECORDING, E-MAIL SETTINGS, and FTP SETTINGS screens. (Note that the setting configured most recently will take precedence.) 2 To simultaneously record the video and sound, set [AUDIO] to "ON". 3 To detect tampered images, set [ALTERATION DETECTION] to "ON". 4 Configure recording conditions for [ALARM EVENT1]. You can configure four patterns of recording conditions (for ALARM EVENT1 to ALARM EVENT4) and use the optimal pattern depending on the monitoring purpose of the camera. Working with Administrator Configuration Screens 51/71
-
 1
1 -
2
-
3
-
4
-
5
-
6
-
7
-
8
-
9
-
10
-
11
-
12
-
13
-
14
-
15
-
16
-
17
-
18
-
19
-
20
-
21
-
22
-
23
-
24
-
25
-
26
-
27
-
28
-
29
-
30
-
31
-
32
-
33
-
34
-
35
-
36
-
37
-
38
-
39
-
40
-
41
-
42
-
43
-
44
-
45
-
46
-
47
-
48
-
49
-
50
-
51
-
52
-
53
-
54
-
55
-
56
-
57
-
58
-
59
-
60
-
61
-
62
-
63
-
64
-
65
-
66
-
67
-
68
-
69
-
70
-
71
-
72
-
73
-
74
-
75
-
76
-
77
-
78
-
79
-
80
-
81
-
82
-
83
-
84
-
85
-
86
-
87
-
88
-
89
-
90
-
91
-
92
-
93
-
94
-
95
-
96
-
97
-
98
-
99
-
100
-
101
-
102
-
103
-
104
-
105
-
106
-
107
-
108
-
109
-
110
-
111
-
112
-
113
-
114
-
115
-
 116
116 -
 117
117 -
 118
118 -
 119
119 -
 120
120 -
 121
121 -
 122
122 -
 123
123 -
 124
124 -
 125
125 -
 126
126 -
127
-
128
-
129
-
130
-
131
-
132
-
133
-
134
-
135
-
136
-
137
-
138
-
139
-
140
-
141
-
142
-
143
-
144
-
145
-
146
-
147
-
148
-
149
-
150
-
151
-
152
-
153
-
154
-
155
-
156
-
157
-
158
-
159
 |
 |
