Sanyo VCC-HD4600 VCC-HD4600 Manual - Page 40
IP Address, Port, SSL, and Camera Title are editable. Refer to the Manually Setting Up IP
 |
UPC - 086483075704
View all Sanyo VCC-HD4600 manuals
Add to My Manuals
Save this manual to your list of manuals |
Page 40 highlights
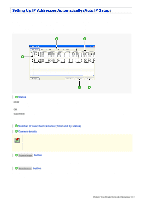
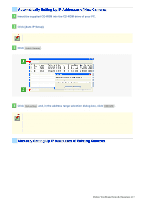
If you are installing two or more new cameras on the same local network, you need to change the factory default IP address of each camera to prevent IP address overlap. The supplied "Auto IP Setup" software frees you from this burden by automatically assigning a unique IP address to each camera on your network. Before setting up the IP addresses automatically, click the [Search Cameras] button in the utility window to search all cameras on the network and display the address settings and details of each camera. 1 Status NEW: OK: The camera has the default IP address ("192.168.0.2"). Assign a unique IP address. The camera has a unique IP address and can be connected successfully to network. CAUTION: The camera cannot be connected successfully to the network because of IP address overlap or other reason. Change the IP address. 2 Number of searched cameras (Total and by status) 3 Camera details "Model name", "IP Address", "Port", "SSL", "Camera Title", and "Firmware Version" are not shown if the network board or other hardware is not supported. "IP Address", "Port", "SSL", and "Camera Title" are editable. (Refer to the "Manually Setting Up IP Addresses of Existing Cameras" section.) 4 Camera Image button Select the desired camera row and click this button. Then, video from the camera appears in a separate window. Use it to check which camera is selected or when editing the camera title or other data. 5 Web Browser button Select the desired camera row and click this button. Then, the Web browser opens and connects to the camera automatically. Before You Begin Network Operation 3/13
-
 1
1 -
2
-
3
-
4
-
5
-
6
-
7
-
8
-
9
-
10
-
11
-
12
-
13
-
14
-
15
-
16
-
17
-
18
-
19
-
20
-
21
-
22
-
23
-
24
-
25
-
26
-
27
-
28
-
29
-
30
-
31
-
32
-
33
-
34
-
 35
35 -
 36
36 -
 37
37 -
 38
38 -
 39
39 -
 40
40 -
 41
41 -
 42
42 -
 43
43 -
 44
44 -
 45
45 -
46
-
47
-
48
-
49
-
50
-
51
-
52
-
53
-
54
-
55
-
56
-
57
-
58
-
59
-
60
-
61
-
62
-
63
-
64
-
65
-
66
-
67
-
68
-
69
-
70
-
71
-
72
-
73
-
74
-
75
-
76
-
77
-
78
-
79
-
80
-
81
-
82
-
83
-
84
-
85
-
86
-
87
-
88
-
89
-
90
-
91
-
92
-
93
-
94
-
95
-
96
-
97
-
98
-
99
-
100
-
101
-
102
-
103
-
104
-
105
-
106
-
107
-
108
-
109
-
110
-
111
-
112
-
113
-
114
-
115
-
116
-
117
-
118
-
119
-
120
-
121
-
122
-
123
-
124
-
125
-
126
-
127
-
128
-
129
-
130
-
131
-
132
-
133
-
134
-
135
-
136
-
137
-
138
-
139
-
140
-
141
-
142
-
143
-
144
-
145
-
146
-
147
-
148
-
149
-
150
-
151
-
152
-
153
-
154
-
155
-
156
-
157
-
158
-
159
 |
 |
